Arranging in the Sequencer : Clip handling

Clip handling
Clip arrangement in the sequencer is done mainly in the Song View - but could also be done in Edit Mode, if the clips you’re arranging are on the same lane. The descriptions in this chapter refer to arrangement in the Song View, unless otherwise stated.
Creating Clips
Clips are created automatically when you record, but you can also create empty clips and add notes and other events in them by drawing with the Pencil Tool.
*
This will create an empty clip with the length of the current Snap value setting (e.g. 1 bar). To create longer clips, double click, keep the mouse button pressed and drag to the right.
*
Selecting clips
*
A selected clip is indicated with a thick black border with Clip Resize handles on either side. In Edit Mode, the Clip Resize handles appear in the Clip Overview area.
Selected clips in Song View.
*
Inspector displays for selected clips
In the sequencer Inspector, the Position and Length displays shows the start position and length of the selected clip. For selected audio clips, four additional displays are shown: Fade In, Fade Out, Level and Transpose. If several clips are selected, the displays show the values for the earliest (or topmost) selected clip in the song.
The Inspector displays for selected Audio Clips.
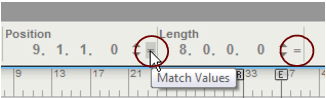
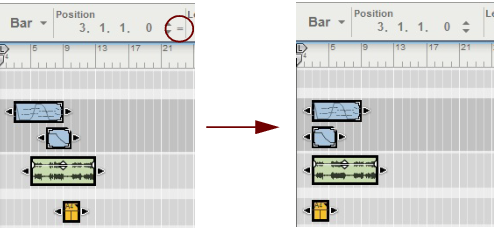
The clip Position display shows at what position in the song the clip begins. The display readout is divided into Bar, Beat, 1/16 Note and Ticks (1/16th note=240 Ticks). The position can be edited according to the descriptions in “Moving clips using the Inspector”.
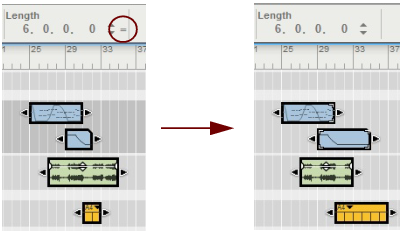
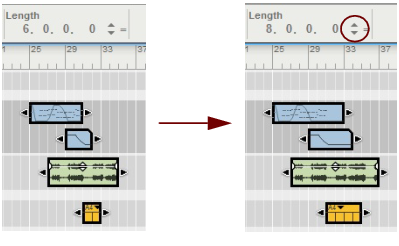
The clip Length display shows the length of the clip. The display readout is divided into (from left to right) Bar, Beat, 1/16 Note and Ticks. The length can be edited according to the descriptions in “Resizing clips using the Inspector”.
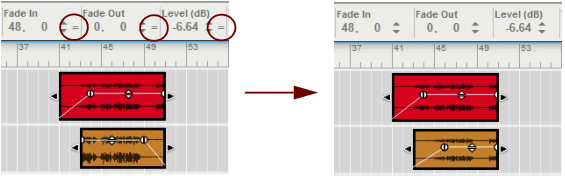
The Fade In and Fade Out displays for selected audio clips show the Fade In and Fade Out times for the audio in the clip. The readout is divided into 1/16 Note and Ticks. The Fade times can be edited as described in “Inspector segment displays”.
The Level display for selected audio clips shows the level of the audio in the clip. The readout is divided into dB and 1/100 dB. The level can be edited as described in “Inspector segment displays”.
The Transpose display shows the transposition of the audio recordings in the selected Audio Clip(s) - relative to the original pitch. The display readout is divided into (from left to right) Semitones and Cents, See “Transposing Audio Clips”.
Selecting multiple clips
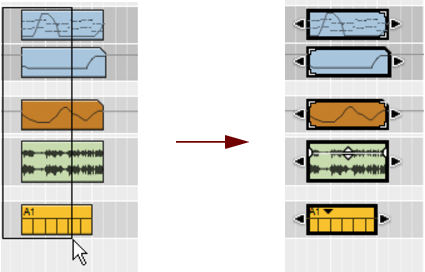
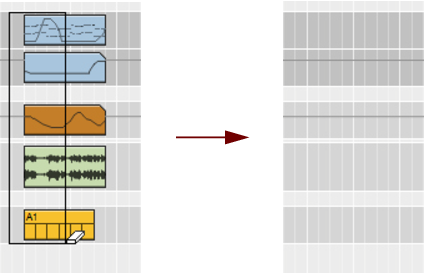
In Song View, several clips can be selected, e.g. for cutting, copying, pasting, deleting, moving and resizing purposes. If you select multiple note clips, these can be opened for Multi Lanes editing, see “Multi Lanes editing”.
*
Under Windows, you can also press [Shift] and click to select a range of clips on the same lane.
*
Click, hold and draw a rectangle with the Selection Tool to select multiple clips.
All clips that are touched by the selection rectangle will be automatically selected when the mouse button is released.
*
This allows you to make multiple, non-contiguous selections: first select some clips, then hold [Shift] and select some more clips, and so on.
*
Alternatively, hold down [Ctrl](Win) or [Cmd](Mac) and press [A].
Two selected clips in the Clip Overview area in Edit Mode.
Selecting clips with the arrow keys
Another way of selecting clips on the Arrange Pane is to use the arrow keys on the computer keyboard.
*
*
*
Setting audio clip Level and Fades
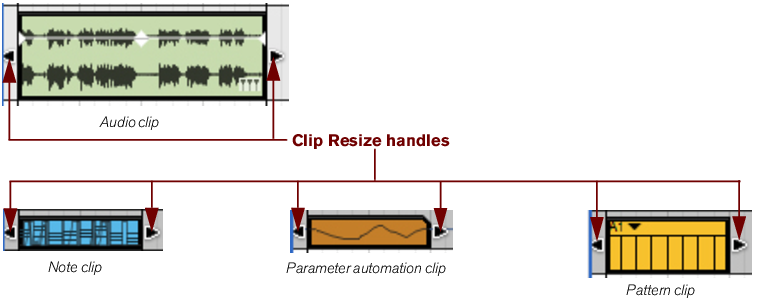
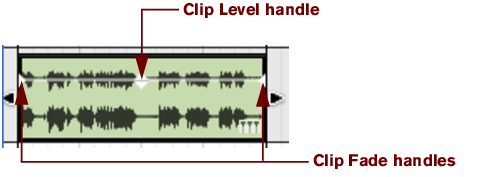
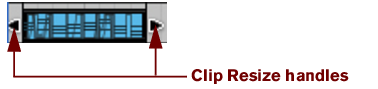
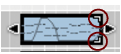
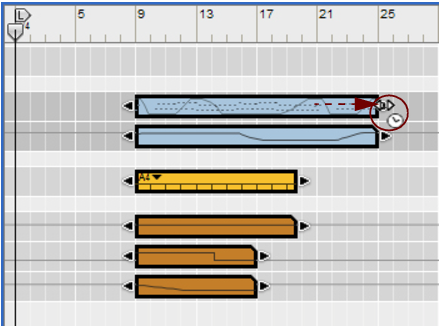
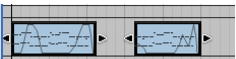
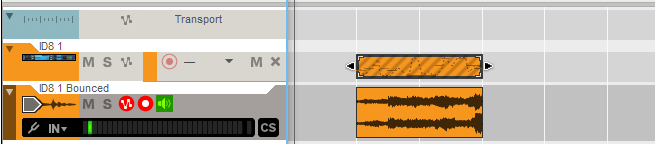
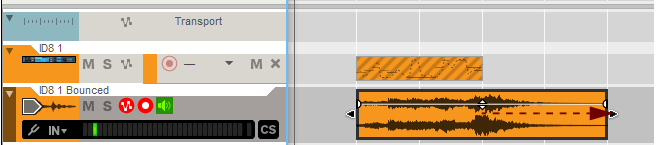
Besides the Clip Resize handles, a selected audio clip also has Fade In and Fade Out handles plus a Clip Level handle. These can be edited at any time, either by using the handles as described below, or using the Inspector as described in “Fade In and Fade Out displays (audio clips only)” and “Level display (audio clips only)”:
A selected audio clip in Arrange Mode.
Fade In and Fade Out Handles
*
The Fade settings can be set individually for each audio clip in the song. The fading is non-destructive and can be changed at any time. If Snap is activated (see “Snap”), the set Snap value is taken into account when setting the fade time(s).
Clip Level Handle
*
The Level can be set individually for each audio clip in the song. The Level setting is non-destructive and can be changed at any time.
Deleting clips
*
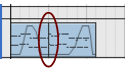
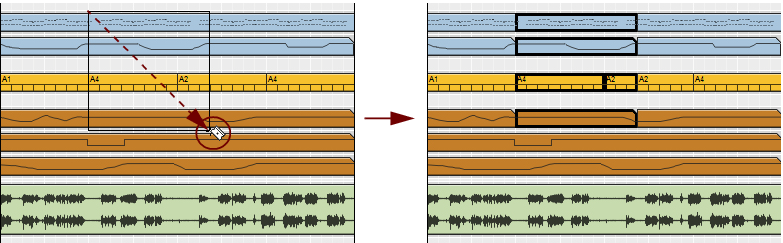
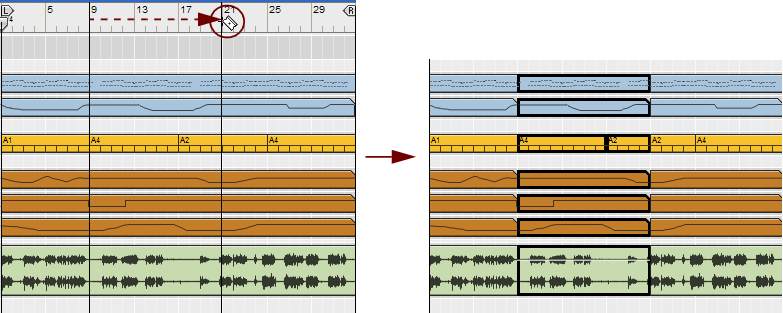
You can also draw selection rectangles with the Selection tool, encompassing several clips and delete them all at once. The same rules apply as when selecting clips (see “Selecting clips”).
*
Deleting clips with the Eraser tool
You can also use the Eraser tool to delete clips on the Arrange Pane. The Eraser tool can be used in two ways: you can click on single clips or you can make a selection rectangle encompassing several clips:
*
Select the Eraser Tool and click on the clip you want to delete.
Alternatively, if you want to delete multiple clips:
*
Click, hold and draw a rectangle with the Eraser Tool to erase multiple clips.
All clips that are touched by the selection rectangle will be deleted once you release the mouse button.
Resizing (masking) clips
All clip types can be resized by clicking and dragging either of the Clip Resize handles on the selected clip(s). This can be done both in the Song View and in Edit Mode. In Edit Mode, the Clip Resize handles appear in the Clip Overview area.
A selected note clip.
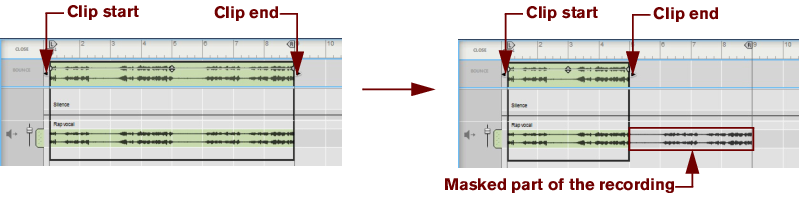
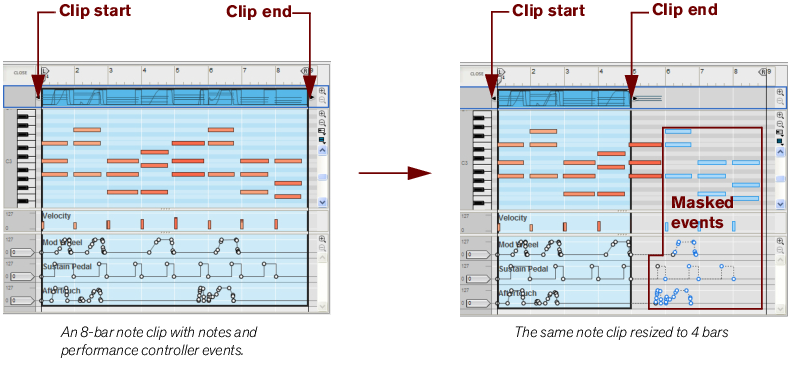
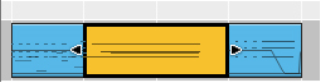
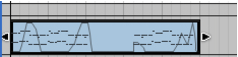
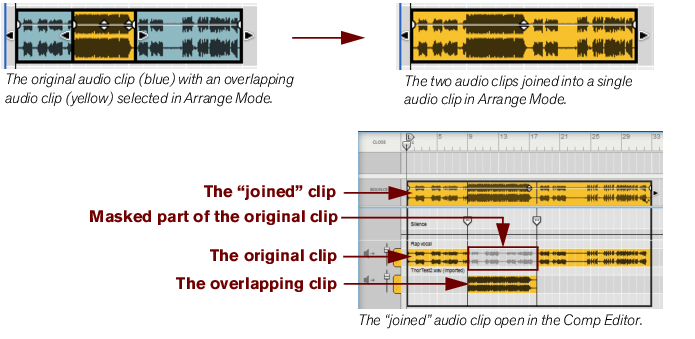
If you resize a clip and make it smaller, any recordings or events that now lie outside the clip boundaries will not sound, or have any effect, when played back. However, they are not deleted - just masked. If you make the clip larger again, the recordings or events that were masked will become visible and will play back again. See “About masked recordings and events”.
If you enlarge an unmasked clip, nothing special will happen except that the clip “window” becomes larger.
Resizing multiple clips
It’s possible to resize several clips by first selecting the clips, and then dragging a Clip Resize handle on one of the selected clips. All selected clips will be resized by the same amount.
Resizing clips using the Inspector
Another way of resizing clips is to change the clip length(s) in the Inspector. This can be done in the following way:
*
In the example below, we expand the clip lengths by 2 bars by clicking the up arrow button twice.
All selected clips become 2 bars longer.
*
See “Inspector segment displays” for more details on how to edit in the Inspector displays.
About masked recordings and events
A note or parameter automation clip which contains masked events is indicated by white corners on the left, right or both clip boundaries:
The position of the white corners indicate on which side of the clip boundary the masked events exist:
*
Masked recordings in audio clips
If you resize an audio clip and make it smaller, the masked part of the recording will be silent during playback. If you open a masked audio clip in the Comp Editor, the part of the recording that will actually play back is shown in the Clip Overview area. The masked part of the recording will appear grayed out on a Comp Row:
An open audio clip before and after masking.
Masked events in note and parameter automation clips
In the picture below is an open note clip in Edit Mode with notes and performance controller events, before and after resizing the clip:
After resizing the clip from 8 to 4 bars, all events that begin in bars 5-8 are now masked and won’t play back. All masked events will still be there - and follow along with the clip if the clip should be moved, cut or copied.
Masked events will be a blue color on the Note Edit Lane, to indicate that they won’t play back. The first three-note chord in the masked area is still an orange color. That’s because the notes begin in bar 4 (just before the downbeat) and thus will play back in their entirety, also after resizing the clip.
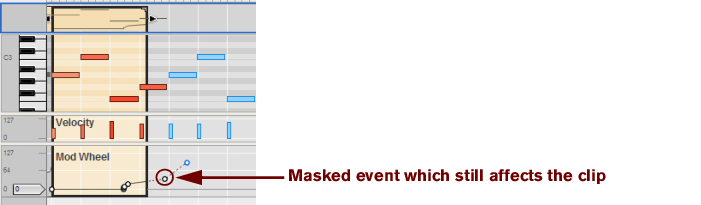
Masked performance controller events, parameter automation events and pattern automation events will be inactive - but could still affect the masked clip (see “About masked performance controllers and automation events” below). Outside a masked clip, the controller/parameter/pattern values will default to their Static Values in the masked area (see “Static Value Handles”).
*
About masked performance controllers and automation events
Masked performance controller and parameter automation events just outside a clip can still affect the clip, since they affect the curve shape. The example below shows a masked note clip with Mod Wheel performance controller.
The first Mod Wheel automation event to the right of the masked part of the clip determines the direction of the automation curve from the last event in the unmasked area. These types of automation events are not blue, but black and white, just like unmasked events.
The result in this example is that the Mod Wheel value will continue to rise all the way to the end of the masked clip, at which point the value will drop down to the Static Value - in this case “0”.
The “Crop Events to Clips” function
There may be situations when you want to delete all masked events, i.e. events located outside the left and/or right clip boundaries. This function only works for note and parameter automation clips and will delete all masked notes that begin in the masked clip section, plus any performance controller or parameter automation events:
1.
2.
3.
Tempo scaling clips
It is possible to tempo scale the content of clips, i.e. make the clip play back at faster or slower tempos. This can be achieved in two different ways:
*
*
Below, we will describe how to use the “scale tempo” tool to manually stretch clips. Numerical tempo scaling in the Tool Window is explained in “Scale Tempo” in the “Note and Automation Editing” chapter.
1.
2.
When you reach any of the Clip Resize handles, the arrow symbol switches to a “scale tempo” arrow.
3.
In this example, we make the “stretched” clip four bars longer by dragging the right clip handle one bar to the right.
Now, all clips have been tempo scaled and the clip content have been stretched to match the new clip length. Note that the content of all selected clips have been scaled proportionally. The Pattern Clip has only been resized, though. The pattern tempo in the source device has NOT been scaled.
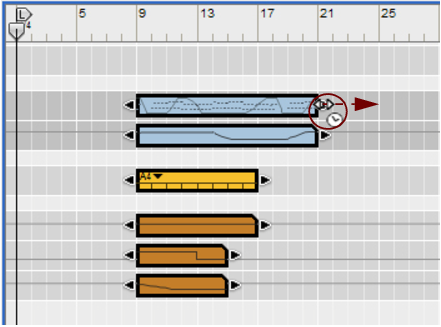
For more details about tempo scaling audio clips, refer to “Tempo scaling Clips” in the “Audio Editing in the Sequencer” chapter.
Moving clips
Moving clips on the same lane
*
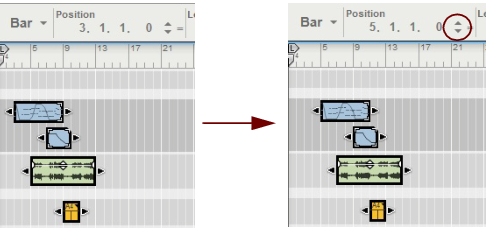
It’s also possible to select and move several clips by dragging and dropping them at the desired destination. If the Snap function is selected (see “Snap”), you will only be able to move the clip(s) in steps of the selected Snap value.
*
Nudging clip positions
You can use the left and right arrow keys on the computer keyboard to “nudge” the positions of selected clips in a couple of different ways:
1.
2.
It doesn’t matter if Snap is on or off - the clip will always be moved in steps of the set Snap value.
*
There are 240 ticks per 1/16 note so this is very fine editing - check the tick positions in the inspector when you nudge because typically you won’t “see” the position changes unless you’re working at a high zoom level.
*
Moving clips using the Inspector
Another way of moving clips is to change the clip position in the Inspector. This can be done in the following way:
*
In this example, we move the clips position 2 bars forward by clicking the “Up” spin control twice.
All selected clips are moved forward by 2 bars.
Moving clips between lanes
You can move clips between lanes, either on the same track or between lanes on different tracks:
*
The set Snap value is taken in to account if the function is activated (see “Snap”). It’s also possible to move several selected clips in one go.
*
*
*
About alien clips
An alien clip is a clip containing types of event, or different parameter range/resolution, other than that the lane is intended for. For example, if we move a note clip from a note lane to a parameter automation lane, the note clip would become alien and won’t play back on the automation lane:
If a note clip is moved from a note lane to a parameter automation lane, for example, the clip becomes alien.
An alien clip can be distinguished by its red stripes, which indicate that the clip is currently inactive. If you place the cursor over an alien clip, a tool tip appears with detailed information:
Tool tip for an alien note clip.
In most cases, you can resolve this by first selecting the clip and then selecting “Adjust Alien Clips to Lane” from the Edit menu or from the context menu.
For example, if a parameter automation clip for a parameter that has a bipolar (-64 to 63) value range is moved to a parameter automation lane with a unipolar (0 to 127) value range, it will become alien. Selecting “Adjust Alien Clips to Lane” from the Edit menu or context menu will adjust the parameter automation events of the clip to fit the range of the parameter on the destination lane.
Moving clips with performance controller automation to another track
If you move note clips that contain performance controller automation events to another track (for a different type of instrument device), there are a few things to note:
Be aware that all devices do not respond to all performance controllers - the Malström device, for example, does not respond to Aftertouch, Expression or Breath performance controller data.
In such cases the automation data for an incompatible controller will simply be ignored.
About overlapping clips
If you move or resize clips so that the clips overlap each other, the following rules apply:
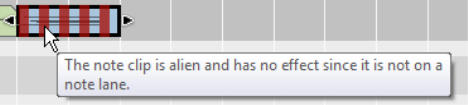
Any lane can only play back a single clip at a time - if you want to mix two clips, put them on separate lanes (note clips) or on separate tracks (audio clips). See “Adding note lanes” and “Duplicating/copying tracks and devices”.
This means if a shorter clip is placed “in the middle” of a longer clip, as in the picture below, the sequencer will play the beginning of the long clip, then the shorter overlapping clip and then the end of the long clip.
*
Duplicating clips
*
As you begin dragging, the cursor displays a “+” sign next to it to indicate duplication.
Cutting, Copying and Pasting clips
You can move or duplicate clips using the “Cut”, “Copy” and “Paste” commands on the Edit menu or the context menu. When you paste, the clips will end up at the current song position, on their original lane(s).
If you paste a clip into another Reason song document, the pasted clip will be placed on the track with edit focus, if possible. Typically, you can just select a track in the other document, place the song position pointer where you want, and paste the clip(s) onto the selected track.
New tracks will be created when necessary. Since all tracks must have a device associated with them, the new tracks will be associated with empty Combinator devices. You can then use the Patch browser on the Combinator to select a suitable patch and device type. The above rules also apply when pasting alien clips and parameter automation clips.
Using Cut/Copy and Paste to repeat clips
When you cut or copy clips, the song position will automatically move to the end of the selection (or, if Snap is activated, to the closest Snap value position after the end of the longest clip). This allows you to quickly repeat a section of clips in the following way:
1.
2.
Activate Snap (see “Snap”) and set the Snap value to “Bar” (or to the length of the section you want to repeat).
3.
Since you can select clips on several tracks , this is a quick way to copy entire song sections.
4.
The song position is moved to the closest snap value after the end of the longest clip in the selection (provided that the sequencer is stopped).
5.
The copied section is pasted in, and the song position is moved to the end of pasted selection.
6.
Naming clips
1.
A text field is opened.
2.
When adding labels to several selected clips in one go, they will all receive generic names according to the clip type (e.g. “untitled note clip”). Double-clicking on a label in a clip opens the text field where you can type in the label text.
Renaming clips
*
Removing labels from clips
*
Alternatively, double-click on the clip label, press [Backspace] or [Delete] and then press [Return].
Coloring clips
By default Clips are set to "Use Track Color", and will have the same color as their tracks. You can override this by selecting individual colors from the Clip Color submenu.
*
All selected clips will be colored according to the selected color. If you record new clips on the lane, they will be colored according to the set track color.
Splitting clips
You can split clips using the Razor Tool in Arrange Mode. To split a single clip, proceed as follows:
1.
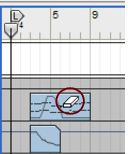
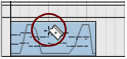
On the Razor Tool’s left edge is a cross-hair which indicates where the split will take place. If activated, the Snap setting is taken into account (see “Snap”).
2.
The clip is now split into two separate clips.
A vertical line appears where the clip is split.
*
It’s also possible to split clips on all tracks in a song:
1.
2.
Clips on tracks and lanes - including tracks and lanes that might not be visible - on the Arrange Pane will also be split.
You can also cut out a section of one or several clips in one go to:
1.
2.
3.
If you want to “cut” out a section of all clips on all tracks in the song, this can be done as follows:
1.
2.
3.
*
Duplicating a part of one or several clips
By using either of the methods described above, it’s also possible to duplicate the “split” section of the clip(s) and then move them to a new destination. Here’s how:
*
The original clips will remain uncut, just as they were before the operation.
Joining clips
Separate clips on the same lane can be joined into one clip. You can also join clips that aren’t directly adjacent on the lane, or clips that overlap each other.
1.
2.
A single clip is created. If there was a gap between the clips before the operation, this area will be empty - the
original positions of all events in the original clips will be preserved in the joined clip.
It’s possible to select several clips on several lanes, but only selected clips on the same lanes will be joined.
The non-selected clips in-between will then overlap and mask the joined clip at their current positions.
*
*
About joining audio clips
Joining audio clips basically works in the same way as joining note and parameter automation clips - except when it comes to joining overlapping audio clips. What happens if you join overlapping audio clips is that the clips will be placed on separate Comp Rows - and be automatically comped to a “final” clip. No recording will be deleted. Let’s have a look at the example in the picture below:
As you can see, the entire audio recording in the original clip is preserved - only masked where the overlapping clip is located. If you change your mind afterwards, you will still be able to access the entire original recording.
The Clip Level in the joined clip will be set to -0 dB.
Also, if you join audio clips that aren’t directly adjacent, any Fade Out in the first clip and Fade In in the second clip will be removed.
Reversing clips
It’s also possible to reverse clips, i.e. play the content of the clip “backwards” (from the end to the start). This works a little differently for audio clips and note clips. Please refer to “Reverse” for information about reversing note and automation clips, and to “Reversing audio clips” for information about reversing audio clips.
Muting clips
Clips can be muted as follows:
*
Muted clips are indicated with gray stripes, borders and events:
Muted clips.
*
Unmuting clips
Muted clips can be unmuted as follows:
*
*
*
*
Merging clips on note lanes
Several note lanes on a track can be merged into a single note lane:
1.
A selected instrument track with separate note lanes.
2.
The clips on all note lanes will be merged on the topmost note lane.
The same instrument track after merging.
Bounce in Place
The Bounce in Place function lets you bounce the sound generated from playing back note or audio clips, with any insert effects and channel strip coloration - but without Send FX and Master Section settings - to a new audio clip on a new audio track. The Bounce in Place function is mainly intended for creative audio work, for example:
This is great for reverberated drum hits or vocals etc. that you could then play backwards for interesting effects.
*
Here is an example of how you can use the Bounce in Place function:
1.
In this example we choose a note clip on an ID8 instrument track:
2.
A new audio clip is created on a new audio track, colored and named according to the original track - with the addition of the word “Bounced” in the destination track name. The destination track inherits the settings from the source track, i.e. mixer settings and any Output Bus routing.
The bounced audio clip always has the same position and length as the original source clip.
Note also that the source clip is automatically muted.
3.
Expand the bounced audio clip to reveal any sustaining audio tail.
The audio from the extended note(s) will be masked in the audio clip, so you will have to expand the bounced audio clip to hear the complete rendering.
*
This means that what you heard when you played back the source track is exactly what you will hear when you play back the bounced clip on the destination track.
Bouncing multiple clips
If you have selected multiple clips to “Bounce in Place”, this is what happens:
Bouncing overlapping clips
If you have selected multiple overlapping clips to “Bounce in Place”, this is what happens:
Bouncing clips on instrument tracks that use several Mix Channels
On each of these audio tracks there will be a separate audio clip rendered from each of the Mix Channels.
About tracks with no Mix Channel of their own
For example, if an instrument device is connected to a Mixer 14:2, which has other instrument devices connected to it, and then routed to a single Mix Channel device, there's no obvious way to isolate the audio from a single instrument device (since other devices connected to the Mixer 14:2 might be playing as well). Thus, the Bounce in Place function will be disabled.
Matching clips using the “Match Values” function
The “Match Value” function in the Inspector can be used for matching the positions or lengths of several selected clips to the position and/or length of the topmost selected clip (or leftmost if the clips are on the same lane).
Matching clip positions
To match clip positions:
1.
2.
All selected clips are moved to the start position of the topmost selected clip.
*
Matching clip lengths
Another Match Value function in the Inspector can be used to match the lengths of several selected clips to the length of the topmost (or leftmost if on the same lane) selected clip:
1.
2.
All selected clips are resized to a length of 6 bars - the same as the topmost selected clip.
Matching audio clip levels, fades and transposition
In addition to Position and Length matching, audio clips can have their Fades, Levels and Transpose values matched:
1.
2.
After having clicked the Match Values buttons, all selected audio clips get the same values as the topmost selected audio clip.

Arranging in the Sequencer : Clip handling