Audio Basics : How Reason communicates with your audio hardware

How Reason communicates with your audio hardware
Reason receives, generates and plays back digital audio - a stream of numerical values in the form of ones and zeroes. For you to be able to record and play back anything, the audio must be converted from analog to digital when recording, and from digital to analog when playing back through some kind of listening equipment (a set of speakers, headphones, etc.).
This conversion is most often handled by the audio card installed in your computer, or by an external audio interface connected via USB or FireWire. To achieve the best possible performance, Reason requires that the audio card uses an ASIO driver on Windows systems. On Mac OS X systems, Reason supports Core Audio.
To receive and deliver digital audio to the computer’s audio hardware, Reason uses the driver you have selected in the Preferences dialog. In the Rack on screen, this connection is represented by the Hardware Interface (also known as the Hardware Device):
The Hardware Interface is always located at the top of the rack.
*
The Hardware Interface contains 64 input and 64 output “sockets”, each with an indicator and a level meter. There are also two Sampling Inputs that can be used for sampling audio to sampler devices. 16 input and 16 output sockets are shown on the main panel, and an additional 48+48 sockets are shown if the “More Audio” button is activated on the main panel. Each one of these indicators represents a connection to an input or output on your hardware audio interface (or a ReWire channel to another application if you are using ReWire).
However, the number of available inputs and outputs depends on the number of inputs and outputs on your hardware audio interface. For example, if you are using a standard sound card with stereo inputs and outputs, only the first two inputs and outputs will be available. In the Hardware Interface, the indicators are lit green for all currently active and connected inputs and outputs. Activation of inputs and outputs on your hardware audio interface is done on the Audio page in the Preferences dialog (see “Active input and output channels”).
Inputs and outputs that are currently connected have green indicators. Available but un-connected inputs and outputs have yellow indicators and any connections made to unavailable inputs and outputs have red indicators.
In this case, Inputs 1 and 2 are available, but not connected, Outputs 1 and 2 are available and
connected, whereas Output 3 is unavailable, but connected on the back of the Hardware Interface.
*
Manual audio routing
In most cases, you will want to have the Main Mixer Master Section device connected to outputs 1 and 2 of the Hardware Interface. This connection is made automatically as soon as you create a new Song document. However, there might be situations where you want to manually route audio to other outputs of the Hardware Interface. For example if you want to use the Control Room Outputs of the Main Mixer (see “Control Room output section”).
To send the sound of a device in the Rack to a specific output, you route the device output to the corresponding Output jack on the Hardware Interface. This is done by using the patch cables on the back of the rack, as described in “Manual routing”. If we flip the rack around, by pressing the [Tab] key, the Hardware Interface looks like this:
On the rear of the Hardware Interface, Inputs 1 and 2 are available but not connected,
Outputs 1 and 2 are available and connected, whereas Output 3 is connected but unavailable.
*
Audio quality
The audio quality in a computer based recording system depends on two things:
In our case, this is the Reason DSP (Digital Signal Processing) code.
Software
This ensures the highest possible audio quality throughout the entire signal chain.
Reason also supports lower sampling frequencies, but using a sample rate of less than 44.1 kHz is not recommended since it might affect the audio quality negatively.
Audio hardware
How good a hardware audio interface actually sounds depends on a number of things; its frequency range and frequency response curve, the resolution (bit depth), the signal to noise ratio, the distortion under various circumstances, etc. Furthermore, some designs are more prone to disturbance from the other electronics in the computer than others. Such disturbance might add hum or high pitched noise to the signal.
The only advice we can give is that if you are serious about sound, choose your audio hardware carefully!
Audio settings
Sample rate and resolution are properties of digital audio which determine the quality of the sound. Generally, higher sample rate and resolution result in better audio quality (but also larger audio files and higher demands on computer performance and audio hardware). The table below shows some common sample rate/resolution combinations:
To cater for all different situations, Reason supports multiple sample rates and resolutions.
Sample Rate settings for recording and playback
Reason handles all internal audio processing in 32-bit floating point resolution, with 64-bit summing in the mix bus in the Main Mixer Master Section. However, the resolution of the input and output audio is determined by the hardware audio interface. That is, if you have a 24-bit audio card, Reason will record and output audio in 24-bit resolution, and if you have a 20-bit audio card, audio will be recorded and played back in 20-bit resolution.
The recording and playback sample rate can be specified on the Audio tab in the Preferences dialog (accessed from the Edit menu (Win) or Reason menu (Mac)):
*
Note that the available options on this pop-up menu depend on which sample rates are supported by the audio hardware.
*
Reason allows import (or recording) of audio of any sample rate. If the original sample rate of a recording is different than the rate currently set for the audio card, Reason will automatically do a sample rate conversion.
First, a real-time sample rate conversion algorithm is used (allowing the audio to be played back immediately). Meanwhile, in the background, the program calculates a sample rate conversion of the highest quality, which will be used as soon as it is calculated. The CALC progress indicator on the transport panel lights up whenever the program is doing high quality calculations in the background:
The CALC progress indicator on the Transport Panel appears when Reason performs high quality audio calculations.
Buffer Size settings
The Buffer Size can be adjusted on the Audio tab in the Preferences dialog (accessed from the Edit menu (Win) or Reason menu (Mac)):
*
The trick here is to find the optimum relationship between audio quality, DSP Load and latency. Experiment with different Sample Rate settings in combination with different Buffer Size settings to get the best result.
A professional audio interface used together with a state-of-the-art computer should normally be able to handle a combination of a high sample rate (96 kHz) and a small Buffer Size (64-128 samples) without problems. A budget priced audio interface normally requires a lower sampling frequency (44.1 kHz) in combination with a little higher Buffer Size (256-512 samples).
See “About latency” for more information about buffer size and latency. Also see “About audio rendering using the audio card buffer size setting” below for information on how to improve the DSP performance.
About MultiCore Audio Rendering
Reason fully supports multi-core audio rendering. This means that if your computer has multiple CPU Cores (Quad Core, for example), or multiple CPUs, Reason takes advantage of this to significantly enhance the performance. A higher system performance allows for more tracks and devices in your songs.
If your computer has a multi-core CPU, or multiple CPUs, MultiCore Audio Rendering is active by default, as indicated on the “Audio” tab in Preferences:
*
About audio rendering using the audio card buffer size setting
The “Render audio using audio card buffer size setting” function should be selected (checked) for best plugin performance. When selected, the audio batches are rendered internally according to the set Buffer size (see “Buffer Size settings” above). For example, if you have a Buffer size of 512 Samples, each audio batch will be 512 samples internally. Raising the Buffer size will let Reason process larger audio batches in one go, which is often more efficient. Many plugins are also more efficient when doing larger audio batches. if you are using DSP-heavy VSTs (mastering effects, for example), these will run a lot smoother with this function selected.
*
If unchecked (off), all audio batches are rendered internally at a fixed size of 64 samples - regardless of the Buffer size setting. This might be desirable if you are using feedback signal routings and CV connections in your songs, and want the internal latency of those connections to be fixed at a short value all the time. This might result in performance problems for DSP-heavy VSTs, though.
Unchecked will give the same performance as in previous Reason 10 versions.
Master Tune setting
By default, Reason plays back a “middle A” at 440 Hz, which is the standard tuning in most instruments. However, if you are playing Reason together with other instruments, you may want to adjust the tuning:
1.
2.
3.
*
*
*
*
About audio levels
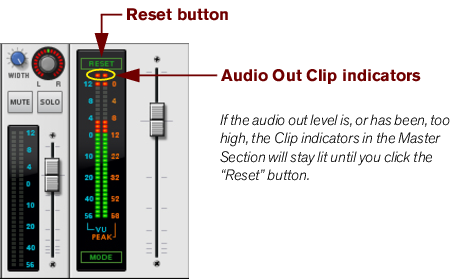
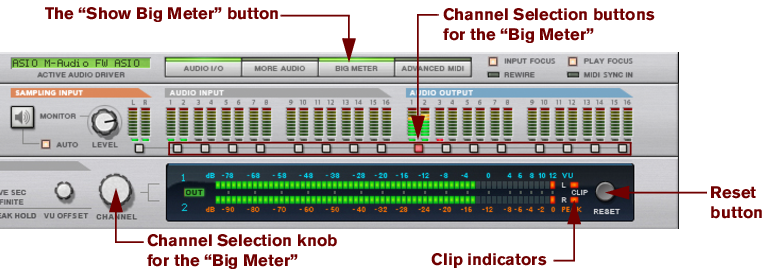
When recording and playing back in Reason, you should keep an eye on the Audio In and Audio Out Clip indicators on the Transport Panel, or on the Hardware Interface and the Big Meter. You should also keep an eye on the clip indicators on the Main Mixer Master Section. If any of the clip indicators light up, the audio level is too high, resulting in clipping (digital distortion).
The Clip indicators on the Audio In and Audio Out meters on the Transport Panel.
The Clip indicators in the Master Section of the Main Mixer.
*
*
The Big Meter on the Hardware Interface.
*
*
*
*
You could also use the MClass Maximizer as an insert effect on the Master Section in the Main Mixer to ensure that clipping never occurs - see “The MClass Maximizer”.
*
If the audio level is, or has been, too high, the Clip indicators on the Big Meter will stay lit until you click the Reset button, or select new audio channels for the Big Meter.
*
In some situations, the Audio Out Clip indicator on the Transport Panel and the Output Clip indicators on the Reason Hardware Interface might light up if the metronome Click is active in the sequencer during playback (see “Click and Pre-count”). This is nothing to worry about and won’t cause any distortion in your song. To determine if the metronome is causing the clipping indication, just disable Click and see if the clipping stops.
*
The technical reason for this is that internally, Reason uses high resolution floating point processing, which ensures highest audio quality and virtually limitless headroom. In the Hardware Interface, the floating point audio is converted to the resolution used by the computer’s audio interface, and that’s where audio out clipping might occur.
If you are using multiple outputs
If you are using an audio interface with more than two outputs, you might want to have different devices connected to different outputs. If the Audio Out Clip indicator on the Transport Panel lights up, you should play back the section again while checking the Reason Hardware Interface. Each output socket has a level meter - if the red meter segment lights up, the output is clipping.
The indicator for Output 7 on the Hardware Interface indicates clipping.
*
If you are using ReWire
If you are streaming audio to another application using the ReWire protocol, clipping can not happen in Reason. This is because the conversion from floating point audio happens in the other audio application. See “ReWire” for more information.

Audio Basics : How Reason communicates with your audio hardware