Audio Editing in the Sequencer : Editing audio in the Comp Editor

Editing audio in the Comp Editor
In this section we will describe audio editing procedures that are common for Single Take clips and Comp clips when edited in the Comp Editor. Comp clip specific procedures are described in “Comping audio”.
Audio clip elements in the Comp Editor
When an audio clip is open for editing in Comp Edit mode, its contents are shown on the Edit Pane below the Clip Overview area. An open audio clip can have one or several Comp Rows on which the audio recordings reside. The number of Comp Rows depends on how you recorded your audio clip. If you only recorded once in the clip, there will only be one single Comp Row. If you have recorded several times in the same clip, or several cycles in Loop Mode, there will be one Comp Row for each take, or cycle.
There are vertical zoom controls for resizing the Clip Overview area and the Comp Row area. You can also scroll in the Comp Row area by using the scroll bars on the right hand side of the Edit Pane.
Single Take clips in the Comp Editor
For Single Take clips, only the recording on the selected Comp Row is played back. If there is only one single Take (Comp Row) in the clip, this will play back by default. This is how an open Single Take clip with only one recording on one Comp Row could look like when opened in Comp Edit mode:
A Single Take clip open in the Comp Editor.
The Clip Overview area at the top shows the clips on the selected audio track. In the Clip Overview area, selected audio clips are displayed in the same fashion as in the Arrange View, i.e. with Clip Resize handles, Level handle and Fade handles. You can select one or several audio clips in the Clip Overview and perform clip-based editing (e.g. moving and resizing) - just like in the Arrange View.
By clicking and dragging either of the handles, you can change the position and length of the clip.
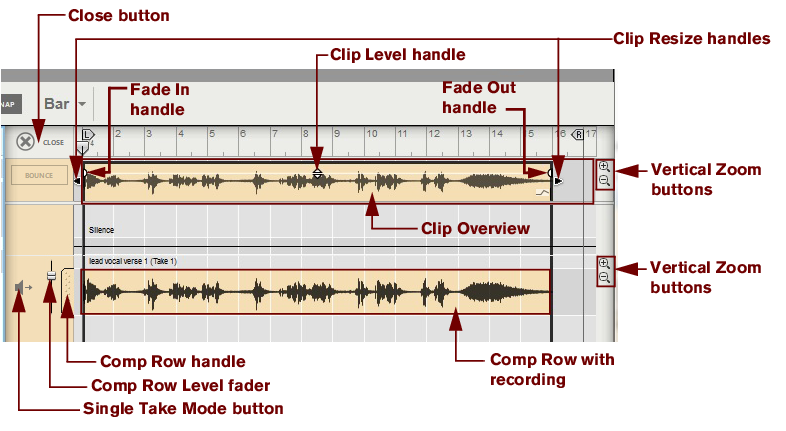
Click and drag these handles horizontally to introduce a fade in and/or fade out of the audio in the clip. The fading is non-destructive and can be changed at any time. If Snap is activated (see “Snap”), the set (Arrange Mode) Snap value is taken into account when moving the Fade Handles.
Click this button to close the audio clip and exit to the Arrange View.
Click and drag this handle vertically to adjust the audio level of the recordings in the clip. The level adjustment is non-destructive and can be changed at any time.
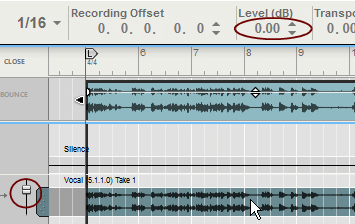
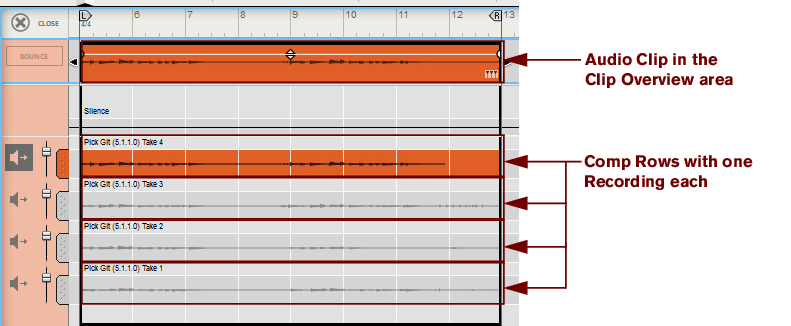
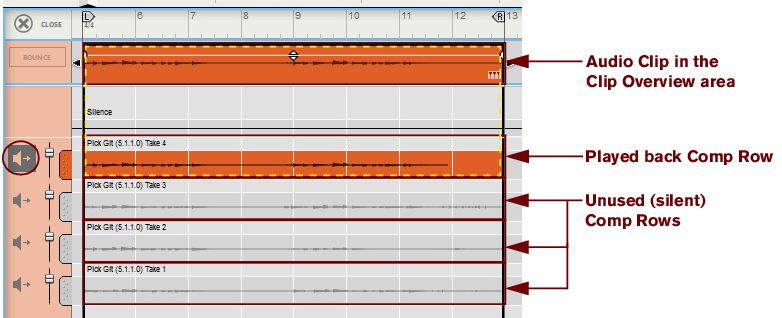
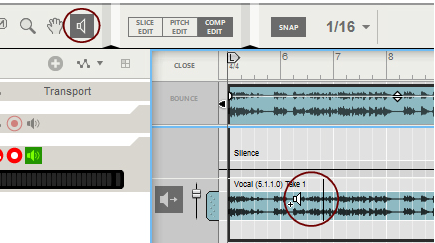
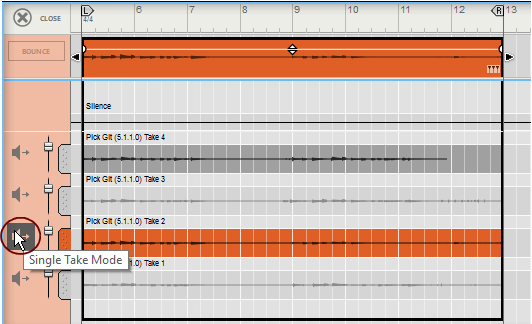
Depending on how you recorded the audio clip, there can be one or several Comp Rows, containing one audio recording each. Comp Rows can be described as “virtual tracks” in the sense that you can have many parallel Comp Rows in an audio clip but only play back from one Comp Row at a time (see “Creating a comped audio clip”). In Single Take clips, only the audio recording on the currently selected Comp Row will play back.
If there are several Comp Rows in the audio clip, it’s possible to rearrange the order of the Comp Rows by clicking and dragging the Comp Row handles vertically.
Use the Comp Row Level fader to adjust the volume of the recording on the corresponding Comp Row. This is especially useful in Comp Mode, when you want to trim and balance the levels of the recordings on several Comp Rows.
Click this to manually select the desired Comp Row for playback - and thus set the clip to Single Take Mode.
*
Comp clips in the Comp Editor
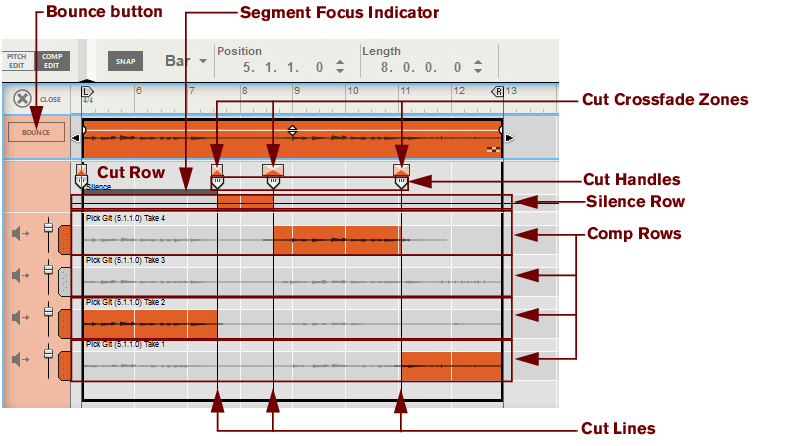
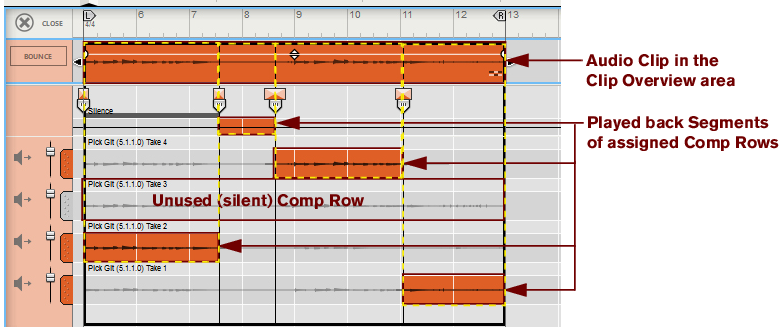
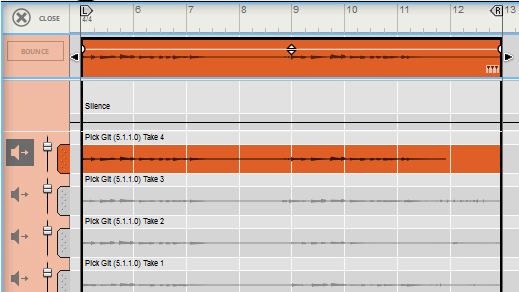
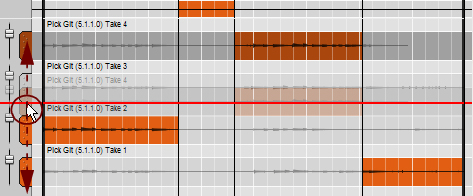
A Comp clip consists of several Comp Rows, with one recording on each Comp Row. If you have recorded several takes in an audio clip and want to cut out sections of the various takes and comp into a final clip, this can be done in the Comp Editor (see “Creating a comped audio clip”). This is how an already comped audio clip could look like in Comp Edit mode:
A Comp clip open in the Comp Editor.
From the top down in the preceding picture, the Edit Pane contains the following elements:
Clicking this button will bounce the recordings of the comped clip to a new recording, automatically select the bounced recording’s Comp Row - and thus set the clip type to Single Take. The same thing happens automatically if you click the Slice Edit or Pitch Edit buttons in the Toolbar.
The area between the Clip Overview and the topmost Comp Row is called the Cut Row. This is where the Cut Handles are placed.
The gray Segment Focus Indicator appears if you click on the Cut Row, or if you double-click on a Comp Row. A Segment is the area between two Cuts. The Segment Focus Indicator shows which segment currently has edit focus. Edit focus is required for editing using keyboard short-cuts (see the “Keyboard Commands” pdf document).
When you have comped an audio clip by creating cuts and assigning different Comp Rows to the resulting segments, it’s possible to set individual crossfades between the segments. This makes it possible to get smooth transitions between the audio recordings in the different segments. Any crossfades are indicated by boxes. The widths of the boxes indicate the crossfade times.
Each cut in a comped audio clip is indicated by a Cut Handle and a Cut Line. The Cuts indicate where the playback changes from one segment to another (in most situations from one Comp Row to another). You can edit the Cut positions by clicking and dragging any of the Cut Handles or Cut Lines sideways.
The Silence Row can be used for inserting silent segments in the comped audio clip, e.g. for removing breath noise between vocal phrases.
All of your audio recordings reside on Comp Rows. Depending on how you recorded the audio clip, there might be one or several Comp Rows, each containing one audio recording. The most recent take is on the topmost Comp Row. In a Comp clip, the colored part(s) of each Comp Row (or Silence Row) will play back. All Comp Rows used in the clip have colored Comp Row Handles. Any unused Comp Rows in the clip are indicated by gray Comp Row Handles.
The relationship between Clips, Comp Rows and Recordings
In the Comp Editor, the contents of an open clip are displayed on the Comp Row(s) on the Edit Pane:
A Single Take clip with four Comp Rows, with the topmost Comp Row manually selected for playback.
A Comp clip with alternating playback from four Comp Rows.
The number of Comp Rows and their position can be unique for each individual audio clip. Any edits you make in an audio clip will never interfere with other clips in the Song.
If the clip was recorded in one single take, it will have a single Comp Row. If the clip was recorded in several takes one after another, or recorded in Loop Mode, it will contain one Comp Row for each take or loop. Also, if you imported audio files to a clip, each audio file will end up on a separate Comp Row.
In a Single Take clip with more than one Comp Row, only the Comp Row you have selected by clicking the Single Take Mode button will play back. In a Comp clip, you can alternate the playback between the Comp Rows by assigning regions of the different Comp Rows to different Segments in the Clip. What you hear when you play back an audio clip is displayed in the Clip Overview area at the top on the Edit Pane. (The Clip Overview area displays the same content as the clip in the Arrange View.)
A Single Take clip with four Comp Rows, with the topmost Comp Row manually selected for playback.
A Comp clip with alternating playback from three Comp Rows plus the Silence Row.
This means that you could move Comp Rows up or down on the Edit Pane, change Comp Row Levels and Crossfades, or move Recordings back and forth on the Comp Rows, without affecting any neighboring audio clips.
However, the actual audio data is not duplicated. Reason features a very sophisticated internal audio management system which re-uses Recordings throughout the entire Song whenever necessary. This means that the Song file size won’t increase when you duplicate audio clips or Comp Rows.
Comp Editor window handling
Resizing, zooming and scrolling
*
*
*
*
*
*
*
*
Comp Editor audio editing tools
When editing audio in the Comp Editor, some of the Toolbar tools have different functionality as when editing note and automation clips. There are also some additional tools that are unique to audio editing.
Razor (Cut) Tool
When editing audio in the Comp Editor, the Razor Tool on the sequencer Toolbar is used for creating Cuts. When you place the Razor Tool over the Comp Rows, Silence Row or Cut Row, it changes into a “Cut Tool”.
*
*
Assigning the recording on the “Take4” Comp Row to a new segment.
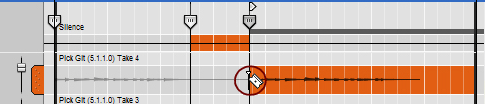
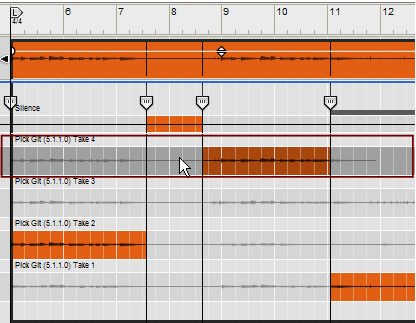
See “Adding Cuts” for more details on how to use the Cut Tool.
The Razor Tool can also be used for assigning a complete Segment, with a start and end Cut, by clicking and dragging (swiping) the Razor Tool horizontally on the desired Comp Row. See “Adding Segments” for more details on how to swipe with the Cut Tool.
Speaker Tool
It’s possible to audition individual recordings on Comp Rows, without needing to start playback of the sequencer. This is very useful when you’re going to select what Comp Rows to use in the clip:
1.
The cursor switches to a speaker symbol with crosshairs next to it.
Auditioning a recording on a Comp Row.
2.
The playback starts at the current crosshairs position and proceeds for as long as you keep the mouse button depressed. The playback position is indicated by a vertical moving line on the auditioned Comp Row.
*
*
*
Selecting a Comp Row for playback in a Single Take clip
In a Single Take clip, only the selected Comp Row will play back throughout the entire clip length. It’s also possible to change Comp Row Levels and Recording Offsets in a Single Take clip. The picture below shows an open Single Take clip in the Comp Editor. The clip consists of four separate takes, each on a separate Comp Row. When played back, the recording on the selected “Take 4” Comp Row will play back:
A Single Take clip open in the Comp Editor with four recorded takes.
If you want to change which Comp Row should play back in a Single Take clip:
*
The “Take 2” Comp Row is now manually selected for playback throughout the clip.
Now, the “Take 2” Comp Row will play back instead when the sequencer is started.
Selecting Comp Rows
*
The selected Comp Row is shown in a darker color:
The selected Comp Row is shown in a darker color.
*
*
*
Deleting Comp Rows
*
Select one or several Comp Rows (see “Selecting Comp Rows”) and then press [Backspace] or [Delete], or select “Delete” from the Edit menu or context menu.
*
Moving Comp Rows
Moving Comp Rows up or down on the Edit Pane can be useful to make it faster and easier and to access the desired Comp Rows when editing a comped clip. Let’s say you have recorded six takes but you’re only going to edit takes 1, 3 and 5. In this case, it would be more practical to have these Comp Rows right below one another at the top of the Edit Pane.
*
A red insertion line is shown, indicating where the Comp Row will be placed after you release the mouse button.
Moving a Comp Row.
*
A red insertion line is shown, indicating where the Comp Rows will be placed after you release the mouse button. Note that if you move non-adjacent Comp Rows, they will be placed as a group (adjacent) on the Edit Pane.
*
*
Duplicating Comp Rows
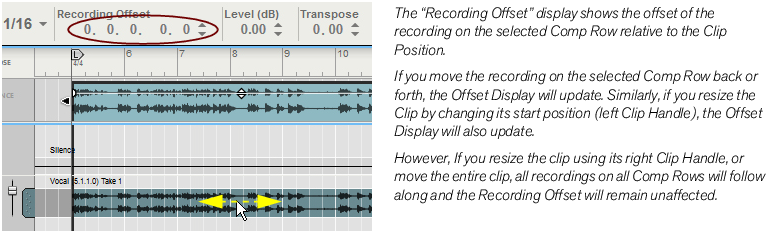
Duplicating Comp Rows can be useful if you want to re-use the same part of a take several times in a comped clip. Duplicate the Comp Row and then adjust the Recording Offset (see “Adjusting the Recording Offset”) in the duplicated Comp Row to access the same part of the recording in another segment of the comped clip. Duplicating Comp Rows will not use up any more space on your hard disk, so you can do this as many times as you like.
*
The duplicated Comp Rows will be placed below the lowest selected Comp Row. Note that if you duplicate non-adjacent Comp Rows, they will be placed as a group (adjacent) below the lowest selected Comp Row.
*
Cutting, copying and pasting Comp Rows
To move recordings between clips, you can cut or copy and paste Comp Rows as follows:
1.
Alternatively, select “Cut” or “Copy” from the Edit menu or context menu.
2.
This can be in the same song or a different one.
3.
The pasted Comp Rows will be placed at the top of the Edit Pane. Note that if you paste non-adjacent Comp Rows, they will be placed below each other, starting at the top of the Edit Pane.
*
Adjusting the Comp Row Level
If you are comping different Takes where the levels differ a bit, you might want to adjust the levels individually for the Takes:
1.
The Comp Row is displayed in a darker color to indicate it’s selected.
2.
The Level (dB) display is divided into dB and 1/100th of a dB.
Adjusting the audio level of a recording on a Comp Row.
3.
*
Any level adjustments you make on the Comp Row and in the Clip Overview are summed.
Adjusting the Recording Offset
In some situations you might want to move, or nudge, the entire recording on a Comp Row to make it play back exactly when you want. Maybe you just need to fine tune the position by a couple of Ticks:
1.
2.
The Recording Offset display is divided into Bars, Beats, 1/16th notes, Ticks and Subticks. There are 240 Ticks for each 1/16th note and 16 Subticks for each Tick.
Adjusting the offset (position) of a recording on a Comp Row.
You can also nudge the Recording Offset of the selected recording by using the arrow keys on the keyboard.
*
Note that Snap doesn’t have to be activated for this to work.
*
*
*

Audio Editing in the Sequencer : Editing audio in the Comp Editor