Audio Editing in the Sequencer : Comping audio

Comping audio
In this section we will describe procedures that are specific to audio editing in Comp clips. At the end of this section is a detailed example on how to use the various procedures to create a complete comped audio clip - see “Creating a comped audio clip”. General audio editing procedures are described in “Editing audio in the Comp Editor”.
Adding Cuts
*
*
*
A new Cut Handle is added on the Cut Row. The recording to the right of the Cut Line on the Comp Row is assigned to a new Segment:
Assigning the recording on the “Take4” Comp Row to a new Segment.
*
*
A new Cut Handle is added on the Cut Row. The previous recording assignment is retained throughout the new segment.
You can then adjust the timing (Recording Offset) or level of the duplicated Comp Row as needed, without affecting any segments playing the original Comp Row.
*
*
*
*
Adding Segments
The Razor Tool can be used for assigning a complete Segment, with a start and end Cut, by clicking and dragging (swiping) the Razor Tool horizontally on the desired Comp Row.
*
*
Swiping on a Comp Row will automatically assign the recording on that Comp Row to the new segment. Swiping on the Cut Row will insert a new segment but won’t change the recording assignment. The result after inserting a new segment in an existing segment is three separate segments. Swiping over an existing Cut will remove that Cut.
You can then adjust the timing (Recording Offset) or level of the duplicated Comp Row as needed, without affecting any segments playing the original Comp Row.
*
*
*
Adding Crossfades to Cuts
To add a crossfade zone to a Cut (between two Segments), proceed as follows:
*
The crossfade slopes are indicated by curves on the assigned Segments. The longer the crossfade time, the flatter the curves.
*
Deleting Cuts
*
The segment to the right of the deleted Cut will be deleted. The segment to the left of the deleted Cut will expand and replace the deleted segment:
*
Moving Cuts
Moving Cuts has a similar effect to resizing a clip, i.e. you select what part of the recording on the Comp Row should be active for playback. Recordings outside the active segment on the Comp Row will be masked (silent) but not affected in any other way.
*
The segment to the left of the Cut Line will be resized. The segment to the right of the resized segment will now have a new start position:
*
*
*
*
Changing Comp Row assignments
When you have created a comped audio clip, you might later want to change which Comp Rows are assigned to play:
*
Make sure you double-click in the area between the desired Segment’s Cut Lines.
You can also use keyboard commands to change comp row assignments and segment focus as follows:
*
*
This will move the Segment Focus Indicator between the segments. Note that you can still change comp row assignments using this keyboard command together with the up/down arrow keys.
The Segment Focus Indicator shows which segment has currently focus.
Bounce Clip(s) to New Recording(s)
*
A very nice way to “clean up” among the recordings in a comped audio clip is to bounce the clip to a new recording. Bouncing to a new recording is also a prerequisite to be able to edit the clip in Slice Edit mode and stretch and quantize the audio.
What happens is that the audio recordings in all segments of the comped clip, including any Cut Crossfades and individual Comp Row Levels, are combined into a single recording on an additional Comp Row. After the clip has been bounced to a new recording, you can delete the unused recordings to reduce the file size. Bouncing clips to new recordings can be made for one or several selected audio clips:
*
A new “combined” recording is created on a new Comp Row, which is created above the other Comp Rows on the Edit Pane. The new Comp Row is assigned the suffix “(bounced)”.
As the clip is bounced, the clip automatically switches from a Comp clip to a Single Take clip. If you play back the clip now, you will only hear the bounced recording on the automatically selected (topmost) Comp Row. However, the clip will sound exactly the same as before the bounce.
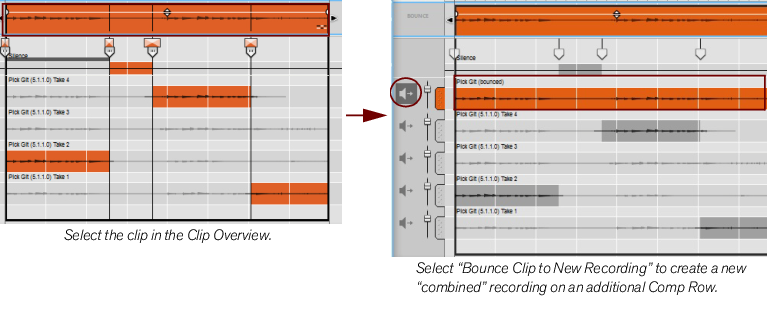
If you’re happy with the result and don’t plan to edit the clip any further, you can use the “Delete Unused Recordings” function to delete the recordings on the original Comp Rows and reduce the file size (see “Delete Unused Recordings”). If file size is not an issue, you can keep the original takes in the clip. This way you can switch to Comp Mode at any time if you need to edit the comp.
*
*
Creating a comped audio clip
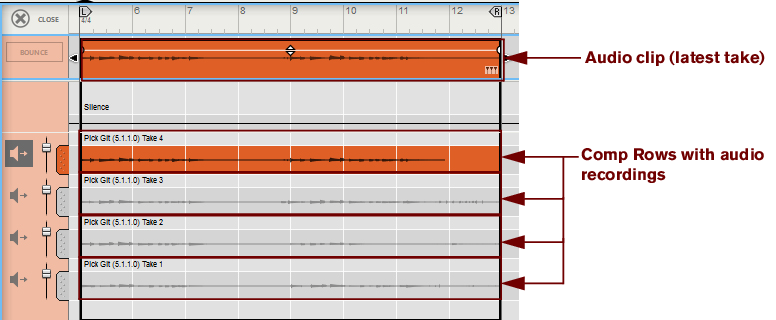
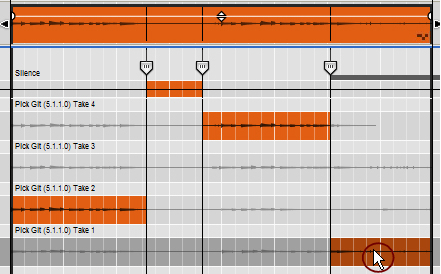
If you have recorded more than one loop cycle of audio in Loop Mode (see “Recording audio in Loop mode”), or recorded over or into an existing audio clip (see “Recording over or into an existing audio clip”), each recording has been placed on a separate Comp Row. If you like, you can now select the best parts (segments) of the recordings on the various Comp Rows and create a final “comped” audio clip. All editing described below is non-destructive and can be changed at any time:
1.
Each take has generated a separate Comp Row, each with a separate recording on it. The latest take, on the topmost Comp Row, is the one that will play back.
An audio clip (in Single Take Mode) with four separate takes recorded in Loop Mode.
*
2.
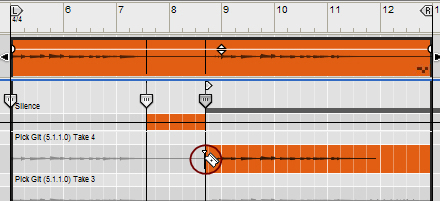
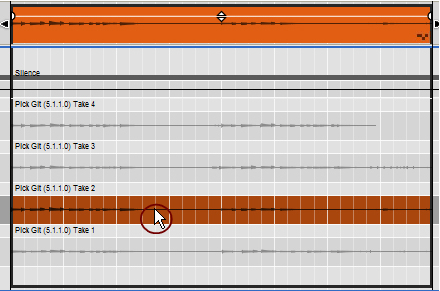
Audition the recordings on the Comp Rows to decide which recordings to use at what position in the comped clip. Select the Speaker Tool and click-hold at desired positions on the different Comp Rows (see “Speaker Tool” for details).
*
3.
In this example, we decide to use the recording on the “Take 2” Comp Row:
Double-click on the “Take 2” Comp Row to assign it to the first segment of the clip.
4.
We want the recording on the “Take 2” Comp Row to play until beat 3 of Bar 7. After beat 3 of bar 7 we want the clip to be silent to get rid of some background noise that could be heard when we recorded without playing anything. Therefore, place the Razor Tool on the Silence Row at Beat 3 of bar 7 and click:
Now, you have assigned the recording on the “Take 2” Comp Row from the beginning of the clip to beat 3 of bar 7. At the same time you have assigned the Silence Row to a second segment of the clip.
5.
We found a good recording that we want to use on the “Take 4” Comp Row between beat 3 and 4 of bar 8 until beat 1 of bar 11.
6.
Swipe with the Razor Tool on the “Take 4” Comp Row from beat 3 and 4 of bar 8 until beat 1 of bar 11:
Now the recording on the “Take 4” Comp Row is assigned to a third segment in the clip. Two new Cut Handles have been added: one at the beginning of the swiped segment and one at the end.
7.
We used the Audition Tool and found that the recording on the “Take 1” Comp Row was just what we were looking for to play through to the end of the clip. Since a fourth segment was already created when you swiped in the previous step, you just need to double-click with the Selection Tool on the “Take 1” Comp Row, to the right of the last Cut Line, to assign the recording to the fourth segment:
Double-click on the “Take 1” Comp Row, to the right of the last Cut Line,
to assign it to the last segment in the clip.
8.
Crossfades can be applied by first selecting a Cut Handle and then clicking with the Selection Tool and dragging the Cut Crossfade Handles that appear above the selected Cut Handle:
The crossfade slopes are indicated by curves on the assigned Segments. The longer the crossfade time, the flatter the curves.
Repeat the procedure for the other Cut Crossfade Handles in the clip if needed.
*
9.
Click with the Selection Tool and drag the Comp Row Level Faders on the respective Comp Row to achieve a balanced audio level throughout the clip. The Comp Row level adjustments can be made anytime during the creation of the comped audio clip.
Adjusting the individual Comp Row audio levels.
*
*
The clip is then also automatically set to Single Take mode, which makes it possible to edit the clip in Slice Edit mode, where you can stretch and quantize the audio etc. (see “Editing audio in Slice Edit mode”), or in Pitch Edit mode, where you can correct and edit the pitches of monophonic audio recordings (see “Editing audio in Pitch Edit mode”).
Bouncing also helps you keep things organized and can be a way to create a “snapshot” of your current comp, for comparison while you continue to fine-tune the edits.
*

Audio Editing in the Sequencer : Comping audio