Working with Blocks in the Sequencer : Arranging Blocks in the Song View

Arranging Blocks in the Song View
Once you are finished with your clips on the tracks and lanes in the Block View, it is time to arrange the Blocks to build up your song in the Song View. Setting up the Blocks and their playing order is done by creating Block Automation Clips on the Blocks Track in the Song Arrange view.
The following section describes functions and routines that are specific to Block Automation Clips. General clip handling procedures (e.g. naming, coloring etc.) are described in the general “Clip handling” section.
Creating Block Automation Clips
A Block Automation Clip is very similar to a Pattern Clip (for a Redrum device, for example). A Block Automation Clip defines which Block should play back, and for how long. To create Block Automation Clips, proceed as follows:
1.
2.
The Block selector appears in the Inspector:
3.
In this example, we will use Block 1.
4.
This creates a Block Automation Clip which instructs the sequencer to play back the events you have previously recorded in Block 1:
A Block Automation Clip drawn on the Blocks Track in the Song View.
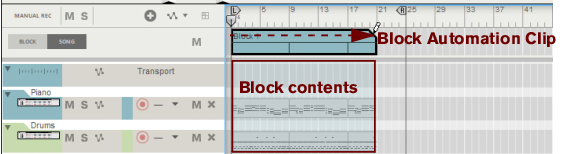
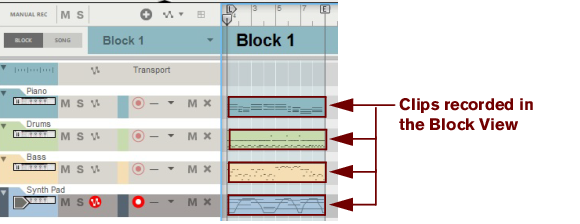
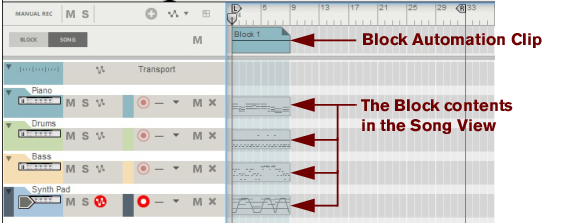
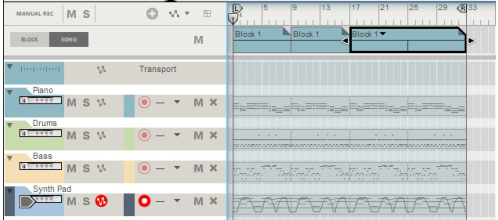
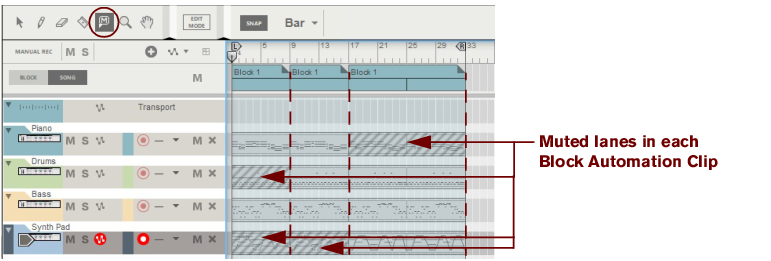
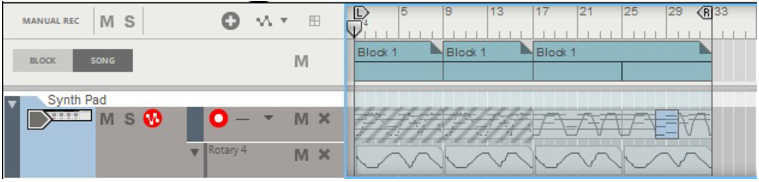
The contents (clips and events) of Block 1 are displayed on the respective sequencer tracks in a ghosted fashion on a colored background. This way you will see what events and/or recordings the Block will play back. This also allows for muting of individual lanes in the Block (see “Muting lanes in Block Automation Clips”).
The following rules apply to Block Automation Clips:
In the picture above, the Block length is 8 bars and the Block Automation Clip is 20 bars. This means that Block 1 is repeated at bars 9 and 17. The repetitions are indicated with thin vertical lines in the Block Automation Clip and on the sequencer tracks (similar to a Pattern Automation clip).
In the picture above, the last 4 bars of the third repetition are masked out.
*
The clip gets the length of the currently selected Snap value. To create longer clips, double click, hold and drag to the right.
Resizing Block Automation Clips
As with other clip types Block Automation Clips can be resized by clicking and dragging the clip handle(s) with the Selection (Arrow) tool or by editing the Position and Length values in the Inspector.
This means that the Block Automation Clip could start playing in the middle of the Block, i.e. not from the beginning. The picture below shows a Block Automation Clip before and after resizing the start position:
Changing the start position by resizing a Block Automation Clip
In the example above, the Block Automation Clip will begin playing at Bar 7, and will start playing back the events that begin at Bar 7 in the Block.
Reassigning Blocks in Block Automation Clips
*
The Block Automation Clip color changes to the color of the new Block and the ghosted clips on the tracks switch to show the contents of the new Block.
Muting lanes in Block Automation Clips
When you have arranged your Block Automation Clips as desired on the Blocks Track, it is possible to mute individual lanes contained in any Block. These lanes will remain muted until the end of the Block Automation Clip.
This way you can use the same Block to create a song intro, by gradually introducing more and more sequencer tracks/lanes. The example below shows how to mute lanes in individual Block Automation Clips to create a song intro.
We are going to use one single Block - Block 1 - to create a song intro. The Block is 8 bars long and uses four sequencer tracks. In the Block View we have recorded on all four sequencer tracks:
Block 1 in the Block View with four sequencer tracks.
Now, we want to arrange our song so we switch to the Song View and draw an 8 bar Block Automation Clip on the Blocks Track:
An 8 bar Block Automation Clip assigned to Block 1.
In our intro we want the Piano and Bass track to play the first eight bars. In the next eight bars we want to have the drums playing as well. Then, we want the song to continue for another 16 bars with all tracks playing except the Piano track.
To achieve this, we need to create several Block Automation Clips that play back the same Block. This is because when we’re going to mute lanes later on, we need to define for how many bars we want the mutes to be active. The duration of the mutes are defined solely by the lengths of the Block Automation Clips.
We begin by copying and pasting the Block Automation Clip twice. Then we resize (expand) the last Block Automation Clip to 16 bars:
The Block Automation Clip assigned to Block 1 copied and pasted twice, with the last Block Automation Clip resized to 16 bars.
Now, we want to mute individual lanes for the duration of each Block Automation Clip to create our intro. We select the Mute tool from the Toolbar and click on the lanes we want to mute in each Block Automation Clip:
Muted lanes throughout the length of each Block Automation Clip.
Now, we have our intro with the Piano and Bass playing the first 8 bars. Then, the song continues for another 8 bars with Piano, Bass and Drums. Finally the song plays another 16 bars with Drums, Bass and Synth Pad. All we needed for this intro was one single 8 bar Block.
*
Converting Block Automation Clips to Song Clips
After you have arranged your Block Automation Clips in the Song View, you might want to convert the content of the Block(s) to “regular” clips on the sequencer tracks and lanes. There are a few ways of doing this:
Converting single Block Automation Clips to clips in the Song View
1.
2.
All unmuted clips in the Block(s) are automatically converted to regular clips on the tracks. The Block Automation Clip and its contents are preserved and left unchanged:
Before and after the “Convert Block Automation To Song Clips” command used on the first Block Automation Clip.
Converting all Block Automation Clips to clips in the Song View
*
All unmuted clips in all Block Automation Clips are automatically converted to regular clips on the tracks. The Block Automation Clips and their referenced Block contents still are preserved but the Blocks Track is automatically muted. This is made to reduce the clutter on the arrangement pane:
Before and after the “Convert Block Automation To Song Clips” command on the Track List context menu.
*
Using Cut/Copy and Paste for individual clips
You can of course also use the standard Cut/Copy & Paste functions to copy clips from the Block View to the Song View, and vice versa.
1.
2.
3.
4.
Combining Block Automation Clips with Song Clips
It’s possible to combine Block Automation Clips with regular clips in the Song View. The general rule is that clips in the Song View have priority over Block data. This means that if a clip in the Song View overlaps a (ghosted) clip on the same lane in a Block, the Song Clip will play back and the clip in the Block “underneath” will be silent (masked):
Song clips and Block Automation Clips in combination in the Song View.
If we play back the song in the picture above, this is what we will hear:
Practical tips on combining Blocks and Song Clips
A nice way of working with Block Automation Clips and Song Clips is to first create a couple of Blocks in the Block View and then arrange Block Automation Clips in the Song View. When you have arranged your Block Automation Clips, you could record a couple of shorter Song Clips with variations in the Song View. Then, place these short clips at desired positions in the arrangement to create nice variations in the song, according to the example below:
Short Song Clips combined with Block Automation Clips in the Song View to create nice variations.
*
About Performance Controllers and Parameter Automation
Since the sequencer tracks and lanes are shared between the Blocks and the Song arrangement, the following rules apply regarding Performance Controller and Parameter Automation:
The picture below shows a piece of an arrangement with an instrument track which has one note lane and one parameter automation lane. The arrangement is built up by Blocks (the ghosted data) and one short Song Clip for variation in bars 28 through 29 (the blue clip on the note lane). The Block uses Mod Wheel Performance Controller automation (the gray line inside the note clips in the Block) and automation of the Rotary 4 parameter (the gray line in the parameter automation clips in the Block):
During this time, the Rotary 4 automation is active. (However, no notes are played back in bars 1 through 16 since the note lane in the Block is muted.)
The Rotary 4 automation is still active.
Since the Mod Wheel isn’t touched at all in the Song Clip, its value is set to zero. However, note that the Song Clip is still affected by the Rotary 4 automation in the Block!
The Rotary 4 automation is still active.

Working with Blocks in the Sequencer : Arranging Blocks in the Song View