Matrix Pattern Sequencer : Programming patterns

Programming patterns
Pattern basics
Matrix contains a built-in pattern sequencer. Unlike the main sequencer in Reason, the Matrix sequencer repeatedly plays back a pattern of a specified length. The typical example in the “real world” (as well as in Reason) is a drum machine which plays drum patterns, usually one or two bars in length.
Having the same pattern repeat throughout a whole song may be fine in some cases, but most often you want some variations. The solution is to create several different patterns and program pattern changes (automatic switching from one pattern to another) at the desired positions in the song.
How the Matrix pattern sequencer integrates with the main Sequencer
The built-in pattern sequencer in the Matrix interacts with the main Reason sequencer in the following ways:
If the Tempo track (see “Recording tempo automation”) is used, Matrix will follow this.
If the Matrix has a track in the sequencer and you mute this track, Matrix will automatically be muted as well. This is indicated by a Mute indicator on the device panel. If there are several note lanes on the Matrix track, their respective mute status will not be indicated on the device panel.
*
This starts the built-in pattern sequencer in the device. To stop playback, click the Run button again or click the Stop button on the Transport panel.
In other words, you can record or create pattern changes in the main sequencer, and have them occur at the correct position on playback.
Selecting Patterns
The Matrix has 32 pattern memories, divided into four banks (A, B, C, D).
The Bank and Pattern buttons for the Matrix pattern sequencer.
*
*
Nothing happens until you click the Pattern button.
The pattern change takes effect on the next downbeat according to the time signature set in the transport panel or on the transport track.
The Pattern Enable switch
The Pattern Enable switch.
Next to the Bank and Pattern buttons you will find an additional switch, which is normally activated. If you click this to turn it off, the pattern playback will be disabled, starting at the next downbeat - exactly as if you had selected an empty (silent) pattern. For example, this can be used for bringing Matrix patterns in and out of the mix during playback.
Steps
Matrix patterns consist of a number of discrete steps. For each step, you can enter a note, a CV value and a Curve value. When you run the pattern, each step will be played back in turn and will play a sound or send out the information programmed for this step. If you have ever used a drum machine, this will be obvious to you.
Clearing a Pattern
To clear (empty) a pattern, select it and use the Clear Pattern command on the Edit menu or device context menu.
*
Using Cut, Copy and Paste
By using the Cut, Copy and Paste Pattern commands on the Edit menu or device context menu, you can move or duplicate patterns. The following rules apply:
*
*
This is the same as first performing Copy Pattern and then Clear Pattern.
*
This overwrites the selected pattern with the one on the clipboard.
Transferring patterns between Reason songs
If you want to copy patterns between different Reason songs, you use copy and paste:
1.
2.
3.
You can also hold [Ctrl](Win) or [Cmd](Mac) and press [C] to copy.
4.
This is done by clicking in the song window or by selecting the song from the Windows menu.
5.
Note that any pattern already stored in that location will be overwritten!
6.
You can also hold [Ctrl](Win) or [Cmd](Mac) and press [V] to copy.
Tutorial
The programming procedure of the Matrix is to input note and gate values into the upper and lower fields of the pattern window respectively. You can input values by clicking or dragging in the pattern window. Proceed as follows:
1.
You don’t have to use the Subtractor device to use the Matrix, in fact you don’t have to use an instrument device at all, but for this basic tutorial we will use a “standard” setup.
2.
The Matrix Note and Gate CV outputs will now be auto-routed to Subtractors Sequencer Control Gate and CV inputs, as you can see if you flip the rack around.
3.
As you can see, there are two rows of red rectangles. The one with horizontal rectangles at the bottom of the upper field in the pattern window represent note pitch, for each step in a pattern. At the moment they are all set to the same note pitch. The row of vertical rectangles in the lower field represent Gate velocity values - currently these are all set to a velocity value of 100 for all steps.
4.
An orientation line is displayed in the grid to make it easier for you to find the desired note, and the red rectangles are placed according to where you click. You can drag to input continuous note values.
5.
You can create vertical Gate velocity strips of varying heights. The higher the strip, the higher the velocity value.
6.
The pattern you “programmed” in the previous steps is now repeated. At the top of the pattern window, a red rectangle indicates every step of the pattern.
*
The note pitch corresponds to the keyboard printed to the left of the pattern window, in a one octave range, and as previously mentioned, an orientation line is visible when clicking or dragging, making it easy to find the note pitch on the keyboard.
*
*
*
Note that there can only be one note for each step in the pattern.
7.
Using Curve Patterns
Curve patterns are independent patterns that can be applied separately to the note pattern programmed in “Keys” mode. If you switch the Keys/Curve switch to “Curve”, the note, but not the gate steps, disappear from view, and leaves the upper area of the pattern window empty. You can now start programming a curve pattern. Proceed as follows:
1.
As you can see, the Curve pattern looks like large vertical gate steps.
*
This is because the Curve CV output hasn’t been connected to any parameter yet.
2.
3.
Now the curve pattern controls the filter frequency of the Subtractor.
*
*
Actually, Curve CV signals can also produce Gate triggers (used for triggering samples or envelopes for example).
*
If you look at the picture below, steps 2,4 and 6 will produce a trigger, because steps 1, 3 and 5 are set to zero, but the rest of the pattern would not.
About Unipolar and Bipolar Curves
On the back panel of the Matrix you will find a switch, allowing you to select between “Unipolar” or “Bipolar” Curves. The difference is as follows:
*
“0” is the value produced by all steps when they are “empty” (not visible). Unipolar is the default setting of this switch when a new Matrix is created.
Unipolar curve
*
The curve reflects this. If no curve has been drawn and you switch to bipolar mode, all steps go from the bottom up to the middle of the scale printed to the left of the pattern window. Thus, all steps are at “0”, and the curve can be drawn both up and down from the middle.
Bipolar curve
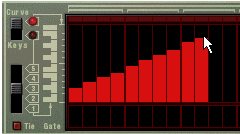
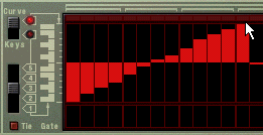
Bipolar curves are essential in some instances. If you want to use the Matrix to CV control the Pan parameter for a mixer channel for example, a unipolar curve would start at zero - which for Pan equals center position. This means that you would only be able to use the curve to pan in one direction from this center position. A bipolar curve however, will have the zero value in the middle, allowing you to draw pan curves in both directions. Bipolar curves can also be used for controlling parameters with positive and negative values.
Setting Pattern Length
You may want to make settings for Pattern length, i.e. the number of steps the pattern should play before repeating:
*
The range is 1 to 32. You can always extend the number of steps at a later stage, as this will merely add empty steps at the end of the original pattern. You could also make it shorter, but that would (obviously) mean that the steps you remove won’t play back. The steps you remove aren’t erased though, if you set the step number back again, anything recorded in the previously removed step locations will be played back.
Using Tied Notes
If you activate “Tie” to the left of the Gate pattern window, you can create longer notes (eighth notes, quarter notes etc.). A quick way to draw tied gates is to hold down [Shift] when you input the gate values.
Entering tied gate values.
*
Tied gate steps are indicated by being twice as wide in the pattern window.
*
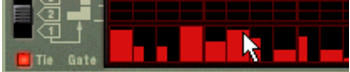
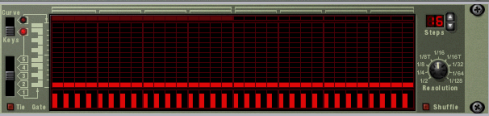
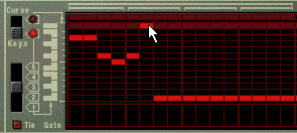
Tied notes are also essential if you want to create typical TB-303 “Acid”-type lead lines - see “Programming “Acid Style” lead lines”.
Setting Pattern Resolution
Matrix always follows the tempo setting on the transport panel, but you can also make Matrix play in different tempo “resolutions” in relation to the tempo setting.
Pattern Shuffle
Shuffle is a rhythmic feature, that gives the music a more or less pronounced swing feel. It works by delaying all sixteenth notes that fall in between the eighth notes.
Straight sixteenth note pattern (viewed in the sequencer).
The same sixteenth note pattern with shuffle applied.
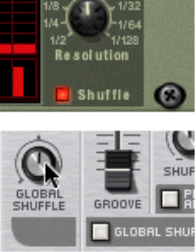
In Reason, you can activate or deactivate shuffle individually for each pattern in a pattern device. However, the amount of shuffle is set globally with the Global Shuffle control in the ReGroove Mixer. The ReGroove Mixer is described in “The ReGroove Mixer”.
The Shuffle on/off switch in Matrix and the Pattern Shuffle control on the transport panel.
Pattern Mute
If you deactivate the “Pattern” button above the Pattern select buttons, the pattern playback will be muted, starting at the next downbeat (exactly as if you had selected an empty (silent) pattern). For example, this can be used for bringing different pattern devices in and out of the mix during playback.
If you mute the Matrix track in the sequencer, it is muted instantly and the Mute indicator lights up on the panel. Note that all tracks connected to the Matrix must be muted for this to work.
Pattern Functions
When a pattern device is selected, you will find some specific pattern functions on the Edit menu (and on the device context menu).
Shift Pattern Left/Right
The Shift Pattern functions move the notes and corresponding gate values in a pattern one step to the left or right.
Shift Pattern Up/Down
*
The Shift Pattern functions will transpose all the notes in a pattern one semitone up or down.
Randomize Pattern
The Randomize Pattern function create random patterns. These can often be great starting points and help you get new ideas. Both Note, Gate and Curve CV values will be created.
Alter Pattern
The Alter Pattern function modifies existing patterns. Note that there must be something in the pattern for the function to work on - using an Alter function on an empty pattern will not do anything.
*
Chaining Patterns
When you have created several patterns that belong together, you will most probably want to make these play back in a certain order.
*
The Patterns play to the end before changing, so you won’t have worry too much over the “timing” of the pattern changes you input manually. When you are done, the sequencer track will contain pattern change data, and the patterns will automatically switch according to the order set while recording. More on recording pattern changes on “Recording pattern automation”.
*
Editing in the Pattern lane is described in the Sequencer chapter.
Converting Pattern data to notes in the main sequencer
You can convert Matrix Patterns to notes in the main sequencer. This allows you to edit the notes freely, create variations or use Groove quantizing.
The “Copy Pattern to Track” function
This function is useful when you have created a single pattern in the Matrix device and want to render individual note events on a sequencer track.
*
Proceed as follows:
1.
You may want to make sure that the space between the locators is a multiple of the pattern length, to avoid “cutting off” the pattern.
2.
You should not copy the notes to the Matrix track, but to the track for the device controlled by the Matrix (since the Matrix doesn’t produce any sound in itself). You can also copy the notes to any other instrument track if you like.
3.
The pattern is converted to a single note clip on the track, with Note and Gate (Velocity) values. If the space between the locators is greater than the pattern length, the pattern will be repeated in the clip to fill up the space.
When you use the “Copy Pattern to Track” function with the Matrix, you should note the following:
The notes will have the pitch according to the key CV value for the step, and the velocity according to the Gate value.
*
This is because you probably don’t want both the Matrix and the sequencer notes to play the device at the same time and thus cause “note doubling”.
*
The “Convert Pattern Automation to Notes” function
If you have recorded or drawn pattern automation on a Matrix track, you can have the whole track converted to notes, in the following way:
1.
2.
For each pattern clip, the corresponding pattern is converted to note clips on the track (following the same rules as for the “Copy Pattern to Track” function). The track will play back just the same as when you played the pattern device with the pattern changes.
*
The Pattern (Enable) button on the device is automatically turned off.
*
This is because the Matrix doesn’t make any sound itself.

Matrix Pattern Sequencer : Programming patterns