Menu and Dialog Reference : Edit menu

Edit menu
Undo
Virtually any actions in Reason can be undone. This includes creation, deletion and reordering of devices in the rack, parameter value adjustments, recording and editing in the sequencer and tempo/time signature adjustments. You can undo hundreds of actions.
*
*
The action to be undone is indicated next to the Undo command on the Edit menu. For example, if your latest action was to delete some device(s) from the rack, the Edit menu will say “Undo Delete Devices”.
See “Undo and Redo” for more detailed information.
Redo
*
The action to be redone is indicated next to the Redo command on the Edit menu. You can undo/redo hundreds of actions.
See “Undo and Redo” for more detailed information.
Cut/Cut Tracks and Devices/Cut Channels and Tracks
This command takes the selected item(s), removes them and places them on the clipboard (an invisible storage location) from where they can later be pasted in.
Cutting applies to devices/channels and their sequencer tracks, sequencer clips, notes and automation points.
*
Copy/Copy Tracks and Devices/Copy Channels and Tracks/Copy Patch
This command takes the selected item(s), copies them and places the copies on the clipboard (an invisible storage location) from where they can later be pasted in.
Copying applies to devices/channels and their sequencer tracks, sequencer clips, notes, automation points and device patches. Also individual Kong Drum patches can be copied and pasted from one selected pad to another.
*
Paste/Paste Tracks and Devices/Paste Channels and Tracks/Paste Patch
This command takes the items that you have cut or copied to the clipboard and pastes them back into the document.
Pasted tracks and devices are inserted below the currently selected track in the track list and below the selected device in the rack, respectively.
*
If nothing is selected, the pasted items will appear at the bottom of the track list/rack.
*
For example, [Shift]-pasting an instrument device typically connects it to the first free Mix Channel device input(s) above it in the rack.
*
If you have deleted the original tracks, or if you paste into another Reason song document, the clip will be pasted at the song position on the selected track (if the track type is the same as the original). Otherwise new tracks will be created. If the clip is a note clip, a new ID8 instrument track will be created.
Delete/Delete Tracks and Devices/Delete Channels and Tracks
This menu item is used for deleting selected items. If you delete a sequencer track with this menu item (then called “Delete Tracks and Devices”), its device is also deleted.
*
Delete Tracks
This deletes the currently selected sequencer track(s) without removing the corresponding rack device(s) or mixer channels.
Duplicate Tracks and Devices/Duplicate Channels and Tracks
This creates a duplicate of the selected device and track, or channel and track, complete with all parameters and recordings/events. The duplicated items will appear below the selected device and track, respectively.
*
Select All/Select All Devices/Select All Tracks/Select All Channels
This selects all devices in the rack, all tracks in the track list, all channels in the Main Mixer, or all clips or all notes or automation points in an open clip. The result depends on which area (rack, track list, Main Mixer etc.) has focus. This is indicated by a thin frame around an area in the document window.
*
You can use this menu item to quickly apply a command to all items you are working on, for example deleting all devices in the rack (select Select All Devices and then press [Delete]) or for Quantizing all notes in an open clip (select Select All and then click the Quantize button in the Tool window).
Select All in Device Group
This will select all devices within the selected device’s Device Group. See “About selecting all devices in a Device Group”.
Sort Selected Device Groups
This function should be used if you want to rearrange devices, channel strips or sequencer tracks according to the order of the current selection. For example, if you want to rearrange the rack devices according to the current sequencer track order, you can select all sequencer tracks and then choose “Sort Selected Device Groups” to rearrange the rack devices. See “About the “Sort Selected Device Groups” function” for more examples.
Auto-route Device
Auto-routing is when devices’ audio and CV/gate connections are automatically routed according to default rules. Auto-routing is normally performed when:
However, if a device is already in the rack, you can “force” it to be auto-routed by selecting it and then select this menu item.
For more information about auto-routing rules, see “Automatic routing”.
Disconnect Device
This disconnects all audio and CV/gate connections from the selected device(s).
Combine/Uncombine
*
*
In case the whole Combinator is selected, this will be removed and the devices it contains will be moved into the rack.
See “The Combinator” for more details.
Copy/Paste Channel Settings (Main Mixer channel strips)
This function allows you to copy and paste the parameters of different sections of a Main Mixer channel strip and paste into another channel strip. The available parameter groups are:
This will copy the entire Effect Combi patch (with all Combinator devices included)
This will only copy the FX Send parameters in the channel strip - not any FX devices or patches.
This will copy all channel strip parameters, including any Insert FX devices.
Route to (Main Mixer channel strips)
This allows you to create, and automatically route, one or several selected Main Mixer channel strips to a new or existing Output Bus for sub-mixing purposes. See “Creating an Output Bus”.
Create Parallel Channel (Main Mixer channel strips)
This allows you to create a parallel mixer channel for parallel processing purposes. See “Creating Parallel Channels”.
Clear Insert FX
This disconnects and removes all Insert FX devices of a selected Mix Channel or Audio Track device in the rack, or of a selected channel in the Main Mixer. See “Deleting Insert effects” for more details.
Reset All Channel Settings (Main Mixer channel strips)
This will reset all channel strip parameters to their default values. Any Insert FX Combinator patches will be removed.
Reset Device
Sometimes it is useful to start with a “clean slate” when creating a sound or effect. This is done by selecting Reset Device from the device context menu or Edit menu. This sets all parameters to their default values. Resetting NN-19, NN-XT, Dr. Octo Rex, Redrum or Kong devices also removes samples from the device, allowing you to start from scratch.
Cut Pattern
Moves the current pattern in the selected Redrum or Matrix to the clipboard. The pattern is then cleared.
Copy Pattern
Copies the current pattern in the selected Redrum or Matrix to the clipboard.
Paste Pattern
Copies the pattern on the clipboard to the current pattern location in the selected Redrum or Matrix device. This overwrites the current pattern with the one on the clipboard. Note that this can be used to transfer patterns between different Reason songs.
Clear Pattern
This menu item clears (empties) the current pattern on the selected pattern device (Redrum or Matrix).
Browse Patches.../Browse Insert FX Patches...
This menu item allows you to select a new Patch for a device or an Insert FX Patch for a selected channel strip. The menu item reflects which device is selected - in other words, you must select the device for the corresponding Browse Patches item to appear on the Edit menu.
When you select the menu item, the Browser appears (if hidden), allowing you to locate and select the patch, on disk or within a ReFill.
When you load a patch, the device’s parameters will be set according to the values stored in the patch, and the name of the patch will be shown in the patch name display. As with any change you make, this operation can be undone.
*
Patches for the Redrum, Combinator (if any sampler devices are part of the Combi), NN-19, NN-XT Kong, Grain and Dr. Octo Rex devices contain references to samples. Just like patches, samples can be independent files on the hard disk or elements within a ReFill or a SoundFont. However, if sample files have been moved or renamed after a patch was saved, the sample file references in the patch will not be accurate.
If this is the case when you select a patch, the program will tell you so. You can then choose to either manually locate the missing files, to have the program search for them in all stored locations and ReFills or to proceed without the missing sounds.
Browse Loops...
This menu item is used to add a loop to the selected Dr. Octo Rex Loop Slot. Files to be imported can be in REX, RCY or RX2 file format.
Loading a new REX file will replace any currently loaded file in the selected Loop Slot.
Browse Samples...
This menu item lets you load samples into the devices that use them; the Redrum, the NN19, the NN-XT, Grain and the NN-Nano drum module in Kong. The following sample formats can be loaded:
.wav, .aif, .mp3, .aac, .m4a and .wma.
.wav, .aiff, .3g2, .3gp, .mp1, .mp2, .mp3, .mpeg, .mpa, .snd, .au, .sd2, .ac3, .aac, .adts, .amr, .caf, .m4a .m4r and .mp4.
SoundFonts are an open standard for wavetable synthesized audio, developed by E-mu systems and Creative Technologies.
REX files are music loops created in the ReCycle program or when editing audio clips inline in Reason (see “Bounce Clip to REX Loop”). The NN19 and NN-XT let you load REX files either as complete patches or individual REX slices as separate samples. The NN-Nano lets you load separate slices from REX files as individual samples.
 
Redrum:
To use this menu item to load a new drum sound into Redrum, proceed as follows:
1.
2.
The Redrum channel gets Browser focus and displays compatible files.
3.
 
NN19:
This menu item can also be used to add a sample to a key zone in a key map in the NN19 sampler.
1.
This can be empty, or contain a sample - it doesn’t matter for now.
2.
The following will happen:
*
*
 
NN-XT:
This menu item is used for adding one or more sample(s) to a key zone in the NN-XT:
1.
If the remote editor panel is folded in, you will only be able to browse for NN-XT patches.
2.
The sample(s) will be placed in separate zones and mapped across the same key range.
*
Replacing samples this way is only possible when you load a single sample.
Automap Samples
This menu item applies to the NN19 Sampler. If you have a number of samples that belong together but haven’t been mapped to key zones, you can use the “Automap Samples” function. This is used in the following way:
1.
One of the samples will be loaded to a key zone spanning the whole range, and the rest will reside in the sample memory.
2.
Now the samples currently in memory will be arranged automatically so that:
Most audio editing programs can save root key information as part of the file.
The root key will always be in the middle of each zone, with the zone extending both down and up in relation to the root position. Hence, no key zone high or low limits have to be manually set!
Mapping Samples Without Root Key or Tuning Information:
Some samples may not have any information about root key or tuning stored in the file (nor indicated in the file name). If this is the case, you can still make use of the Automap function:
1.
One of the samples will be loaded to a key zone spanning the whole range, and the rest will reside in the sample memory.
2.
Without any information stored in the file, or if the file name doesn’t indicate the root key, you will have to use your ears for this step. Play the sample across different areas of the keyboard and listen to where it sounds the most “natural”. As long as you are in the general area of the correct root key, the result should be o.k. You can always adjust this later.
3.
Proceed like this until you have set a root key for all the samples.
4.
The samples will be automatically mapped according to their set root key positions!
Delete Sample/Remove Sample
Redrum:
*
The sample is removed from the drum sound channel and from sample memory.
 
NN19:
*
The sample is removed from the zone and from sample memory.
 
NN-XT:
*
The sample is removed from the zone and from sample memory. The zone still remains though. To delete a zone, you must use the option “Delete Zones”.
Delete Unused Samples
This menu item is used for the NN19 Sampler. When you select it, all samples that are not assigned to a key zone are deleted from sampler memory.
This way you can make sure that you are not wasting any sample memory for samples that are not actually used.
Split Key Zone
This menu item is used for the NN19 Sampler. It splits the currently selected key zone in the middle. The new zone is the upper half of the split, and is empty. The dividing point has a “handle” above it.
Delete Key Zone
This menu item is used for the NN19 Sampler. It deletes the currently selected key zone from the key map.
Reload Samples
This menu item is used with the NN-XT sampler. When you select this, any changes you have made on a loaded sample using the sample parameters (root key, loop settings, etc.) are immediately undone, and the settings revert back to the original.
Add Zone
This menu item is used with the NN-XT sampler. It is used for adding an empty zone to the key map. An empty zone can be resized, moved and edited in the same way as zones that contain samples.
An empty zone is indicated with the text “**No Sample**”. After you have added an empty zone, you can assign a sample to it.
Copy Zones
This menu item is used with the NN-XT sampler. It copies the selected zone(s), and all of its settings - including references to any sample it may contain - and places it in the clipboard buffer. You can then select “Paste Zones” to create a new zone that is an exact replica of the copied zone(s). Note that copying/pasting zones can also be performed between separate NN-XT devices.
Paste Zones
This menu item is used with the NN-XT sampler. If you have used the “Copy Zones” command, with any number of selected zones, you can create exact duplicates of these by using the “Paste Zones” command. The pasted zones will then be added below any existing zones in the key map.
Duplicate Zones
This menu item is used with the NN-XT sampler. It lets you duplicate any number of already existing zones (containing samples or empty).
1.
2.
The selected zones will now be copied and automatically inserted below the last one in the key map display.
The duplicated zones will contain references to the same samples as the original zones. They will also have the exact same key ranges and parameter settings.
Delete Zones
This menu item is used with the NN-XT sampler. Selecting this option will remove both the selected zones, and any samples they may contain.
Select All Zones
This menu item is used with the NN-XT sampler. This option will automatically select all zones in a key map.
Copy Parameters to Selected Zones
This menu item is used with the NN-XT sampler. It lets you easily copy parameter settings from one zone to any number of other zones. Proceed as follows:
1.
By this we mean the zone with the settings you wish to copy, and the zone(s) to which you want to copy the settings.
2.
Focus is indicated by a thick border.
3.
All the selected zones will now get the exact same parameter settings.
*
Sort Zones by Note
This menu item is used with the NN-XT sampler. This option lets you automatically sort the selected zones within a Group in descending order according to their key ranges. When you invoke this option, the selected zones will be sorted from top to bottom in the display starting with the one with the lowest range. If two or more zones have the same key range, they are instead sorted by velocity range.
Sort Zones by Velocity
This menu item is used with the NN-XT sampler. This option lets you automatically sort the selected zones within a Group in descending order according to their set low or high velocity values.
When you invoke this option, the selected zones will be sorted from top to bottom starting with the one with the highest “Lo Vel “value.
If two or more zones have the same velocity range, they are instead sorted by key range.
Group Selected Zones
This menu item is used with the NN-XT sampler. It lets you put any number of selected zones together in a group.
Grouping zones is good for two things:
*
For example if you have created a layered sound consisting of piano and strings, you could put all string samples in one group and all piano samples in one group. Then you can quickly select all piano samples and make an adjustment to them by trimming a parameter.
*
For example, you may want to set a group to legato and monophonic mode and add some portamento so that you can play a part where you slide between notes.
Proceed as follows:
1.
The zones don’t have to be contiguous in order to be grouped. Regardless of their original positions in the samples column, they will all be put together in succession.
2.
The zones are grouped.
Note that there is always at least one group, since the zones you create are always grouped together by default.
Set Root Notes from Pitch Detection
This menu item is used with the NN-XT sampler. All instrument sounds have an inherent pitch. When playing a sample of such a sound on the keyboard, the keys you play must correspond to that pitch. For example, you may have recorded a piano playing the key “C3”. When you map this onto the NN-XT key map, you must set things up so that the sampler plays back the sample at original pitch when you press the key C3, and this is done by adjusting the root note.
The NN-XT features a pitch detection function to help you set the root keys of loaded samples. This is useful if you for example load a sample that you haven’t recorded yourself, and you don’t have any information about its original pitch.
Proceed as follows:
1.
2.
The samples in all the selected zones will now be analyzed, and the detected root keys will automatically be set for you.
*
Automap Zones
This menu item is used with the NN-XT sampler. The automap function can be used as a quick way of creating a key map, or as a good starting point for further adjustments of a key map.
Automap works under the assumption that you intend to create a key map for a complete instrument, for example a number of samples of a piano, all at different pitches.
1.
Now you have three options:
*
*
*
2.
3.
All the selected zones will now be arranged automatically in the following way:
*
*
The key ranges are set up so that the split between two zones is exactly in the middle between the zones’ root notes. If two zones have the same root key they will be assigned the same key range.
Automap Zones Chromatically
This menu item is used with the NN-XT sampler. It will map the selected zones chromatically (one zone per semitone) from C2 and up. This is useful if you are mapping non-pitched material (e.g. drum or percussion samples) and want one sample per key. Before you select Automap Zones Chromatically, you may want to adjust the order of the zones, since this determines which zone is mapped to which key.
Create Velocity Crossfades
This menu item is used with the NN-XT sampler. This is used for automatically setting up velocity crossfades for smooth transitions between overlapping zones. To set up crossfades, you adjust the fade out and fade in values for the overlapping zones.
An example:
*
*
This means that this zone will play at full level with velocity values below 40, With higher velocity values, it will gradually fade out.
*
This has the effect that as you play velocity values up to 80, this zone will gradually fade in. With velocity values above 80, it will play at full level.
Instead of manually setting up a crossfade, you can let NN-XT do it for you. Proceed as follows:
1.
2.
You can select as many zones as you wish, not just one pair of overlapping zones.
3.
NN-XT will analyze the overlapping zones and automatically set up what it deems to be appropriate fade in and fade out values for the zones.
Note the following important points:
*
At least one of the zones must have a partial velocity range (see “Setting crossfading for a Zone”).
*
Copy Loop to Track
This menu item is used for the Dr. Octo Rex loop player device. To be able to make your REX loop start at the same time as other sequencer or pattern data, you “convert” the slices in the loop to note clips in the sequencer:
1.
2.
You may want to make sure that this area doesn’t contain any note clips already, to avoid overlapping clips.
3.
4.
Now, the program will create a note for each slice, positioned according to the timing of the slices. The notes will be laid out in semitone steps, with the first note on C1, the second on C#1 and so on, with one semitone for each slice. If the range between the locators is longer than the loop length, the loop notes will be repeated to fill out the loop.
Now you can reorder, overdub onto, and otherwise edit the note data on the edit lanes in the sequencer.
Copy Pattern to Track
This menu item is used for the Redrum drum machine and Matrix pattern sequencer. It converts the selected pattern to notes on a sequencer track. Proceed as follows:
1.
When working with a Redrum, you want to select the track for the Redrum device. For the Matrix, you would typically select the track for the Matrix’ target device (the instrument device to which the Matrix is connected). This is because the Matrix itself produces no sound, so the notes won’t do any good on the Matrix track.
2.
If the range set is longer than the pattern(s), the data will be repeated to fit the range.
3.
4.
Note clips will be created between the left and right locators, according to the selected pattern.
*
*
Otherwise, both the main sequencer and the pattern sequencer will play the drum sounds, simultaneously.
*
*
See “Convert Pattern Automation to Notes”.
Shift Pattern Left/Right
These menu items are used for Redrum, Matrix, Thor (called “Shift Sequencer Pattern Left/Right”) and the RPG-8 Arpeggiator (when the Pattern editor is activated).
The Shift Pattern functions move the notes in a pattern one step to the left or right.
Shift Drum Left/Right
These menu items are used for Redrum.
The Shift Drum functions move the notes for the selected instrument one step to the left or right.
Shift Pattern Up/Down
These menu items are used for the Matrix.
The Shift Pattern functions will transpose all the notes in a pattern one semitone up or down.
*
Random Sequencer Pattern
This menu item is used for the Thor synthesizer. It will assign random values to the pattern sequencer steps, but only for the property selected with the Edit knob. For example, if “Note” is the edited property, only the note pitches will be randomized; leaving velocity values, lengths, durations and curves intact.
*
*
*
Randomize Pattern
This menu item is used for the Redrum, Matrix and RPG-8 Arpeggiator (when the Pattern editor is activated).
The Randomize Pattern function create random patterns. These can often be great starting points and help you get new ideas.
*
Randomize Drum
The Randomize Drum functions creates random patterns for the selected drum sound channel in the Redrum drum machine.
Alter Pattern
This menu item is used for the Redrum, Matrix and RPG-8 Arpeggiator (when the Pattern editor is activated).
The Alter Pattern function modifies existing patterns. Note that there must be something in the pattern for the function to work on - using an Alter function on an empty pattern will not do anything.
*
Alter Drum
This function modifies existing patterns for the selected drum sound in Redrum. Note that there must be something in the pattern for that channel for the function to work - using an Alter function on an empty pattern will not do anything.
Invert Pattern
This menu item is used for the RPG-8 Arpeggiator device, when the Pattern editor is activated. This inverts the pattern, so that active steps become rests and vice versa.
Arpeggio Notes to Track
This menu item is used for rendering the arpeggio from an RPG-8 to actual note clips. For this to work, you must have recorded chords or notes on the RPG-8 track and set the locators (so that an arpeggio is generated when you start playback from the left locator).
“Arpeggio Notes to Track” will create a note clip between the locators on the selected track, containing the generated arpeggio notes. You can then mute the original note clip(s) on the RPG-8 track and edit the rendered arpeggio notes as usual.
Create Track for.../Delete Track for...
A rack device can have one sequencer track or no sequencer track. Instrument devices are by default created together with a sequencer track, while effect devices, mixers etc. are created without tracks.
*
Select it to create an empty sequencer track for the device.
*
It will remove the sequencer track and all its contents, but leave the device.
Go To Track for
*
Insert Bars Between Locators
*
This function inserts an empty area between the locators in the main sequencer. All events after the left locator are moved to the right to “make room” for the inserted area. See “Inserting bars” for more information.
Remove Bars Between Locators
*
This function removes all material between the locators in the main sequencer. All events after the right locator are moved to the left to “fill out” the gap after the removed section. See “Removing bars” for more information.
Edit
This opens the selected clip(s) in Edit mode in the sequencer. If multiple note clips are selected, they are opened for editing in Multi Lanes mode, see “Multi Lanes editing”.
Bounce in Place
The Bounce in Place function lets you bounce the sound generated from playing back note or audio clips, with any insert effects and channel strip coloration - but without Send FX and Master Section settings - to a new audio clip on a new audio track. See “Bounce in Place”.
Bounce Clips to New Samples (Audio Clips)
It’s possible to bounce Audio Clips to new Song Samples. You could then edit the samples in the Edit Sample window and then load into a sampler device for playback. See “Bounce Clip(s) to New Sample(s)”.
Bounce Clip to Disk... (Audio Clips)
This function allows you to export a selected audio clip as a WAV or AIFF file to disk. See “The “Bounce Clip to Disk” function”.
Bounce Clips to New Recordings (Audio Clips)
This function allows you to export the recording of a selected audio clip to an additional Comp Row. See “Bounce Clip(s) to New Recording(s)”.
Bounce Clip to REX Loop (Single Take Audio Clips)
This lets you bounce an open Single Take audio clip to a Rex file. The Rex file ends up on the Song Samples tab in the Tool Window. See “Bounce Clip to REX Loop”.
Bounce Audio Clips to MIDI
It’s possible to convert Single Take audio clips to note clips. This is especially useful for monophonic audio that can be opened in Pitch Edit mode. See “Bouncing audio to MIDI notes”.
Stretch and Transpose Type
This function allows you to choose which Stretch and Transpose Type to use for a selected Audio Clip. See “Opening audio clips for editing” for more information.
Correct Pitch (Audio in Pitch Edit Mode)
This lets you correct pitches of selected notes, or of all notes in an audio clip in Pitch Edit mode. See “Correcting pitches”.
Reset Pitch (Audio in Pitch Edit Mode)
This lets you reset the pitches of selected notes, or of all notes in an audio clip in Pitch Edit mode. See “Resetting pitches”.
Split At Slices (Single Take Audio Clips)
This lets you split an open Single Take audio clip at the selected Slice Markers, and thus create several separate audio clips out of a bigger one. See “Split at Slices”.
Split At Notes (Single Take Audio Clips)
This lets you split an open audio clip in Pitch Edit mode at the selected notes, and thus create several separate audio clips out of a bigger one. See “Splitting the clip at notes”.
Revert Slices (Single Take Audio Clips)
This lets you undo all Slice Marker edits you made in an open Single Take audio clip and revert to the clip the way it was before you edited it. See “Revert All Slices”.
Revert Notes (Notes in Single Take Audio Clips in Pitch Edit Mode)
This lets you “undo” all edits you have made in Pitch Edit mode (similar to the “Revert Slices” function in Slice Edit mode). See “Reverting all notes”.
Enable/Disable Stretch (Audio Clips)
This function lets you decide if a selected audio clip should stretch and follow tempo changes in the song. When disabled, the audio clip doesn’t follow the song tempo. When enabled, the audio clip is stretched and follows the song tempo of the sequencer. See “About tempo changes and tempo automation of audio tracks”.
Delete Unused Recordings (Audio Clips)
This function deletes all recordings that are not used in the selected clip - or anywhere else in the song. By using this function, the file size of the song can be reduced. See “Delete Unused Recordings”.
Heal Clip Safe Clips (Audio Clips)
This function heals all selected audio clips that are affected by the Clip Safe function in the Propellerhead Balance audio interface. See “Recording using the Clip Safe function in Propellerhead Balance”.
*
Delete Clip Safe Audio (Audio Clips)
This function deletes the Clip Safe signal from selected audio clips. The clips revert to being ordinary clips (no clipped waveform indication, and no healing button). See “Recording using the Clip Safe function in Propellerhead Balance”.
*
Normalize Clips (Audio Clips)
This function increases the overall audio level of selected Audio Clip(s) so that the loudest peak touches 0 dB. See “Normalizing audio clips”.
Reverse
This function reverses selected Clip(s) and plays them back backwards, from the end to the start. See “Reverse” for information about reversing note and automation clips and “Reversing audio clips” for information about audio clips.
Stretch Type for New Recordings
Here you can set what Stretch and Transpose Type your following recordings on the selected Audio Track should use by default. (You can always change the Stretch and Transpose Type for your recordings afterwards, if you like.)
Convert Pattern Automation to Notes
If you have recorded or drawn pattern changes on a Redrum or Matrix track, you can have the whole track converted to notes, in the following way:
1.
2.
For each pattern clip, the corresponding pattern is converted to note clips on the track (following the same rules as for the “Copy Pattern to Track” function). The track will play back just the same as when you played the pattern device with the pattern changes.
*
“Enable Pattern Section” (Redrum) and the Pattern Enable switch (Matrix) are automatically turned off.
*
This is because the Matrix doesn’t make any sound itself.
Convert Block Track to Song Clips
This item is available only when the Blocks Track is on. Selecting this item will convert all Block Automation Clips on the Block Track to regular clips on the respective tracks and lanes in the song.
Commit to Groove
This function is available if the track list has focus and one or several note lanes on the selected track have ReGroove Mixer channels assigned.
Commit to Groove will move all notes (on all note lanes on the selected track) to their grooved positions and then reset the groove settings to “No Channel” for the note lanes. In other words, this makes the groove “permanent” - the track will play back exactly as before, but you can now view and edit the grooved notes.
New Note Lane
Adds a new note lane to the selected track(s). This is the same as clicking the “+ Lanes” button above the track list.
Merge Note Lanes on Tracks
If there is more than one note lane on the selected track, this menu item will merge all note clips on all lanes into a single lane.
*
This is the same rule as during playback - performance control data in the topmost lane has priority.
Get Groove From Clip
This requires that a single note clip is selected. The function will look at the notes in the clip and extract a groove from these. You can apply this groove to other note lanes or save it as a groove patch for later use.
1.
You may for example record a drum pattern, or use the notes playing the slices in a REX loop.
*
2.
This is where your custom groove will end up - choose an unused channel if you don’t specifically want to replace a groove.
3.
The groove is assigned to the ReGroove Mixer channel as “User”. By selecting that ReGroove Mixer channel for other note lanes, you can make the music fit with your custom groove.
4.
Here you can adjust how the groove should affect note timing, velocity and length and also save the groove as a ReGroove Patch (including the settings of the sliders in the window).
Read more in “The ReGroove Mixer”.
Join Clips
This requires that more than one clip is selected on the same lane. Join Clips will join the selected clips together.
*
Mute Clips/Unmute Clips
If there are one or several unmuted clips selected, this menu item is called “Mute Clips”. Muted clips (shown with angled stripes and dimmed borders) will not play back but can be edited and arranged as usual.
If only muted clips are selected, the menu item is called “Unmute Clips”. The keyboard shortcut for Mute/Unmute Clips is [M].
Crop Events to Clips
Notes or automation events can be positioned outside the start or end of a clip. For example, this would happen if you have resized a clip after recording. Notes outside the clip become masked and won’t be heard on playback, but you can view and edit them if you open the clip.
Selecting “Crop Events To Clips” removes all such outside events from the selected clip(s). If tracks are selected in the track list, this function is performed on all clips on the selected track(s). See “About masked recordings and events” for more details.
Add Labels to Clips/Remove Labels from Clips
This allows you to name the selected clips.
*
*
If you have several clips selected, the “untitled” label will be added to all selected clips. To edit the names of the clips, you need to double click each label.
*
See “Naming clips” for more information.
Clip Color
Allows you to select a color for the selected clip(s). See “Coloring clips” for more details.
Channel Color/Track Color
Allows you to select a color for the selected channel(s) and track(s). The selected color is shown in the track list and will be assigned to all new clips you create on the track. However, clips that are already on the track will not be affected - to change color of existing clips, select the clips and use the “Clip Color” setting.
*
See “Coloring tracks”.
Set Loop to Selection
This command sets the Left and Right Loop Locators to encompass all selected clips in the arrangement.
Set Loop to Selection and Start Playback
This command sets the Left and Right Loop Locators to encompass all selected clips in the arrangement. Then, sequencer playback is automatically started in Loop Mode. This function also has a keyboard shortcut: press [P].
Adjust Alien Clips to Lane
If an automation clip has been moved to a lane for a parameter with a different range (for example if you cross-browse to another device type), it will be shown as alien and won’t play back. Depending on the data, you may be able to fix this by selecting the clip and selecting “Adjust Alien Clips to Lane”. This scales the automation data in the clip to fit the range of the current lane.
*
See “About alien clips” for more information.
Select Notes of Same Pitch
If you have selected one or several notes in an open note clip, this function automatically selects all other notes of the same pitches in that clip.
Move/Duplicate Selected Notes to New Lane
If you have selected one or several notes in an open note clip, this function automatically moves/duplicates the notes to a new clip on a new note lane.
Quantize
This lets you quantize note clips and Single Take audio clips, as well as selected notes in note clips, selected Slices in Single Take audio clips and selected notes in audio clips in Pitch Edit mode. See “Quantizing audio” and “Quantize”.
Edit Sample
This command is available when a sample is selected in the Song Samples location. Selecting Edit Sample opens the sample in the Edit Sample window. See “Editing samples” for more information.
Duplicate Sample(s)
This command is available when one or several samples are selected in the Song Samples location. Select this to create a duplicate of the selected sample. The duplicated sample is placed in the All Self-contained Samples and Unassigned Samples folders. Several selected samples can be duplicated in one go. See “Duplicating samples” for more details.
Export Sample(s)
This command is available when one or several samples are selected in the Song Samples location. Select this to export the selected sample to disk. A dialog appears where you can select file format. Several selected samples can be exported in one go. See “Exporting samples” for more details.
Delete Sample(s)
This command is available when one or several samples are selected in the Song Samples location. Select this to permanently delete the selected sample(s) from the song. Note that samples from the Factory Soundbank and from ReFills will not be deleted from their original locations - only from the song document. Several selected samples can be deleted in one go. See “Deleting samples from a song” for more details.
Edit Keyboard Control Mapping...
This menu command is available when Keyboard Control Edit Mode is selected. It will open a dialog where you can assign a Keyboard Control for a selected parameter. See “Editing Keyboard Control” for more information.
Clear Keyboard Control Mapping
This menu command is available when Keyboard Control Edit Mode is selected. It will remove the Keyboard Control mapping for a selected assigned parameter. See “Editing Keyboard Control” for more information.
Clear All Keyboard Control Mappings for Device
This menu command is available when Keyboard Control Edit Mode is selected. It removes all keyboard mapping you have set up for the selected device. See “Editing Keyboard Control” for more information.
Edit Remote Override Mapping...
This menu command is available when Remote Override Edit Mode has been activated on the Options menu. It opens a dialog where you can assign a Remote Override for the selected parameter. See “Remote Override mapping”.
Clear Remote Override Mapping
This menu command is available when Remote Override Edit Mode has been activated on the Options menu. It will remove the Remote Override mapping for a selected assigned parameter. See “Remote Override mapping”.
Clear All Remote Override Mappings for Device
This menu command is available when Remote Override Edit Mode has been activated on the Options menu. It removes all Remote Override mapping you have set up for the selected device. See “Remote Override mapping”.
Copy/Paste Remote Override Mappings
These menu commands are available when Remote Override Edit Mode has been activated on the Options menu. You can use them to copy override mappings from one device and paste them into a device of the same type.
If the device you paste into is in the same song as the device you copied from, the operation will replace the existing overrides. See “Remote Override mapping”.
Go to Product Page...
With a Rack Extension device selected in the rack, selecting this item will start up your default web browser, which will take you to the product page for the R.E. at the Propellerhead web site.
Preferences – General
Mouse Knob Range
This lets you adjust the response sensitivity of the various knobs in Reason when manipulating them with the mouse. A higher sensitivity gives a higher degree of precision. You can choose between Normal, Precise and Very Precise.
Automation Cleanup Level
The Automation Cleanup setting reduces the number of automation points when you record or draw automation. Adjust this setting if you find that recording or drawing results in too many or too few automation points.
Trigger Notes while Editing
When this is selected, transposing notes, by manually moving them with the Selection Tool, will make the notes trigger - and sound. This is useful since you will hear when the notes reach the correct pitches.
Return to last start position on stop
When active, clicking Stop in the sequencer will make the Song Position Pointer automatically return to the last start position. If not active (default), the Sequencer will simply stop at its current position.
Reduce Cable Clutter Setting
The selected alternative determines how cables on the back of the rack should be displayed when “Reduce Cable Clutter” is selected on the Options menu:
*
All other (non-selected) devices will have “transparent” cables to make it easier to distinguish the cables of selected devices.
*
All devices with auto-routed cables will have “transparent” cables to make it easier to distinguish the manually routed cables.
*
All cable connections on devices will be indicated with colored dots in the jacks, and no cables will be displayed.
See “Cable appearance” for more details.
Cable animation
Cables in Reason are animated in a lifelike fashion when flipping the Rack and making connections. Should you so wish, you can choose to disable the cable movement animation by deactivating this checkbox.
Show parameter value tool tip
Normally, if you hold the mouse pointer over a parameter on a device panel for a moment, a Tool Tip appears displaying the name and the current value of the parameter. If you uncheck this option, Tool Tips will not be displayed.
Show automation indication
If a parameter is automated in the sequencer, this is by default indicated by a green frame around the parameter on the device panel. If you uncheck this option, automation will not be indicated.
Theme
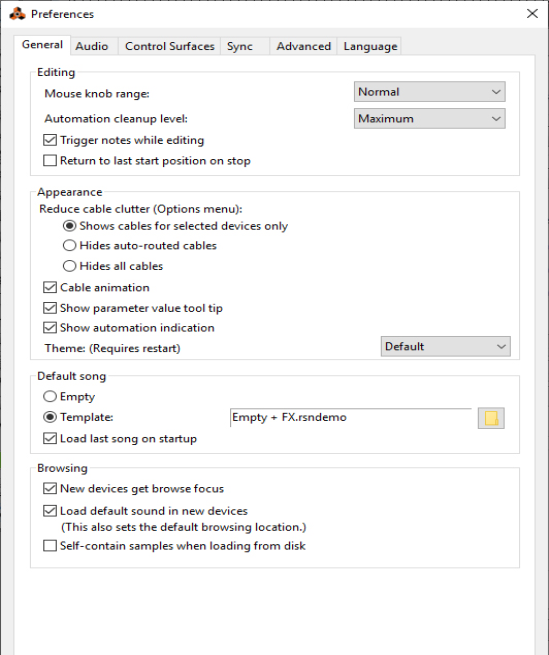
Here you can choose from a couple of different visual themes, i.e. how the user interface should be visually presented. The selected theme/color affects the Sequencer, Browser and Transport Panel areas. See “About different Themes”.
*
Default song
It’s possible to specify a certain song document which will automatically open as a “template” each time you select “New” from the File menu. The Default Song could be an empty document, a song you have created earlier, or a factory made Template song. See “Setting up a Default Song” for information on how to select Default Song.
Load last song on startup
Checking this automatically opens the last saved song each time you launch Reason.
*
New devices get browse focus
When this is active, Browse focus is automatically set to new devices as soon as they have been created. This means that you can immediately start to browse for, and load, compatible patches for the devices you just created. Browse focus is indicated by orange sidebars and an orange patch section on the devices. The top section of the Browser also gets an orange label with the device’s current patch name printed on it.
Load default sound in new devices
When this is activated and you create a new device (of a device type that supports patches), a default patch will be loaded. This way you can be sure that a new device generates sound right away. The default sound will also determine the default location in the Factory Sound Bank when you browse for patches for the new device.
If you turn this off, new devices will be initialized - parameters are reset to their default values and no samples are loaded in sample-based devices.
*
Self-contain samples when loading from disk
When this is activated, any samples you load into a sampler device from disk will automatically become self-contained and saved together with the rest of the song data when you save your Song.
Preferences – Audio
Master tune
This lets you adjust the global tuning in Reason. Standard tuning is “middle A” at 440 Hz. You can adjust this by
+/- 100 cents. The Master Tune setting affects the tuning of all sound sources in Reason, including the Tuner function on the Audio Tracks. It also affects the tuning of the Redrum and Dr. Octo Rex loop player.
*
*
Audio card driver – Windows
This menu lists all the available Audio Card Drivers on your system, and lets you select which one Reason should use. Which option to select depends on the audio hardware:
With an ASIO driver written specifically for the audio hardware you will get lower latency (see below), support for higher sampling frequencies (up to 192 kHz in 24 bit/32 bit float resolution), and possibly better support for additional hardware features such as multiple outputs.
*
Audio device – macOS
This menu lists all the available Audio Devices on your system, and lets you select which one Reason should use. Which option to select depends on the audio hardware:
With a Core Audio driver written specifically for the audio hardware you will get lower latency (see below), support for higher sampling frequencies (up to 192 kHz in 24 bit/32 bit float resolution), and possibly better support for additional hardware features such as multiple outputs.
Sample rate
Reason handles all internal audio processing in 32-bit floating point resolution, with 64-bit summing in the mix bus in the Main Mixer Master Section. However, the resolution of the input and output audio is determined by the hardware audio interface. That is, if you have a 24-bit audio card, Reason will record and output audio in 24-bit resolution, and if you have a 20-bit audio card, audio will be recorded and played back in 20-bit resolution.
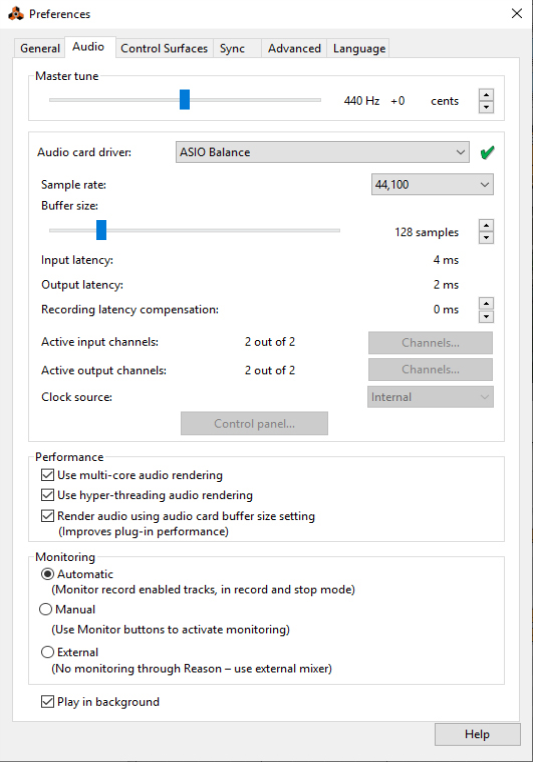
The Sample Rate can be specified on the Audio tab in the Preferences dialog. See “Sample Rate settings for recording and playback” for more details.
Buffer size
The Buffer Size determines the Input and Output Latency of the audio. Generally, the smaller the Buffer Size, the lower the latency. However, too low a Buffer Size setting could result in clicks, pops, dropouts, etc. in the audio. Therefore, the Buffer Size should be set to an “optimal” value rather than to the lowest value. See “Buffer Size settings” for more information.
Input and Output latency
The Input latency is the delay between when the audio is “sent” from a connected microphone or instrument and when it’s detected by Reason. Output latency is the delay between when audio is “sent” from Reason and when you actually hear it. The latencies in an audio system depends on the audio hardware, its drivers and their settings.
When you select a driver, its latency values are automatically reported by the audio card and displayed in the Preferences-Audio dialog. Depending on the audio hardware and the driver, you may be able to adjust these values:
This opens the hardware’s ASIO Device Control Panel, which may or may not contain parameters for adjusting the latency. Usually this is done by changing the number and/or size of the audio buffers - the smaller the audio buffers, the lower the latency. Please consult the documentation of your audio hardware and its ASIO drivers for details!
OK, so why not just set the latency to the lowest possible value? The problem is that selecting too low a latency is likely to result in playback problems (clicks, pops, dropouts, etc.). There are several technical reasons for this, the main one being that with smaller buffers (lower latency), the average strain on the CPU will be higher. This also means that the more CPU-intensive your Reason song (i.e. the more tracks and devices you use), the higher the minimum latency required for avoiding playback difficulties.
See “About latency” for more information.
Recording latency compensation
If you are monitoring via an external mixer, and have selected “External” in the “Monitoring” section on the “Audio” page in Preferences (see “Monitoring”), there might be situations where you experience that the recorded audio is generally played back too early - or too late - in the song. This could be because the latency values reported to Reason by the audio card were not completely accurate.
If you should experience that your audio recordings are played back too early or too late compared to the instrument tracks in your song, you can adjust this by editing the Recording Latency Compensation parameter.
See “Recording Latency Compensation” for information.
Active input and output channels
This displays the number of audio input and output channels the currently selected audio hardware supports. If your audio card has multiple inputs and/or outputs, and an audio driver that supports this is selected, the “Channels...” button will be enabled. Clicking this will bring up a window with check boxes for all available inputs and outputs. By ticking these boxes, you are able to select which input and/or output channels should be active.
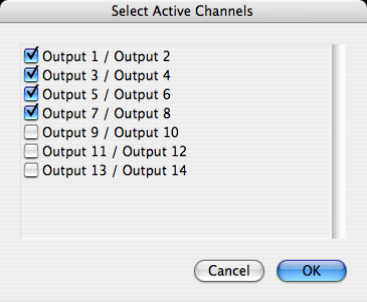
Active inputs and outputs will be also indicated with yellow and green LEDs in the Reason Hardware Interface - see “How Reason communicates with your audio hardware”.
Clock source (ASIO Only)
If you are using an ASIO driver for your audio hardware, you have the possibility of selecting a Clock Source. This is used for determining the source to which audio playback should synchronize its sample rate. If you have an audio card and a driver that supports it, you can choose to synchronize to external sources.
Control panel
If you have selected an ASIO or Core Audio driver, this button brings up a control panel window specifically for that audio hardware. This may contain buffer settings, routing options, synchronization alternatives etc.
Use multi-core audio rendering
Reason fully supports MultiCore Audio Rendering. This means that if your computer has multiple CPU cores (quad-core, for example), or multiple CPUs, Reason takes advantage of this to significantly enhance the performance. If your computer has a multi-core CPU, or multiple CPUs, MultiCore Audio Rendering is active by default.
See “Audio Basics” for more information on how Reason handles audio.
Use hyper-threading audio rendering
As from version 9.5.1 Reason supports hyper-threading also for the audio processing. This could be worth enabling if you are using a multi-core CPU and should experience performance problems. Note, though, that enabling hyper-threading doesn’t necessarily solve all types of performance problems.
Render audio using audio card buffer size setting
The “Render audio using audio card buffer size setting” function should be selected (checked) for best plugin performance. When selected, the audio batches are rendered internally according to the set Buffer size (see “Buffer size” above). For example, if you have a Buffer size of 512 Samples, each audio batch will be 512 samples internally. Raising the Buffer size will let Reason process larger audio batches in one go, which is often more efficient. Many plugins are also more efficient when doing larger audio batches. if you are using DSP-heavy VSTs (mastering effects, for example), these will run a lot smoother with this function selected.
*
If unchecked (off), all audio batches are rendered internally at a fixed size of 64 samples - regardless of the Buffer size setting. This might be desirable if you are using feedback signal routings and CV connections in your songs, and want the internal latency of those connections to be fixed at a short value all the time. This might result in performance problems for DSP-heavy VSTs, though.
Unchecked will give the same performance as in previous Reason 10 versions.
Monitoring
In the Monitoring section you can choose how you want monitoring of the input signals to work on audio tracks.
*
Record enabling of audio tracks is done by clicking the Record Enable button on the track in the track list - see “Record enabling”.
*
*
*
In “External” mode it’s not possible to monitor in Reason.
Play in background
When this is activated, Reason will not “release its grip” on the audio hardware when another application is active.
Preferences – Control Surfaces
This is where you set up your MIDI hardware; keyboards and control surfaces.
*
Selecting a surface in the list allows you to edit its settings or delete it from the list, by clicking the corresponding “Edit” or “Delete” button.
*
This requires a USB connection or a two-way MIDI connection. Note that not all control surfaces support auto-detection - but you can always add control surfaces manually.
*
*
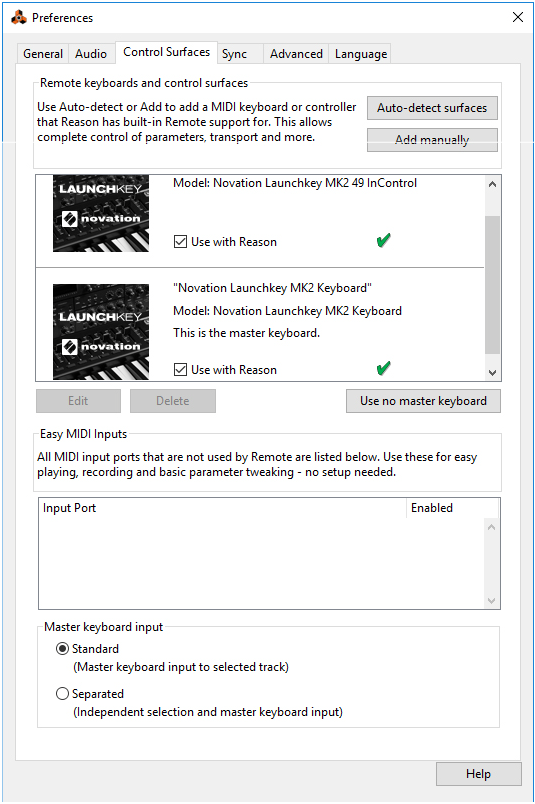
The surface designated as Master Keyboard cannot be locked to a specific device - it always follows the sequencer Master Keyboard Input. By selecting the Master Keyboard surface in the Attached Surfaces list and clicking this button allows you use Surface locking, although you will not be able to play the device. See “Locking a surface” in the Remote chapter for details.
Adding or editing a control surface
To add a control surface, click the “Add” button to open the Control surfaces dialog. If you want to edit the settings for an existing control surface, click the “Edit” button. Then proceed as follows:
1.
If you can’t find it on the menu, see below.
2.
If you can’t find it on the menu, see below.
3.
For some control surfaces, you need to select a specific preset to use the surface with Reason - this is noted here.
4.
If in doubt, you can click the “Find” button and then tweak a control or play a key on the control surface to have Reason find the correct input port for you.
You need to select ports on all MIDI Input pop-up menus.
In some cases this is labeled “Optional” - then you don’t have to make a selection. In other cases, a MIDI Output is required. This is the case if the control surface uses MIDI feedback - motor fader, displays, etc.
5.
6.
*
In some cases, Reason can restore a preset in the control surface to factory settings for you. If so, you will be informed about this.
Finally you return to the Control Surfaces Preferences page, where your added surface is now listed.
If your control surface model isn’t listed
If you can’t find your control surface listed on the Manufacturer or Model pop-up menus when you try to add it, this means that there’s no native support for that model. However, the program supports generic keyboards and controllers. Here’s what to do:
*
or, if the Manufacturer is listed but not your specific model:
*
In both cases, the options are:
Select this is you have a MIDI keyboard with programmable knobs, buttons or faders. You need to set up your control surface so that the controllers send the correct MIDI CC messages, depending on which Reason device you want to control - check out the MIDI Implementation Chart in the Reason documentation.
Select this if you have a MIDI controller with programmable knobs, buttons or faders (but without keyboard).
Again, you need to set your controllers to send the right MIDI CCs.
Select this is you have a MIDI keyboard without programmable knobs, buttons or faders. This is used for playing only (including performance controllers such as pitch bend, mod wheel, etc.) - you cannot adjust Reason device parameters with this type of control surface.
*
After selecting a model, proceed with selecting MIDI input as described above.
About the Master Keyboard
One of the control surfaces can be the Master Keyboard. This is like any other control surface, but it must have a keyboard and it cannot be locked to a specific Reason device (in other words, it always follows the MIDI input to the sequencer). This is the surface you use to play the instrument devices in Reason.
*
This is shown in the Attached Surfaces list on the Preferences page.
*
There can only be one Master Keyboard.
*
Easy MIDI Inputs
By default Reason automatically scans and detects any unused MIDI In port(s) on your computer. If you have a MIDI keyboard or MIDI control surface connected to your computer, Reason automatically connects and lets you use it for controlling Reason. This way you don’t have to do any manual set-up but can start controlling Reason right away.
See “Automatic set-up using the Easy MIDI Inputs function” for more details.
The Master Keyboard Input setting
This determines how you set Master Keyboard Input in the sequencer: to which track and device the Master Keyboard should be directed (which track to play from your keyboard):
This way you can just click anywhere on a track in the track list to select it for playing (or use the arrow keys to step up and down in the track list).
This is useful if you’re working with multiple selections in the track list, or if you want to select different tracks for editing without changing which device you play from your keyboard.
Preferences - Sync
External control
The External Control inputs provide up to 64 MIDI input channels divided into four buses, each with 16 channels.
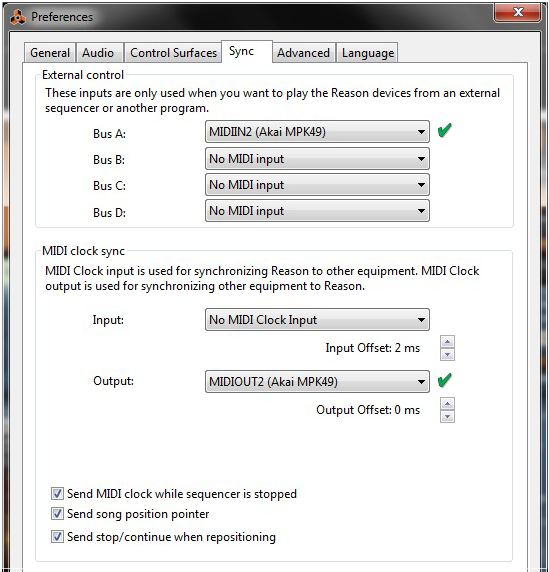
This could be an external hardware sequencer or sequencer software that is installed on the same computer as Reason. See the chapter “Synchronization and Advanced MIDI” for more details.
MIDI clock sync
Using the MIDI Clock Input, you can synchronize Reason to external devices (tape recorders, drum machines, stand alone sequencers, workstations etc.) and other computer programs running on the same or another computer.
By using the MIDI Clock Output, Reason can act as MIDI Clock Sync host for external equipment and applications.
As part of the MIDI Clock standard there are also options for sending out Start, Stop, Continue and Song Position Pointers, see “Using Reason as MIDI Clock Host”.
*
See the “Synchronization and Advanced MIDI” chapter for more information.
See “Adjusting for Latency” for more information.
Preferences – Advanced
On-screen piano keys
In this section you can specify what computer keyboard keys should be used for the On-Screen Piano Keys function.
*
*
*
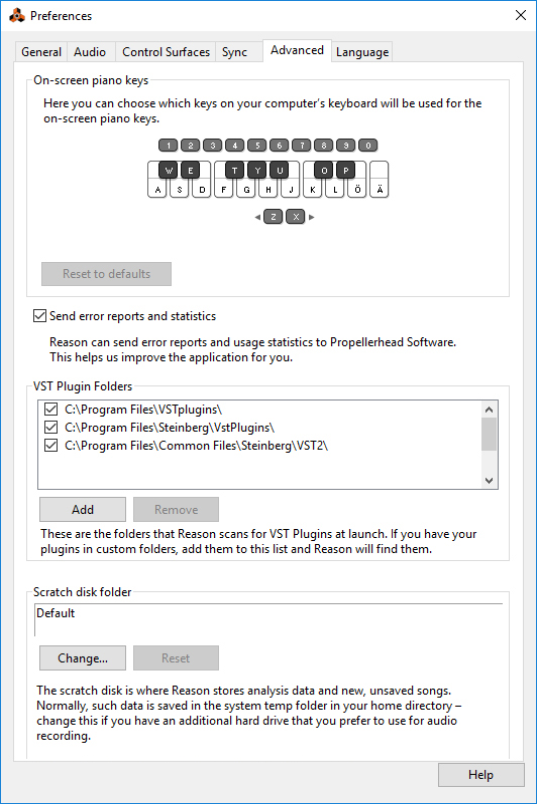
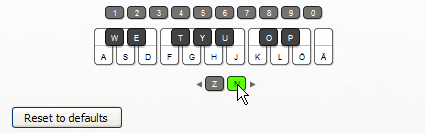
See the “On-screen Piano Keys” chapter for information on how to use the On-screen Piano Keys.
Send error reports and statistics
With this checkbox ticked you allow Reason to send error reports and usage statistics to Propellerhead to help us improve the program. These reports can also be extremely valuable, should we need to help you out with any support cases.
*
*
*
VST Plugin Folders
Here you can select the folders you want Reason to scan for VST plugins during each launch. See “Defining custom VST folders” for more information.
Scratch disk folder
Here you can select where you want to locate the Scratch Disk Folder. The Scratch Disk Folder is a temporary storage for recorded audio files before they have been manually saved in a song document file. By default, Reason places the Scratch Disk folder in the system temp folder in your home directory. You can manually change the Scratch Disk folder location if you like. See “Changing Scratch Disk folder location” for more information.
Preferences - Language (Windows only)
Language (Windows only)
Reason is localized to several different languages. The language setting affects menus, dialogs, tool tips and some display texts, but generally not the texts on the device panels. If you run Reason under Windows, you can select preferred language on this page.
*
*

Menu and Dialog Reference : Edit menu