NN-19 Sampler : About Key Zones and samples

About Key Zones and samples
Loading a Sample into an empty NN-19
1.
2.
This is located above the keyboard display to the left.
*
3.
*
The panel is dimmed in blue and a Sample Replace symbol appears in the center.
When you load the first sample into an empty NN-19, this will be assigned a key zone that spans the entire range of the keyboard, and the default Init Patch settings will be used.
Below the keyboard, the range, sample name, root key, tuning, level and loop status of the current key zone is displayed, each with a corresponding knob.
The light blue strip above the keyboard indicates the currently selected key zone, which is in this case the full range of the keyboard.
The inverted note on the keyboard indicates the “root key” of the sample. All samples contain a root key, tuning and level setting. If NN-19 is empty, a sample will have its root key placed on the middle “C” (C3) key.
4.
*
Loading SoundFont samples
The SoundFont format was developed by E-mu systems in collaboration with Creative Technologies. It is a standardized data format containing wavetable synthesized audio and information on how it should be played back in wavetable synthesizers - typically on audio cards. The SoundFont format is an open standard so there is a vast amount of SoundFont banks and SoundFont compatible banks developed by third parties.
The samples in a SoundFont are stored hierarchically in different categories: User Samples, Instruments, Presets etc. The NN-19 allows you to browse for and load single SoundFont samples, but not entire soundfonts.
1.
The Browser opens the SoundFont and displays the folders within it.
2.
This folder contains a number of samples which can be loaded like any other sample.
3.
The sample is loaded and assigned a key zone range that spans the entire keyboard. You can now make settings for it as with any other sample.
*
The panel is dimmed in blue and a Sample Replace symbol appears in the center.
Loading REX slices as samples
A slice is a snippet of sound in a REX File.
1.
The Browser will then display the slices as files inside that “folder”.
2.
The REX slice is loaded and assigned a key zone range that spans the entire keyboard. You can now make settings for it as with any other sample.
*
The panel is dimmed in blue and a Sample Replace symbol appears in the center.
In the rest of this manual, when we refer to importing samples, all that is said applies to REX slices as well.
Creating Key Zones
A “key zone” is a range of keys, that plays a sample. All key zones together make up a “key map”.
To create a new key zone, the following methods can be used:
*
This splits the currently selected key zone in the middle. The new zone is the upper half of the split, and is empty. The dividing point has a “handle” above it, see “Setting the Key Zone Range” below for a description.
*
The point where you click becomes the lower limit (or boundary) for the original key zone, and the upper limit for the new key zone.
The new empty key zone gets selected upon creation.
Selecting Key Zones
Only one key zone can be selected at a time. A selected key zone is indicated by a light blue (as opposed to dark blue) strip above the keyboard in the display. There are two ways you can select key zones:
*
*
Playing a note belonging to a non-selected key zone from your MIDI keyboard, will select the key zone it belongs to.
Setting the Key Zone Range
*
When you adjust the boundaries of a key zone, the surrounding boundaries are automatically adjusted accordingly.
You can change the key zone range in the following ways:
*
In the case of having two key zones split in the middle, you could thus change the lower limit for the upper (new) key zone and the upper limit for the original key zone.
*
Deleting a Key Zone
*
About Key zones, assigned and unassigned samples
When you load samples and rearrange your key mapping, you will often end up with samples that are not assigned to any key zone. In the following texts we refer to the samples as follows:
Adding sample(s) to a Key Map
If the sample hasn’t been loaded yet
1.
This can be empty, or contain a sample - it doesn’t matter for now.
2.
The following will happen:
*
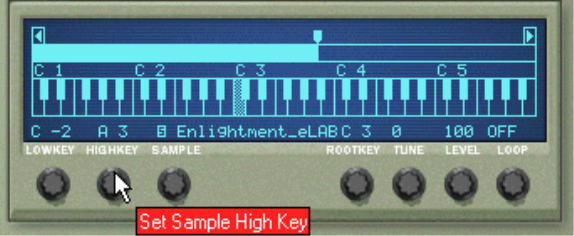
If the zone contained a sample prior to loading, this will be replaced, both in the zone and in the sample memory, unless the sample was also used by another key zone, in which case it will be kept.
*
If the sample is already loaded but unassigned
1.
This can be empty, or contain a sample - it doesn’t matter for now.
2.
The Sample knob.
Setting the Root Key
Once you have defined a key zone, and added a sample, you should set the root key for the sample.
*
Which key to select is normally determined by the pitch of the sample. For example if the sample plays a F#2 guitar note, click on F#2.
*
Removing sample(s) from a Key Map
*
The sample is removed from the zone and from sample memory.
*
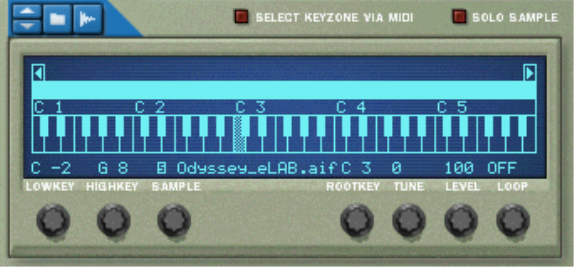
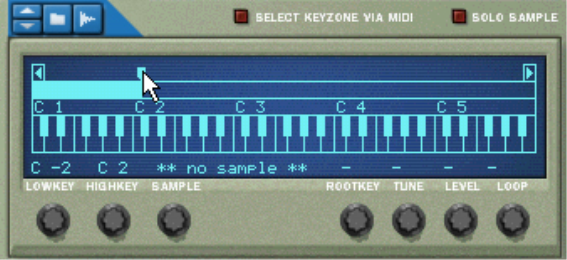
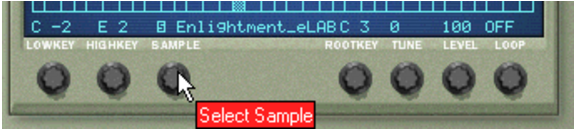
To remove a sample from a key zone/map, without removing it from memory, you can either select “No Sample” with the Sample knob for that zone, or simply replace it with another sample in the same way.
Removing all unassigned samples
*
Rearranging samples in a Key Map
There is no specific function for rearranging or trading places between samples and key zones. Simply select a key zone and change the current sample assignment with the Sample knob.
Setting Sample Level
For each key zone you can set a volume level, using the Level button below the display. If the transition between two key zones causes a noticeable level difference, this parameter can be used to balance the levels.
Tuning samples
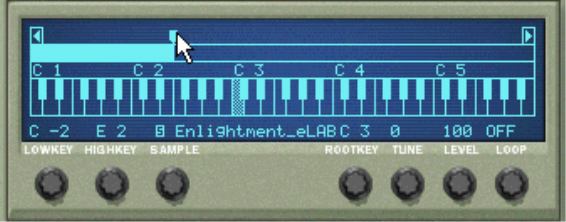
Sometimes you might find that the samples you wish to use in a key map are slightly out of tune with each other. This parameter allows you to tune each sample in a map by +/– half a semitone.
*
*
*
Note that if all the samples were slightly out of tune by the same amount in relation to the song you intend to use the samples in, it would be much simpler to use the Sample Pitch controls in the Osc section directly.
Looping Samples
A sample, unlike the cycles of an oscillator for example, is a finite quantity. There is a sample start and end. To get samples to play for as long as you press down the keys on your keyboard, they need to be looped.
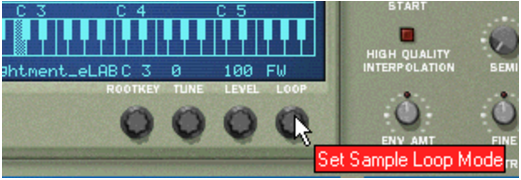
For this to work properly, you have to first set up two loop points which determine the part of the sample that will be looped, and make this a part of the audio file. You cannot set loop points in the NN-19, this has to be done in the Edit Sample window (see “Looping samples”) or in an external sample editor.
All included samples already have set loop points (if needed).
For each sample (or key zone), you can select the following Loop modes by using the Loop knob below the keyboard display:
*
No looping is applied to the sample.
*
The part between the loop points plays from start to end, then the cycle is repeated. This is the most common loop mode.
*
The part between the loop points plays from start to end, then from end to start, and then repeats the cycle.
*
About the Solo Sample function
The Solo Sample button will allow you to listen to a selected sample over the entire keyboard range.
*
This can be useful for checking if the root key is set correctly or if the current range is possible to extend etc.
*

NN-19 Sampler : About Key Zones and samples