NN-XT Sampler : Layered, crossfaded and velocity switched sounds

Layered, crossfaded and velocity switched sounds
Creating layered sounds
You can set things up so that two or more zones have overlapping key ranges - either completely or partially. This way you can create layered sounds, i.e. different samples that are played simultaneously when you press a key on your keyboard.
In the picture above, you can see a set of piano samples at the top, mapped across the key range.
Below these are a set of string samples that also span the entire key range.
Whenever you play a key within this keyboard range, the sound produced will be a combination of the piano and the string sample.
In addition, in the example above, the user has arranged the piano samples into one group and the string samples in another. This is convenient since it allows for quick selection of the entire piano map, for example for balancing its level against the strings.
About velocity ranges
When zones are set up so that their key ranges overlap – completely or partially – you can use velocity switching and crossfading to determine which zones should be played back depending on how hard or soft you play on your MIDI keyboard.
This is done by setting up velocity ranges, with or without crossfading.
Each time you press a key on your MIDI keyboard, a velocity value between 1-127 is sent to Reason. If you press the key softly, a low velocity value is sent and if you press it hard, a high velocity value is sent.
This velocity value determines which samples will be played and which will not.
Let’s say for example that you’ve mapped three different zones across the same key range:
This means that the sample in it will be triggered by velocity values between 1-40.
The sample in this zone will be played back by velocity values between 41-80.
The sample in this zone will be triggered by all velocity values above 80.
Overlapping velocity ranges
Let’s change the values above slightly:
Now, velocity values between 41 and 60 will trigger samples from both Zone 1 and Zone 2. Likewise, velocity values between 81 and 100 will trigger sounds from Zone 2 and Zone 3.
About full and partial velocity ranges
You can see which zones have modified velocity ranges in the key map display:
The top zone has a full velocity range (1-127), and the lower zone has a partial velocity range (any other range), which is indicated by stripes
Sorting Zones by velocity values
The Edit menu and the NN-XT context menu contain an item called “Sort Zones by Velocity”. This option lets you automatically sort the selected zones in the display in descending order according to their set low or high velocity values.
When you invoke this option, the selected zones will be sorted from top to bottom starting with the one with the highest “Lo Vel “value.
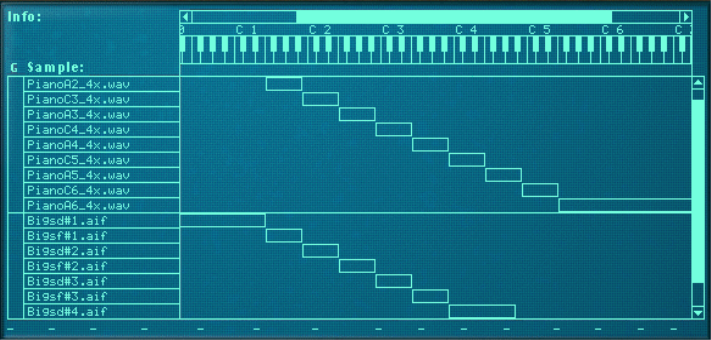
Note however, that the sorting is done strictly on a group basis. That is, only zones that belong to the same group can be sorted in relation to each other.
If two zones have the same velocity range, they are sorted by key range.
Setting velocity range for a Zone
To set up a velocity range for a zone, proceed as follows:
1.
2.
Adjusting the “Lo Vel” value for a zone.
“Lo vel” is the lowest velocity value that should trigger the sample in the zone - i.e. if a key is pressed so softly that the velocity is lower than this value, the sample will not be played.
“Hi vel” is the highest velocity value that should trigger the sample, which means that if a key is pressed so hard that the velocity is higher than this value, the sample will not be played.
About Crossfading Between Zones
At the bottom right in the sample parameter area are two knobs marked “Fade In” and “Fade Out”. These are primarily used for setting up velocity crossfades for smooth transitions between overlapping zones. In order to set up crossfades you adjust the fade out and fade in values for the overlapping zones.
Crossfading Between two Sounds
An example:
This means that this zone will play at full level with velocity values below 40, With higher velocity values, it will gradually fade out.
This has the effect that as you play velocity values up to 80, this zone will gradually fade in. With velocity values above 80, it will play at full level.
Another example:
Crossfading can be used to only fade in or fade out a certain sound. One common example is to set things up so that one sound plays the entire velocity range and another is faded in only at high velocity values.
This means that this zone will start fading in from velocity values 80 and will play at full level in the velocity range 110 to 127.
This can be used for example to add a rimshot to a regular snare sound or a harder attack to a softer violin sample.
Setting crossfading for a Zone
Manually
To set up a crossfade for a zone, proceed as follows:
1.
2.
*
Automatically
If you find it tedious to manually set up crossfades between zones, NN-XT can do it for you! The Edit menu and the NN-XT context menu contain an item called “Create Velocity Crossfades”.
1.
2.
You can select as many zones as you wish, not just one pair of overlapping zones.
3.
NN-XT will analyze the overlapping zones and automatically set up what it deems to be appropriate fade in and fade out values for the zones.
*
At least one of the zones must have a partial velocity range (see “About full and partial velocity ranges”).
*

NN-XT Sampler : Layered, crossfaded and velocity switched sounds