Note and Automation Editing : Automation editing

Automation editing
Overview
Automation in Reason is vector-based. This means that automation is stored in clips as automation events (points), connected by lines.
Automation lanes for a Mixer 14:2 Level slider (top), Mute button (middle) and Aux Send slider (bottom) in Edit Mode. The Aux Send automation clip at the bottom is open for editing.
Each automated parameter has its own Parameter Automation Lane.
Editing parameter automation
Parameter automation events can be edited both in the Song/Block View and Edit Mode. In the Song/Block View the parameter automation clip can be opened in sort of a “semi edit mode”, which shows the automation events of the selected clip. You can also edit the parameter’s Static Value. Editing automation events works in the same way, whether in the Song/Block View or in Edit mode.
Editing parameter automation in the Song/Block View
*
The parameter automation clip is now opened in the Song/Block View:
A parameter automation clip before and after opening it in the Song/Block View.
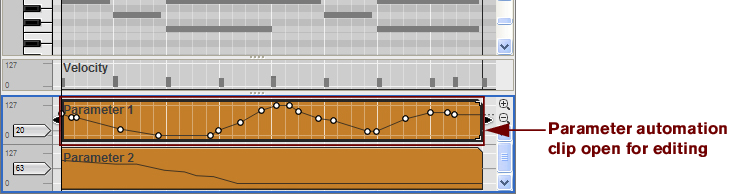
Here you can edit the parameter’s Static Value (see “Static Value Handles”) with the up/down arrow buttons to the left of the open clip. Alternatively, double-click and type in a new Static Value in the box.
In the open parameter automation clip, it’s possible to move, add and delete automation events in the same way as in Edit Mode using the Selection (Arrow), Pencil and Eraser tools - see “Editing parameter automation in Edit Mode”.
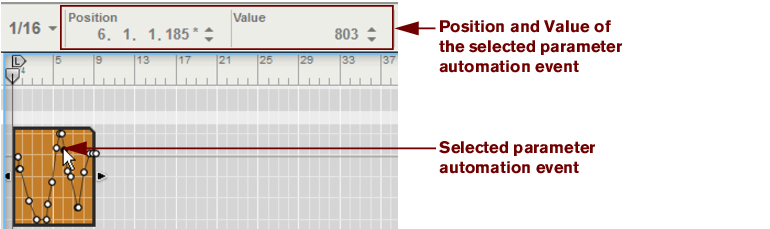
The event’s position and value can be edited numerically in the displays - see “Note and automation editing in the Inspector”.
*
*
In the picture above, a Mixer 14:2 Mute button is automated. The clip only contains a single automation point, but as we extend the clip in both directions, the value is automatically extended to the start and end of the clip. This means you can adjust the Mute automation time by moving and resizing the clip, without having to open the clip.
Editing parameter automation in Edit Mode
1.
*
*
Use the dividers if necessary to locate the automation clip to edit - these are located at the bottom of the Edit/Arrange Pane (not in the note clip). Parameter automation clips are distinguished by a “cut off” upper right corner.
An instrument track in Edit Mode with parameter automation clips at the bottom.
2.
The parameter automation clip is now open for editing.
The “Parameter 1” automation clip open for editing in Edit Mode.
In Edit Mode, the parameter’s Static Value is shown to the left in the automation lane. In this example, the Static Value is set to 20 - this means that the “Parameter 1” value will be set to 20 everywhere in the song except where there are automation clips for the parameter.
*
To fine adjust the Static Value, hold down [Shift] when you click and drag.
*
3.
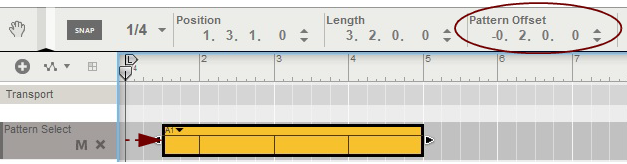
When moving automation events with the Selection (Arrow) Tool, Snap (see “Snap”) is taken into account if enabled. You can also resize the clip by dragging the clip handles.
*
These values can be edited numerically in the Inspector displays. See “Note and automation editing in the Inspector”.
About moving parameter automation events outside an open clip
If you move parameter automation events outside the boundaries of an open clip, the same rules apply as when moving note events outside an open clip. See “About moving notes outside or between clips”.
Drawing parameter automation events
To add new parameter automation events, do any of the following:
*
Double click, hold, and then drag to draw a series of automation points in the clip.
*
When dragging, the resulting curve (i.e. the number of points) depends on two factors; the selected “Automation Cleanup” setting in the Preferences menu (see “About Automation Cleanup”), and the snap value if Snap is activated (see “Snap”).
The length of the range is set with the Snap value.
Drawing an automation range.
Examples of stepped parameters could be device buttons and multi-mode selectors, and the Sustain Pedal performance controller.
Stepped automation.
About drawing parameter automation events outside an open clip
If you draw parameter automation events outside the boundaries of an open clip, the same rules apply as when drawing note events outside an open clip. See “About drawing notes outside an open clip”.
Deleting automation events
*
*
*
Reversing automation events
It’s possible to reverse the order of selected automation events in an open note or automation clip, see “Reverse”.
Editing performance controller automation
*
Performance controllers (Mod Wheel and Pitch Bend in the example above) are shown on separate Performance Controller Edit Lanes at the bottom of the open note clip. The performance controller curves are also indicated in the Clip Overview (top), and in the clip in the Song/Block View.
*
Creating new performance controller automation lanes
If you want to manually draw performance controller automation events for a controller which hasn’t already been
automated, you have to create a new Performance Controller Edit Lane for that parameter. Proceed as follows:
1.
2.
In this example, we select Aftertouch.
3.
4.
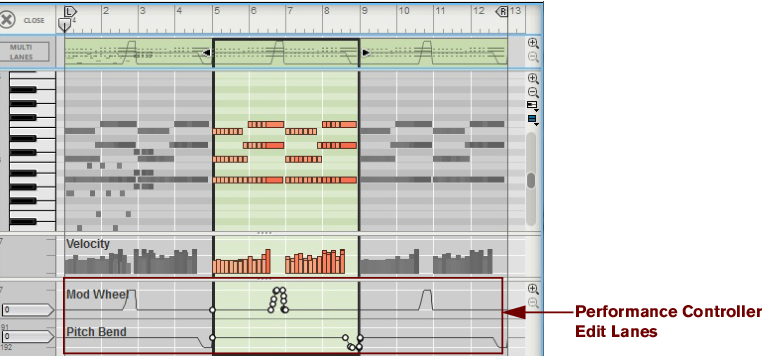
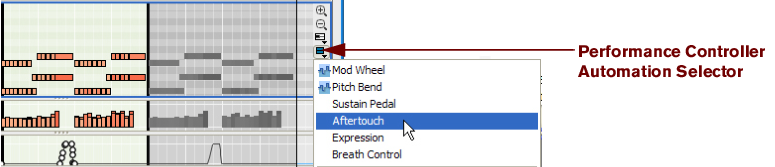
Afterwards, you can edit the performance controller events the same way as with regular parameter automation events (see “Editing parameter automation in Edit Mode”).
*
Just select the desired parameter from any of the sub-menus at the bottom of the Performance Controller Automation Selector pop-up menu.
Deleting performance controller automation lanes
*
This brings up a confirmation alert if there is data on the lane (in any clip). You can delete without the alert by pressing [Ctrl](Win) or [Cmd](Mac) when you deselect the parameter from the list.
About Automation Cleanup
Automation Cleanup is a function for controlling the amount of parameter automation events that should be created during recording and/or manual drawing. The Automation Cleanup function applies to parameter automation events as well as to performance controller automation events. The Automation Cleanup level can be set in the Preferences menu and will apply to all new recorded automation events. You can also use the function on previously recorded parameter automation events. This is done on the Tools tab in the Tool Window.
Automation Cleanup in the “Preferences” menu
*
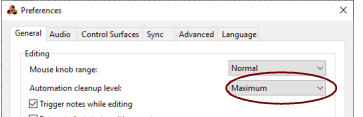
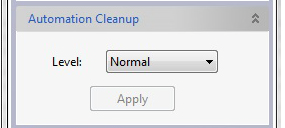
This automatically removes superfluous automation events next time you record or draw events and simplifies the curves. Note that Snap (see “Snap”) also governs the number of events when drawing events.
Drawing automation with “Normal” Cleanup (left), and with “Maximum” Cleanup (right).
The “Automation Cleanup” function in the Tool Window
You can also apply Automation Cleanup to already recorded/drawn events. This is done on the Sequencer Tools tab in the Tool Window:
The Automation Cleanup pane in the Tool Window.
The “Automation Cleanup” function can be applied to:
This has to be done in Edit Mode for performance controllers. For parameter automation, it can be done in both Edit Mode and the Song/Block View.
This is done in the Song/Block View. If the clips are on the same track, it can also be done in Edit Mode.
This has to be done in the Song/Block View.
Editing pattern automation
Pattern automation clips are viewed and edited in the Pattern Select lane, which is available on Dr. Octo Rex, Redrum and Matrix tracks:
Pattern changes are shown as clips with a Pattern Selector at the top (when the clip is selected). A single pattern automation clip can only contain data for a single pattern. In practice this means that each pattern automation clip only contains one pattern automation “event”. All pattern changes in the song will therefore require unique clips.
The Pattern (group and number) indicate which pattern in the source device is playing in this clip. For Dr. Octo Rex devices, the Bank is of no importance.
Click the Pattern Selector triangle, or double-click anywhere in the clip, to bring up a pop-up list featuring all available patterns (groups and numbers) of the source device. Select another pattern from the list if you wish to change pattern in the selected clip. If several pattern clips are selected, selecting a pattern for one of them will set them all to play that pattern.
Click and drag any of the Clip Resize handles horizontally to resize the clip and thus change the pattern playback start position and/or duration.
*
Drawing pattern automation
You can draw pattern automation clips on a Pattern Select lane as follows:
1.
It is probably a good idea to set the Snap value to “Bar”, at least if you are working with patterns of a length corresponding to the time signature (e.g. 16 or 32 step patterns and 4/4 time signature). However, if you are working with patterns of another length, it can make sense to use other Snap values when drawing pattern automation clips.
2.
A Pattern/Loop drop-down list appears in the Inspector. Use this to select the pattern you wish the clip to play. For Dr. Octo Rex devices, the Bank is of no importance.
3.
4.
*
*
This will create an empty pattern change clip with the length of the current Snap value setting (e.g. 1 bar). To create longer clips, double click, keep the mouse button pressed and drag to the right.
Moving, resizing and duplicating pattern automation clips
However, it is recommended that Snap is activated (and in most cases set to “Bar”) when you do this (see “Snap”).
*
A pattern automation clip drawn between bar 1 and 5.
Now, if we resize the clip by dragging the left resize handle two beats to the right, the Pattern Offset will change but the pattern will play back as expected:
The same pattern automation clip “resized” to begin at beat 2.
Again, the same rules apply as for note and parameter automation clips.
Deleting pattern automation clips
*
*
The “Convert Pattern Automation to Notes” function
If you have recorded or drawn pattern automation on a Redrum or Matrix track, you can automatically convert the whole pattern automation lane into note events on an additional note lane. Proceed as follows:
1.
2.
For each pattern automation clip, the corresponding device pattern is converted to note clips on an additional note lane on the track. The generated note lane will play back just the same as when you played the pattern device with the pattern changes.
You can later go back to pattern automation if you wish, by turning on the pattern lane again.
Redrum specifics:
Matrix specifics:
Creating notes for the Matrix itself is pointless, as the Matrix cannot produce any sound.
This is because you probably don’t want both the Matrix and the sequencer notes to play the device at the same time.
Editing tempo automation
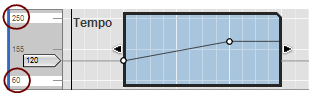
Tempo automation is edited in the same way as regular parameter automation. See “Editing parameter automation”.
Drawing tempo automation events
Drawing tempo automation events is done in the same way as drawing regular parameter automation events. See “Drawing parameter automation events”.
If you want higher tempi than 250 BPM, or lower than 60 BPM, you can easily expand the range, either by selecting and moving a tempo automation event above, or below, the clip border, by double-clicking the max or min values (“250” or “60” in the left column in the picture above) and typing in a new value, or by selecting an event and changing its value in the Value display in the Inspector.
About tempo changes and tempo automation of audio tracks
The built-in Stretch function allows you to change the tempo of the song without affecting the pitch of the recordings on the audio tracks. This is great if you want to adjust the tempo after you have recorded your audio tracks. In Reason, the Stretch is enabled by default for all audio clips.
*
There are three selectable Stretch and Transpose Type algorithms which are suitable for playing back different types of audio material:
In the “Vocal” Stretch and Transpose Type the formants of the original vocal are preserved, which prevents the vocal from sounding artificial when transposed and/or stretched.
*
Stretch preview vs. high quality stretch
Stretch and transposition of audio are always made in two parallel steps: a real-time “preview” so that you can instantly hear the result of your tempo changes or transpositions, and a high quality stretch “in the background” to further improve the sonic results. As soon as high quality stretch is in progress, the “Calc” indicator on the Transport Panel shows a progress indicator:
The CALC indicator appears when Reason performs high quality stretching of audio.
Since the high quality stretch is performed in the background, you can still continue to work with your song without any interruption. When the high quality stretch is finished, the “Calc” indicator goes out and the high quality audio automatically replaces the “preview” audio.
About disabling Stretch for audio clips
In some situations, you might want to exclude audio clips from tempo automation. For example, if you have recorded dialogue or sound effects that shouldn't adapt to tempo changes. In such situations, you can select the audio clip(s) you want to exclude from the tempo changes and select “Disable Stretch” from the Edit menu or clip context menu.
*
Automating time signature
Time signature automation events can only be manually drawn with the Pencil tool - not recorded like tempo automation, parameter automation or performance controller automation. A single time signature automation clip can only contain a single time signature value. In practice this means that each time signature automation clip can only contain one time signature automation “event”. All time signature changes in the song will require a unique clip.
1.
This will be the Static Value, i.e. the time signature of the song wherever there is no clip present on the time signature automation lane.
2.
This will select the Transport track and create a time signature automation lane in one go. The Signature display will also be displayed with a green border, indicating that the time signature has been automated.
*
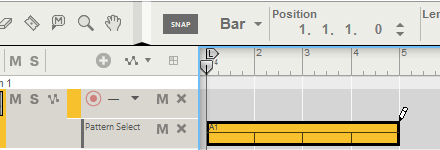
It is generally a good idea to activate Snap (see “Snap”) and have the Snap value set to “Bar” when drawing clips.
3.
When the Pencil tool is selected, a Time Signature drop-down list appears in the Inspector. Select the desired time signature from the drop-down list.
*
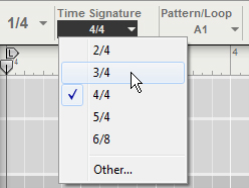
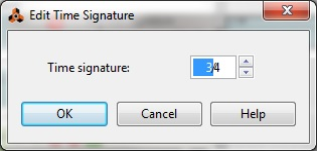
The available signatures are: 1/2-16/2, 1/4-16/4, 1/8-16/8 and 1/16-16/16. The Time Signature display in the dialog can be edited according to the descriptions in “Transport Panel segment displays”.
4.
The time signature will change for the duration of the clip.
5.
*
The clip gets the length of the currently selected Snap value.
*
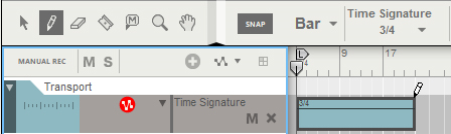
There is no need to switch to Edit Mode unless you wish to change the time signature’s Static Value.
Moving, resizing and duplicating time signature automation clips
*
However, it is recommended that Snap is activated (and in most cases set to “Bar”) when you do this.
*
Again, the same rules apply as for cutting, copying and pasting note and parameter automation clips.
Deleting time signature automation clips
*
*

Note and Automation Editing : Automation editing