Working with Players : Dual Arpeggio

Dual Arpeggio
The Dual Arpeggio device accepts one or several notes as input and generates rhythmic patterns based on these notes. You can use it as a traditional “monophonic” arpeggiator, where arpeggio lines are played back one note at a time, based on the notes you play/hold on the MIDI Control Keyboard.
You can also use it in Pattern Mode, where you can create polyphonic (up to 4 notes) rhythmic patterns, depending on how many notes you play/hold on your MIDI Control Keyboard.
You can control the Velocity of the arpeggiated notes from your MIDI Control Keyboard, or by activating the Velocity switch and drawing in Velocity values in the display.
Dual Arpeggio has two independent arpeggiator sections, that are identical. The sections can either be played by the same input notes (parallel) or you can set up separate key ranges for them (key split). Input notes that are outside the set range(s) will be throughput as is, which means you can play melodies on top of arpeggiated chords etc.
The Dual Arpeggio device plays back in sync with the Reason sequencer, as soon as you input notes to it.
Arp1/Arp2
These are the “on/off” buttons for each of the sections.
Input Range
Here you can define the input note range, to which the arpeggiator should respond. Input notes outside the set range(s) are bypassed and let through unaffected. This is very useful if you, for example, want to play melodies on top of arpeggiated chords.
*
You can also set the Input Range by using the LRN (Learn) buttons:
*
Repeat the procedure in the other display for the other note in the range.
Rate
*
Values: 8 bars, 4 bars, 3 bars, 2 bars, 7/4, 6/4, 5/4, 4/4, 3/4, 2/4, 3/8, 1/4, 3/16, 1/8, 1/8T, 1/16,
1/16 Shuffle*, 1/16T, 1/32, 1/32T, 1/64.
* The Shuffle amount is set with the Global Shuffle knob in the ReGroove Mixer, see “Global Shuffle”.
Octave
*
Range: 1-4 octaves.
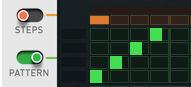
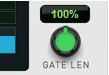
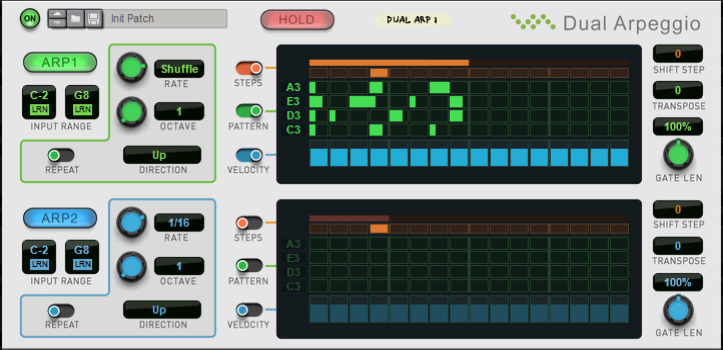
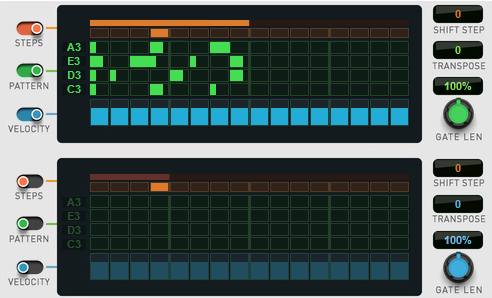
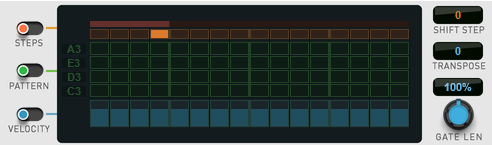
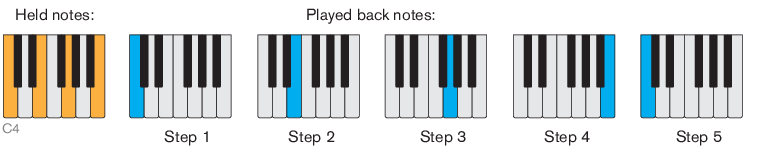
Provided the Pattern function (see “Pattern”) is not active, this is what will be played back:
Repeat
*
Since each note is played back twice at the set Rate, the total length of the arpeggio will be twice as long.
Direction
*
Values: Up, Down, Up+Down and Random.
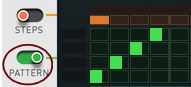
Provided the Pattern function (see “Pattern”) is not active, this is how it works:
| Mode
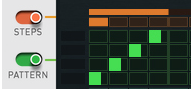
If the Pattern function is active (see “Pattern”), the Direction setting only determines in which direction the steps should advance - regardless of the pitches of the notes in the pattern.
Hold
*
It will continue to arpeggiate the last notes played until a new note-on is received.
The Display sections
In the display sections you can design your arpeggios/patterns.
Normal (Arpeggio) mode
If none of the switches to the left of the display (Steps, Pattern or Velocity) are activated, the display only shows the orange moving step indicator (if you hold down more than one key on your MIDI Control Keyboard). The rest of the display area is dark.
So, if you hold down a 5-note chord, the step indicator advances five steps before it starts over again.
Steps
If you want the arpeggio to always play a certain number of steps, regardless of how many keys you hold down, you can activate the Steps function. This is perfect for maintaining a steady “beat” in your song.
1.
The default value is 4 steps.
2.
The arpeggio (or Pattern, see below) will restart after the set number of steps, regardless of how many notes you are playing.
Range: 1-16 steps.
Pattern
In the default “Arpeggio mode” (Pattern switch off), the arpeggiator(s) work in the standard “monophonic” fashion, where the notes are played back one by one according to the settings you have made in the left section of the device.
With Pattern activated, the arpeggiator turns into a combined pattern player + arpeggiator. Pattern mode allows for up to four-note polyphonic “arpeggios”.
Here is how it works:
1.
All currently active pattern steps (green boxes) light up in the display.
The four green boxes in the example above represent the playback pattern if you hold a 4-note chord on your MIDI Control Keyboard. The lowest row in the display represents the lowest held note in the chord you play.
2.
Set the Direction to “Up” (see “Direction”), to make the examples below work as described.
If you, for example, hold down the keys C4, E4, G4 and B4, the pattern plays back C4 in step 1, E4 in step 2, G4 in step 3 and B4 in step 4. Then the pattern starts over again:
If you hold down fewer keys, the pattern steps gets equally fewer steps and only plays back the new lowest to the new highest notes in the chord:
3.
Editing the pattern.
This way you could draw in “staccato” notes for desired steps, if you like. If you click the full 1/1 of a step (click in the right area of the box), and then click another consecutive box on the same row, the notes will be tied together (played in legato).
If you hold down the keys C4, E4, G4 and B4, the pattern above now plays back C4 and B4 in step 1, E4 and B4 in step 2, G4 in step 3 and B4 in step 4. Then the pattern starts over again:
*
*
Adding consecutive notes by click-holding and dragging.
Here are some general rules regarding Pattern Mode:
If you play a four note chord, some steps may play only the lowest note, others may play a higher note or a combination of notes or all four.
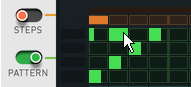
Note that if the Steps function is not active (see “Steps”), note 5 and up will add additional silent steps in the pattern, making the pattern longer.
Let’s take the pattern below (with the Steps function off) as an example:
Pattern Mode with the Steps function off.
If you only hold down key C4, note C4 is repeated (since the pattern length is only one step with one key pressed):
If you hold down C4 and E4, the pattern plays back C4 and E4 alternating (since the pattern length is now two steps with two keys held):
If you hold down C4, E4, and G4 the pattern plays back C4, E4 and G4 alternating (since the pattern length is now three steps with three keys held):
This is what happens:
Pattern Mode with the Steps function on.
If you only hold down key C4, note C4 is played back on step 1 and note C5 is played back on step 2. Steps 3 and 4 are silent. In other words, a new note one octave above is automatically generated on the second step:
If you hold down C4 and E4, the pattern plays back note C4 on step 1, note E4 on step 2, note C5 on step 3 and note E5 on step 4. So, the two held notes are played back one octave higher on steps 3 and 4:
If you hold down C4, E4, and G4 the pattern plays back C4 on step 1, E4 on step 2, G4 on step 3 and C5 on step 4. As you can see, the lowest held note is played back one octave higher on step 4:
Velocity
In default mode, when the Velocity function is off, the velocities of the input notes set the velocity of each generated note in the arpeggio/pattern. If you want to define the velocity values and draw them in manually, you can activate the Velocity function.
1.
2.
When you play your chords, the input velocity is disregarded and replaced by the values you drew in the display.
Range: 0-127.
Shift Step
*
Range: -16 to + 16 steps.
Transpose
*
Range: -24 to + 24 semitones.
Gate Length
*
Here you can change the “gate/hold” time for the generated arpeggio/pattern notes. 100% means the gate time is exactly one full Step. A Length of 25% results in a gate time of 1/4 of a Step and a Length of 400% means a gate time of four Steps.
Range: 25%-400%.

Working with Players : Dual Arpeggio