Recording in the Sequencer : Audio recording details

Audio recording details
Setting up the audio track
Selecting audio input(s) and defining mono or stereo
*
Selecting audio inputs for the Audio Track.
At the top of the drop-down list you can select whether you want to use mono or stereo inputs. Depending on your selection, the LED meter switches to a stereo or mono display. Further down in the drop-down list you can select the audio interface input(s) you want to use for the track.
Setting input level(s)
Before you start recording audio on the track it’s very important to set correct input level(s). The input signal should be loud enough to minimize noise and provide high quality, but not so loud that it causes clipping and distortion.
If you’re using a 24-bit audio interface (recommended), aim at having the level of the input signal around -12dB on the track Input Meter according to the picture below. For 16-bit audio interfaces you may want to raise the level another couple of dB’s.
*
*
*
*
If the input level should clip, at any time, the red clipping LED(s) in the Input Meter will be constantly lit until you click on the Input Meter. This is to notify that there is, or has been, too loud an input signal present on the track.
*
Using the Clip Safe function with Propellerhead Balance
*
If you use the Propellerhead Balance audio interface together with Reason, you will have access to the Clip Safe function. The Clip Safe function lets you record a mono signal with an additional “invisible” headroom. This is done by using both AD converters in Propellerhead Balance for the same mono signal, with the second AD converter dedicated to the additional headroom.
When recording with the Clip Safe function, Reason records the mono signal in parallel using both AD converters. The original AD converter records the signal at normal level and the second AD converter records the same signal “padded” at a lower level.
In practice this means that if the input signal should exceed the normal 0dB clipping level during recording, the program will allow you to use the “padded” signal from the second AD converter and replace the clipped/distorted audio. The padded signal will be amplified in Reason so that its level accurately reflects the original recording level. In other words, the resulting signal will be just as loud as the original signal - but without any clipping or distortion.
Proceed as follows to activate the Clip Safe function:
1.
The CS (Clip Safe) symbol appears to the right of the level meter on the Audio Track.
2.
The Clip Safe button on the Propellerhead Balance audio interface.
A Clip Safe request signal is sent from the Balance interface to Reason. Depending on what audio inputs are selected on the record enabled Audio Track(s), the following happens:
When the Clip Safe LED on the Propellerhead Balance audio interface is green, the Clip Safe function is enabled. If the 1/L input is selected as audio input (Mono), the Right channel on the Balance interface is used for the additional headroom, and vice versa.
The Clip Safe function requires both inputs to be available. Also, if the Balance 1/L (mono) and 2/R (mono) inputs are selected as audio inputs on other record enabled Audio Tracks, the Clip Safe function is disabled.
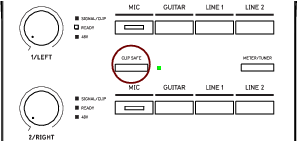
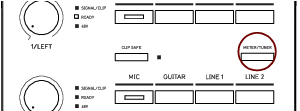
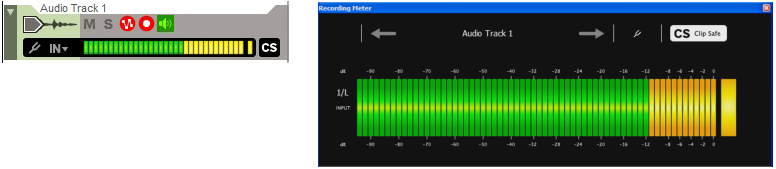
See “Recording using the Clip Safe function in Propellerhead Balance” for more information about using the Clip Safe function.
Monitoring
Monitoring means listening to the input signal of an audio track. Monitoring works according to the following principles:
This makes it possible to hear what you will be recording - before and during recording to disk.
During playback, you will only hear the recorded signal - not any input signal.
*
The input signal is monitored after the Channel strip and Master Section in the Main Mixer which means that all mixer parameters, including any Insert Effects, Dynamics etc., will also be applied to the monitored signal.
*
Depending on the technical specifications and/or settings in your hardware audio interface, the latency of the monitored input could become a problem. If this is the case, it’s probably better to monitor the input signal before it reaches the Reason program, i.e. directly on the external audio interface/mixer/preamp. If you don't want to monitor through the Reason program you should select "External" or “Manual” in the Monitoring section on the Audio tab in the Preferences dialog:
*
Each time you select and/or record enable an Audio Track in the Track List, monitoring in Reason will be automatically enabled. It’s possible to manually disable monitoring in this mode if you like.
*
This mode should be selected if you prefer to have manual control over monitoring, or when you are monitoring through external mixer or audio interface. In the latter case, you would select "Manual" mode and just don't click any monitor buttons.
*
When you select and/or record enable an Audio Track in the Track List, monitoring in Reason will be automatically disabled. It’s not possible to manually enable monitoring in this mode.
Using the Tuner
An audio track also features a built-in tuner function. The Tuner detects and displays the input pitch of a connected instrument - an electric guitar, for example.
1.
The Input Meter switches to a Tuner.
An audio track in Tuner mode.
2.
When the input pitch is detected, the Tuner lights up and indicates how far the pitch is from the displayed note value to the right of the Tuner. The center LED on the Tuner Meter indicates a perfectly tuned note pitch. The green arrow LEDs on either side of the Tuner Meter indicate how the connected instrument should be tuned. The left arrow LED means raise the pitch and the right means lower the pitch.
*
The Recording Meter Window
The main purpose of the Recording Meter floating window is to provide a good overview of recording levels and/or tuner values when you are located some distance away from the computer screen. The Recording Meter mirrors the information from the input level meter and Tuner of the currently selected record enabled Audio Track.
*
*
The Meter/Tuner button on the Propellerhead Balance audio interface.
*
*
By default, the first record enabled Audio Track in the sequencer is displayed in the Recording Meter window.
*
A large Tuner display is shown at the bottom of the Recording Meter window.
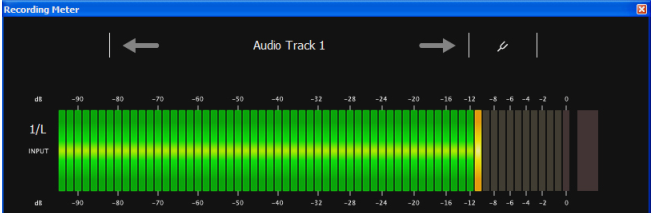
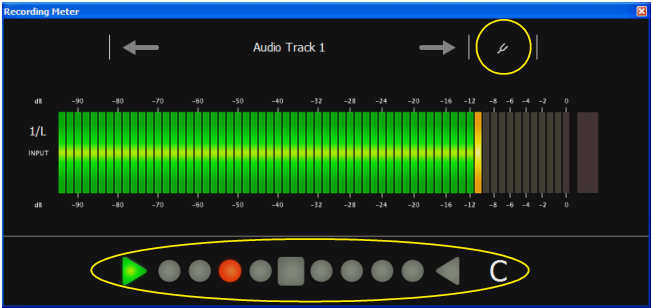
See “Using the Tuner” for more information about the Tuner.
Recording audio
*
1.
2.
3.
An audio clip with a stereo audio recording.
Recording using the Clip Safe function in Propellerhead Balance
If you are recording using the Propellerhead Balance audio interface, you can utilize the Clip Safe function to protect your recordings from any accidental input signal clipping. The program can then take care of and heal any input signals that accidentally exceed 0dB.
See “Using the Clip Safe function with Propellerhead Balance” for more details.
*
Proceed as follows to set up and activate the Clip Safe function:
1.
2.
*
3.
The Clip Safe LED on the Propellerhead Balance audio interface turns green. The CS indicator to the right of the input level meter on the Audio track is lit:
The Clip Safe LED on the Propellerhead Balance interface and the CS indicator on the Audio Track.
4.
*
When the Clip Safe function is active, the Input Meter on the Audio Track, as well as the level meter in the Recording Meter window get their red LEDs replaced by yellow ones. The Recording Window also gets a Clip Safe symbol to the upper right:
The Input Meter on the Audio track and the Recording Meter gets yellow LEDs instead of red ones.
5.
The red vertical line(s) at the top of the of the audio clip indicate that Clip Safe was activated since the input level exceeded 0dB. The selected audio clip also gets an additional Heal (CS) button on its upper right hand side:
Audio recorded with the Clip Safe function active.
6.
You should hear this when the playhead passes over the red vertical line(s) in the audio clip. Sometimes, though, if the clipping is moderate it might not be audible.
7.
Now, the clipped/distorted audio has been replaced by the “padded” Clip Safe audio and the recording should not clip or distort anymore. The area above the audio clip disappears, as does the Heal (CS) button.
*
*
*
*
Recording audio in Loop mode
Recording audio in Loop mode is very useful if you want to record alternative takes of the same part of the song. For example, let’s say you want to sing a couple of takes of the chorus part of your song to later create the perfect chorus by selecting the best parts of the different takes.
*
Proceed as follows to record audio in Loop mode:
1.
2.
3.
Loop mode activated on the Transport Panel.
4.
5.
6.
When the Song Position Pointer has reached the Right Locator, the recording starts over from the Left locator again and you can now record a second take. The audio recorded in the previous take won’t be heard but is saved in the “background” on a Comp Row.
Continue recording for as many loop cycles as you like.
7.
*
8.
If so, open the clip in the Comp Editor by clicking the “Comp Edit” button in the Toolbar.
Otherwise, it opens in the Comp Editor right away. In the Comp Editor, you can see that there is one Comp Row for each of the recorded loop cycles (Takes):
Audio recorded in Loop mode with 5 loop cycles (Takes) recorded.
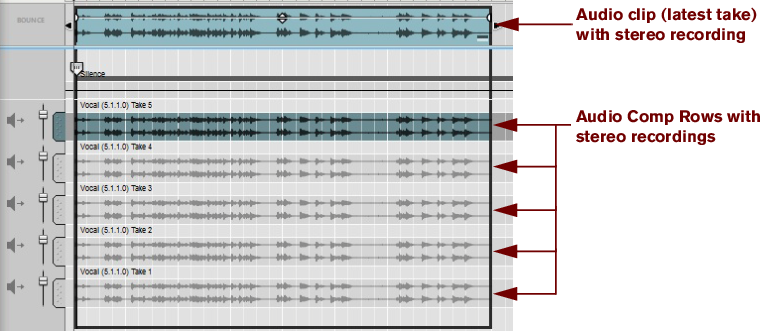
From here, it’s easy to assign the best parts from the different takes and comp them into a final clip. See “Creating a comped audio clip” for details.
*
Overdubbing audio using the “Dub” function
Back in the tape recorder days, overdubbing was used to record additional takes on additional tracks on the same section of the tape, to create a complete arrangement. For example, recording a vocal chorus part could be done by overdubbing the singer three or four times on additional tracks. Overdubbing in Reason works in a similar way, but with much better control, and much better editing possibilities afterwards.
*
This will create a new audio track with a duplicate of the original audio track settings, including the channel strip settings (with insert effects etc.). Now, you can continue recording on the new audio track as described in “Recording audio” and “Recording audio in Loop mode”. Afterwards, you can edit the new track completely independently of the original track.
*
Duplicating audio tracks using the “Alt” function
Closely related to the “Dub” function, described in “Overdubbing audio using the “Dub” function”, is the “Alt” function. This function can be used to create a new audio track with an identical copy of the selected audio track’s settings. The only difference between the “Alt” and “Dub” functions is that the Alt function will automatically mute the original audio track.
*
This will create a new audio track with a duplicate of the original audio track settings, including the channel strip settings (with insert etc.). Now, you can continue recording on the new audio track as described in “Recording audio” and “Recording audio in Loop mode”. Afterwards, you can edit the new track completely independently of the original track.
*
Recording over or into an existing audio clip
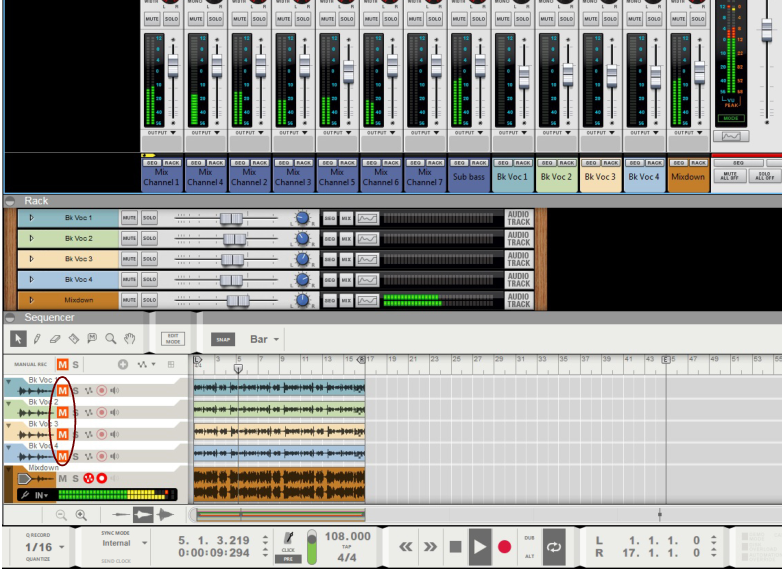
If you start recording over an existing clip on an audio track, the new recording will incorporate (replace, but not erase) the previous recording in the clip. When you open the audio clip in the Comp Editor afterwards, there will be one Comp Row for each of the takes, the same result as when recording audio in Loop mode (see “Recording audio in Loop mode”).
Let’s have a look at the following example:
In the picture below, we have the original audio clip spanning bars 1-8 on the track:
An audio track with an existing clip.
Now, we want to redo (re-record) the part that spans bars 5-6. We place the Song Position Pointer at bar 5 and record 2 bars:
A new recording made on bars 5-6 on the audio track.
The new recording is made over the original clip. The recording in the original clip has therefore been incorporated into the start of bar 5 to the end of bar 6.
You can also see that the clip has become a Comp Clip, as indicated by the symbol (gray dots) at the lower right corner of the clip.
Now, let’s double-click the clip to open it in the Comp Editor:
The new and original recordings (takes) in Edit Mode.
The new recording has incorporated bars 5-6 of the original recording. However, the original recording in bars 5-6 has been left totally unaffected. The entire original audio recording now resides on the “Take 1” Comp Row and the latest recording resides on the “Take 2” Comp Row. The resulting clip will now play back the “Take 1” recording in bars 1-4 and 7-8. Bars 5-6 will play back the “Take 2” recording.
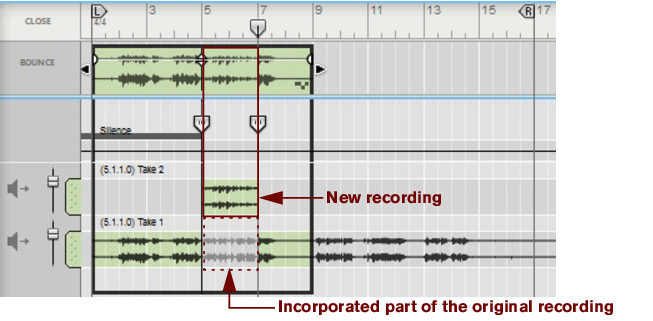
See “Creating a comped audio clip” for details on how to extract parts from individual takes and comp into a final clip.
Recording audio from Mix Channel outputs
Besides recording external audio from the inputs of your audio interface, it’s also possible to record audio internally from the outputs of Mix Channel or Audio Track devices. Typical applications for this could be:
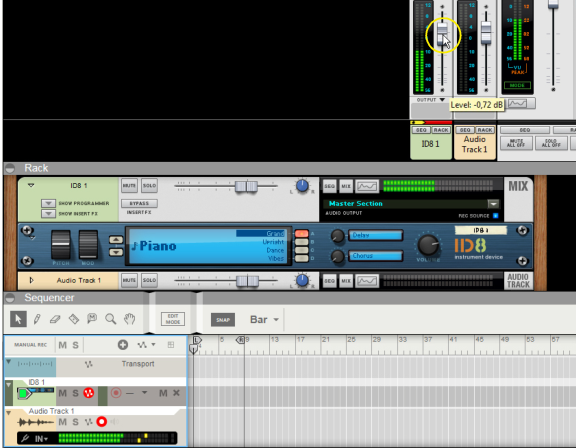
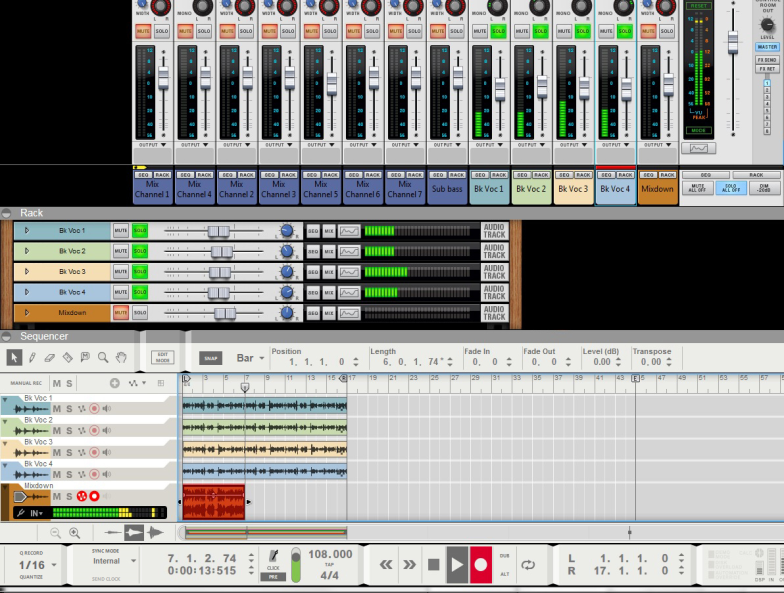
You might have the individual drums of your drum kit on separate tracks and these tracks are routed to a Mix Channel which is set to work as an Output Bus (see “Output Busses”). You then want to record the audio from the Output Bus onto a new Audio Track.
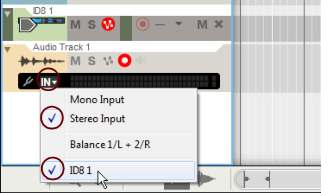
In this situation, all you need to do is create a new Audio Track, activate the Rec Source button on the Output Bus Mix Channel device, and then select the Output Bus in the Select Audio Input drop-down list on the Audio Track in the Track List. Then, record the audio from the Output Bus as described in “Recording audio”.
*
The example below describes how to capture and record the audio from an ID8 device, but the general method can be used for other recording scenarios as well:
1.
You won’t actually be recording on the instrument track in this situation. However, you will need the instrument track to be able to play the instrument device from your connected master keyboard.
2.
3.
The “Rec Source” button on Mix Channel devices is used for real-time audio recording of devices connected to the Mix Channel device.
The “Rec Source” button on Audio Track devices are used for real-time re-recording of audio tracks.
Enabling the Rec Source button on the Mix Channel device in the rack.
4.
All Mix Channel and Audio Track devices that have their “Rec Source” button enabled will appear in the list. In this example, we only have the Rec Source button active on the “ID8 1” Mix Channel.
“Stereo Input” and “ID8 1” selected in the “Select Audio Input” drop-down list.
5.
Select the ID8 1 track and disable the Record Enable button.
6.
Engage Record Enable on the Disk Channel track.
*
7.
Adjusting the instrument’s level to the audio track.
*
8.
*
Recording a mixdown of several audio tracks
Another useful feature is to record a real-time mixdown of several previously recorded audio tracks onto a new, additional audio track. This is sometimes also referred to as recording stems or sub-mixes. Let’s say we have four backing vocal tracks that we want to mix down and record on a new audio track. We can do this as follows:
1.
This is the track we’re going to use for recording the mixdown. We name the track “Mixdown” to make it easier to distinguish.
2.
The “Rec Source” button on the Master Section device.
This will allow you to record the output from the Master Section onto the new audio track.
3.
The four backing vocal Audio Track devices soloed.
Since we’re going to record the four backing vocal tracks through the outputs of the Master Section, we only want the backing vocal tracks to sound. All other tracks in the song should therefore be muted.
4.
“Stereo” and “Master Section” selected as Audio Input source.
Selecting “Stereo” makes it possible to pan the backing vocal tracks in stereo before recording on the mixdown audio track.
5.
*
6.
Recording the mixdown of the four backing vocal tracks to the “Mixdown” track.
*
7.
8.
Playing back the Mixdown track with the original backing vocal tracks muted in the sequencer.
*

Recording in the Sequencer : Audio recording details