Recording in the Sequencer : Parameter automation recording details

Parameter automation recording details
In Reason, you can automate virtually any device and channel strip parameters and create completely automated mixes if you like. This is done by recording parameter events in the sequencer. It’s also possible to record sequencer Tempo automation (see “Tempo automation recording”).
Performance controllers vs. track parameter automation
Recording parameter automation can be done in two different ways; either as performance controller automation or as track parameter automation.
Any standard MIDI performance controllers that you apply when playing (Pitch Bend, Mod Wheel etc.) will be recorded as performance controller automation in the note clip. A clip on a note lane can contain any combination of note events and performance controller automation events.
Which method you should use depends on how you prefer to work. The main differences to take into account are the following:
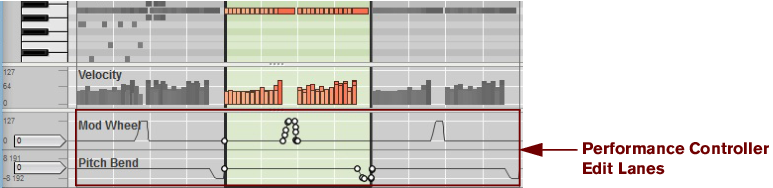
The key feature with performance controller automation is that it’s contained together with the notes in the note clip. Moving the note clip moves the performance controller automation as well. Therefore, if your controller changes are part of your "note performance" (e.g. Pitch Bend and Sustain Pedal), then you want them as performance controllers (see “Recording performance controller automation”).
Filter sweeps played together with the notes etc. can also be recorded as performance controllers (see “Recording parameter automation into Note Clips”).
Track parameter automation is recorded on separate lanes on the track (one lane for each automatable parameter). Track parameter automation clips can be moved individually, independent from any note clips. See “Recording parameter automation”.
Recording performance controller automation
If you use any MIDI performance controllers when recording on a note lane, these are automatically added to the recorded clip. This makes sense as performance controllers are usually recorded at the same time you record notes, as a part of the performance. Standard MIDI performance controllers are Pitch Bend, Modulation Wheel, Sustain Pedal, Aftertouch, Breath Control and Expression.
*
When you have recorded performance controllers in the note clip, the clip will have automation curves visible in it along with the recorded note data.
Performance controllers are shown as curves in the note clip. In this picture, Mod Wheel, Pitch Bend and Sustain Pedal controllers have been used.
Green borders will appear around the automated device parameters to indicate that they are automated.
The Pitch Bend and Mod Wheel parameters have been automated, indicated by the green borders.
*
The Automation Override indicator on the Transport Panel.
The performance controller automation is shown differently in the clip depending on the type of controller used. Controllers with bipolar range (such as Pitch Bend) are shown as lines in the middle when at zero (no pitch bend) with curves travelling up or down from the zero value. Controllers with only positive values (such as Mod Wheel) have zero at the bottom of the clip with applied modulation shown as curves travelling up from the zero value. Controllers with off/on values (such as Sustain Pedal) are shown as rectangular curves (on - duration- off).
Performance controller automation on separate Edit lanes in Edit Mode.
*
*
*
Recording parameter automation into Note Clips
Besides the standard performance controllers (Pitch Bend, Mod Wheel etc.), you can choose to record automation of any type of instrument device parameter into a note clip:
1.
2.
While recording on a note lane according to the description in “Recording notes”, tweak the parameter(s) you want to automate on the instrument device panel in the rack - or use a Remote MIDI controller (see “Remote - Playing and Controlling Devices”).
Any parameter you tweak on the device will be recorded as automation inside the note clip - just like Performance Controller automation.
Green borders will appear around the automated device parameters to indicate that they are automated.
*
*
*
Recording performance controller automation over or into an existing clip
However, if the new recording should start before the original clip’s start position, a new clip will be created which will incorporate the original clip. The new automation data will replace the existing one, but any existing note events will not be affected (see “Recording parameter automation over or into an existing clip” and “Recording over or into an existing note clip”).
About performance controller automation on multiple lanes
If you have several active (un-muted) note clips with performance controller automation on different lanes of the same track, and these note clips overlap position-wise, the following rule applies:
The clip on Lane 2 has Mod Wheel automation, and the clip on Lane 1 also has Mod Wheel automation - plus Pitch Bend and Sustain Pedal automation and note events. The Mod Wheel automation affecting the notes will follow the automation curve of the clip on Lane 2 for its duration. As soon as the clip on Lane 2 ends, the notes will be affected by the Mod Wheel automation in the clip on Lane 1.
Recording parameter automation
Parameter automation is the standard way to automate device and channel strip parameters. Each automated device/channel strip parameter will generate a separate automation lane on the track. It’s also possible to record automation of the Tempo on the Transport Panel. This is described in detail in “Tempo automation recording”.
Before you start recording parameter automation
Before you start recording automation of a device/channel strip parameter, you may want to set it to a suitable start value, what we call its “static value”. By static value we mean the value the parameter should have whenever it is not automated in the song. Here is why:
Let’s say you want to create a fade-out by recording a fader movement in a mixer channel strip. It’s a good idea to first set the fader to the correct static value (i.e. the value the fader should have before you start the fade-out). The same thing is true if you want to create a filter sweep somewhere in the song: first set the filter frequency to the value it should have elsewhere in the song, then record the filter sweep. This makes it possible to set up a static mix first, and then add some automated parameter changes anywhere in the song while maintaining the static values elsewhere in the song.
You can think of the static value as a “default” or “fall-back” position for the duration of the song.
*
Parameter automation recording procedure
1.
For audio track devices and for instrument devices, a sequencer track is automatically created together with the device. For mix channel and effect devices, that might not necessarily have a sequencer track, the easiest way to create a track for parameter automation is by right-clicking (Win) or [Ctrl]-clicking (Mac) on the device/channel strip parameter and selecting “Edit parameter Automation” from the pop-up.
2.
If the track has note lanes you may want turn off the “Record Enable” button for the active note lane (unless you plan to record notes and parameter automation simultaneously of course).
*
3.
4.
During recording, adjust the desired parameter(s), from the device panel or from a MIDI control surface. You can automate any parameter for the device - each parameter you tweak will automatically generate a separate parameter automation lane and a clip will be recorded on the corresponding lane from the point you changed the parameter.
*
5.
In the Song View or Blocks View, the parameter automation clip(s) on the lane(s) show the recorded parameter automation events as curves or lines inside the clip.
If you click the “Stop” button again, or click the “Automation Override” indicator on the Transport Panel, the automated parameters on the device(s) will be marked with green borders, indicating that they have been automated.
If you play back the recorded section again, the automated parameters will change automatically. Outside the clip boundaries, the parameters will have their original settings (the static values they had before you started recording).
*
Recording parameter automation in Loop mode
Recording parameter automation events in Loop mode works similar to “non-looped” recording (see “Recording parameter automation”), except that for every new loop cycle any changed parameter value will replace the previously recorded value for the corresponding parameter.
Recording parameter automation over or into an existing clip
Recording parameter automation events over or into an existing automation clip will simply replace the previously recorded automation events. However, If the new recording should start before the start position of the original automation clip, and expand into the original clip, the new clip will merge with the original clip. After the new clip ends, the parameter automation in the original clip will “take over”.
If you need to redo a section of the recorded automation in an existing clip, or simply record more automation for a parameter, proceed as follows:
1.
As long as you don’t change the parameter value, its automation data will be played back normally, and nothing will be changed.
2.
As soon as you start changing the parameter value, the Automation Override indicator will light up on the transport panel.
The Automation Override indicator on the Transport Panel.
From this point on, the previously recorded automation values will be replaced with the new automation values. Automation recording is different from recording note events where nothing is erased when you record over previously recorded clips. A parameter automation “overdub” will replace any previous automation values at the same position for the duration of the recording. Automation clips logically cannot be “overdubbed” as a parameter cannot have more than one specific value at a given point in time.
3.
You have now replaced the automation values from where you started recording to where you stopped recording. The Automation Override indicator will still be lit but it will go off if you click Stop or Play on the Transport Panel.
*
This “resets” the parameter to the previously recorded value and the automation recording will stop (making the previously recorded automation active again, from that position). You are still in record mode, so as soon as you adjust the parameter again, the Automation Override indicator will light up.
Adjusting automated parameters during playback - “Live mode”
Even if you have automated a device/channel strip parameter, you can still “grab it” and adjust it during playback, overriding the recorded automation:
1.
The Automation Override indicator lights up on the Transport Panel.
From this point onward, the recorded automation for the parameter is temporarily disabled.
2.
This returns the control of the parameter to the parameter automation lane in the sequencer.
*
Recording parameter automation on multiple tracks
Although only one track can have Master Keyboard Input, it is possible to record enable any number of tracks for automation recording.
*
When recording is activated, all automation record enabled tracks will record track parameter changes from their respective devices in the rack. This is especially useful if you have assigned parameters on several devices to a single control on a MIDI control surface, or have multiple control surfaces controlling different devices in the rack while you’re recording. See “Remote - Playing and Controlling Devices” for details.

Recording in the Sequencer : Parameter automation recording details