Redrum Drum Computer : Redrum parameters

Redrum parameters
Drum sound settings
Redrum features ten drum sound channels that can each be loaded with a Wave or AIFF sample or a sample from a SoundFont bank. Although they are basically similar, there are three “types” of drum sound channels, with slightly different features. This makes some channels more suitable for certain types of drum sounds, but you are of course free to configure your drum kits as you like.
On the following pages, all parameters will be listed. If a parameter is available for certain drum sound channels only, this will be stated.
Mute & Solo
At the top of each drum sound channel, you will find a Mute (M) and a Solo (S) button. Muting a channel silences its output, while Soloing a channel mutes all other channels. Several channels can be muted or soloed at the same time.
You can also use keys on your MIDI keyboard to mute or solo individual drum sounds in real time.
*
The sounds are muted for as long as you hold the key(s) down.
*
The sounds are soloed for as long as you hold the key(s) down.
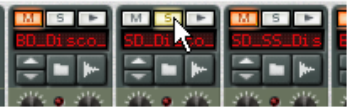
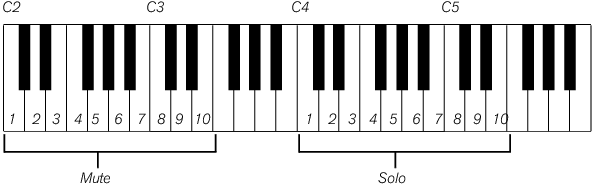
This is a great way to bring drum sounds in and out of the mix when playing Reason live. You can also record the drum channel Mutes in the main sequencer, just like any other controller (see “Recording parameter automation”).
The Effect Sends (S1 & S2)
On the back panel of Redrum you will note two audio connections labeled “Send Out” 1 and 2. When you create a Redrum device, these will by default be auto-routed to the first two “Chaining Aux” inputs on the Mixer device (provided that these inputs aren’t already in use).
This feature allows you to add effects to independent drum sounds in the Redrum.
*
Similarly, the S2 knob governs the send level to the second send effect in the mixer.
*
*
*
See “Connections”.
Pan
Sets the Pan (stereo position) for the channel.
*
In that case, the Pan control serves as a stereo balance control.
Level and Velocity
The Level knob sets the volume for the channel. However, the volume can also be affected by velocity (as set with the Dynamic value, or as played via MIDI). How much the volume should be affected by velocity is set with the “Vel” knob.
*
The higher the Vel value, the larger the difference in volume between low and high velocity values.
*
*
When Vel is set to zero, the LED above the knob goes dark.
Length and the Decay/Gate switch
The Length knob determines the length of the drum sound, but the result depends on the setting of the Decay/Gate switch:
*
In this mode, it doesn’t matter for how long a drum note is held (if played back from the main sequencer or via MIDI) - the sound will play the same length for short notes as for long notes. This is the traditional “drum machine” mode.
*
Furthermore, if a sound set to Gate mode is played from the main sequencer, from a CV/Gate device or via MIDI, the sound will be cut off when the note ends or after the set Length, depending on which comes first. Or in other words, the sound plays for as long as you hold the note, but the Length setting serves as the maximum length for the sound.
There are several uses for the Gate mode:
*
Pitch
Sets the pitch of the sound. The range is +/- 1 octave.
*
Pitch Bend
By setting the Bend knob to a positive or negative value, you specify the start pitch of the sound (relative to the Pitch setting). The pitch of the sound will then be bent to the main Pitch value. Thus, selecting a positive Bend value will cause the pitch to start higher and bend down to the original Pitch, and vice versa.
*
*
With a positive Vel value, higher velocity results in wider pitch bends.
*
*
Tone
The Tone knob determines the brightness of the drum sound. Raising this parameter results in a brighter sound. The Vel knob determines whether the sound should become brighter (positive Vel value) or darker (negative Vel value) with higher velocity.
*
*
Sample Start
The Start parameter allows you to adjust the start point of the sample. The higher the Start value, the further the start point is moved “into” the sample. If you set the Start Velocity knob to a positive amount, the sample start point is moved forward with higher velocities. A negative Start Velocity amount inverts this relationship.
*
*
By raising the Start value a bit and setting Start Velocity to a negative value, you can create rather realistic velocity control over some drum sounds. This is because the very first transients in the drum sound will only be heard when you play hard notes.
*
Global settings
Channel 8 & 9 Exclusive
If this button is activated, the sounds loaded into drum channels 8 and 9 will be exclusive. In other words, if a sound is played in channel 8 it will be silenced the moment a sound is triggered in channel 9, and vice versa.
The most obvious application for this feature is to “cut off” an open hi-hat with a closed hi-hat, just like a real one does.
High Quality Interpolation
When this is activated, the sample playback is calculated using a more advanced interpolation algorithm. This results in better audio quality, especially for drum samples with a lot of high frequency content.
*
Listen to the drum sounds in a context and determine whether you think this setting makes any difference.
Master Level
The Master Level knob in the top left corner of the device panel governs the overall volume from Redrum.

Redrum Drum Computer : Redrum parameters