Remote - Playing and Controlling Devices : Setting up

Setting up
Automatic set-up using the Easy MIDI Inputs function
By default Reason automatically scans and detects all available MIDI In port(s) on your computer. If you have a MIDI keyboard or MIDI control surface connected to your computer, Reason automatically connects and lets you use it for controlling Reason. This way you don’t have to do any manual set-up but can start controlling Reason right away.
At the bottom of the Control Surfaces tab in Preferences all currently available MIDI In Ports are listed:
All available MIDI In Ports on your computer are listed in the Easy MIDI Inputs list.
You can also do manual Remote Overrides to assign Reason parameters to knobs/sliders/buttons on your control keyboard/surface, see “Remote Override”.
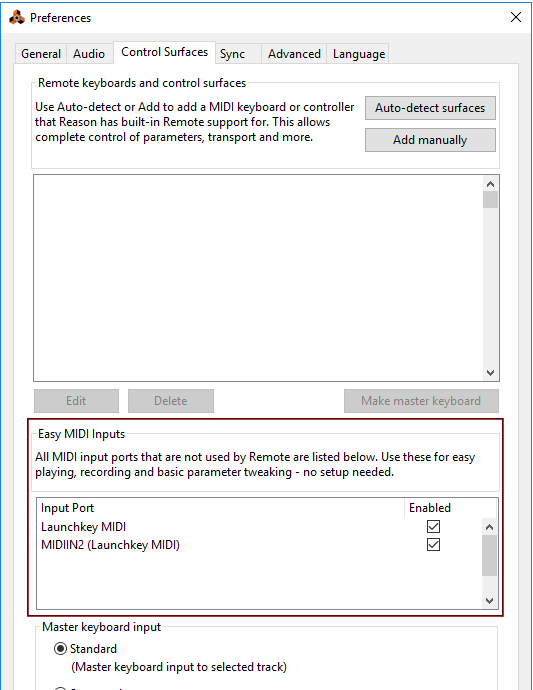
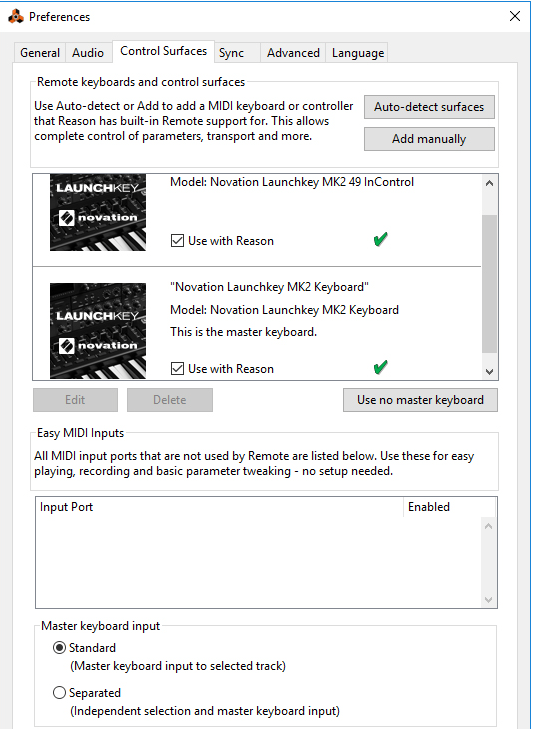
*
For example, if you have a drum machine connected via USB to your computer, you might not want it to start sending MIDI Note data to Reason, especially if it’s synced to MIDI Clock to Reason’s sequencer.
Adding a specific control surface or keyboard
If your specific MIDI keyboard/control surface model is featured in the list of supported surfaces in Reason you will get even more functionality if you add it in the “Remote keyboards and control surfaces” section at the top - with knobs/sliders/buttons already pre-assigned to parameters in Reason.
This is how you add your specific control surfaces - including the master keyboard.
1.
2.
Reason sends an ID request to all MIDI ports and checks for answers from any connected control surfaces. Note that not all control surfaces support auto-detection.
*
3.
This brings up a new dialog.
4.
If you can’t find it on the menu, see below.
5.
If you can’t find it on the menu, see below.
6.
For some control surfaces, you need to select a specific preset to use the surface with Reason - this is noted here.
7.
If in doubt, you can click the Find button and then tweak a control or play a key on the control surface to have Reason find the correct input port for you.
You need to select ports on all MIDI Input pop-up menus.
In some cases this labeled “Optional” - then you don’t have to make a selection. In other cases, a MIDI Output is required. This is the case if the control surface uses MIDI feedback - motor fader, displays, etc.
MIDI inputs not selected here or on the Sync page (see “Advanced MIDI - The External Control Bus inputs”) are available to other programs.
*
8.
9.
In some cases, Reason can restore a preset in the control surface to factory settings for you. In such cases you will be informed about this.
Finally you return to the Control Surfaces tab in Preferences, where your added surface is now listed.
If your control surface model isn’t listed
If you can’t find your control surface listed on the Manufacturer or Model pop-up menus when you try to add it, this means that there’s no native support for that model. However, the program supports generic keyboards and controllers. These alternatives might be more useful than the Easy MIDI Input alternative described earlier - if you have a control surface (or keyboard with knobs/buttons/sliders) that you want predefined parameter destinations for. Here’s what to do:
*
or, if the Manufacturer is listed but not your specific model:
*
In both cases, the options are:
Select this is you have a MIDI keyboard with programmable knobs, buttons or faders. You need to set up your control keyboard so that the controls send the correct MIDI CC messages, depending on which Reason device you want to control - check out the MIDI Implementation Chart. If your control keyboard has templates or presets for Reason devices, these can be used if you run Reason.
Select this if you have a MIDI controller with programmable knobs, buttons or faders (but without keyboard).
You need to set up your control surface so that the controllers send the correct MIDI CC messages, depending on which Reason device you want to control - check out the MIDI Implementation Chart. If your control surface has templates or presets for Reason devices, these can be used if you run Reason.
Select this is you have a MIDI keyboard without programmable knobs, buttons or faders. This is used for playing only (including performance controllers such as pitch bend, mod wheel, etc.) - you cannot adjust Reason device parameters with this type of control surface.
Select this is you have a MIDI keyboard with programmable controls that use multiple MIDI channels (different controls send the same MIDI CC but on different MIDI channels). With this model there is no automatic mapping to device parameters - you need to use Remote Overrides to map each control to a parameter on a device.
Select this is you have a MIDI control surface with programmable controls that use multiple MIDI channels (different controls send the same MIDI CC but on different MIDI channels). With this model there is no automatic mapping to device parameters - you need to use Remote Overrides to map each control to a parameter on a device.
After selecting a model, proceed with selecting MIDI input port as described above.
About the Master Keyboard
One of the control surfaces can be the Master Keyboard. This is like any other control surface, but it must have a keyboard and it cannot be locked to a specific Reason device (in other words, it always follows the MIDI input to the sequencer). This is the surface you use to play the instrument devices in Reason.
*
This is shown in the “Remote keyboards and control surfaces” list on the Preferences page.
*
You can only have one surface as master keyboard at a time.
*
Other functions
*
This lets you change its name and MIDI port settings, if needed.
*
*
This could be useful if the surface is connected to your system but you only want to use it with another program.
There is also the Sync tab in the Preferences. This is only used for External Control MIDI buses and for MIDI Clock Sync settings. All hands-on MIDI control is set up on the Control Surfaces tab.
Example Setups
There are several possible variables when it comes to what type of setup you are using. Please read on.
A single MIDI keyboard with controls
With this setup, the keyboard is your master keyboard, which means it is always routed via the sequencer (it controls the device connected to the sequencer track with Master Keyboard Input). To control another device, you move the Master Keyboard Input (the keyboard symbol in the In column in the track list) to another sequencer track.
You can, however, use Remote Override to control parameters on other Reason devices (or global Reason functions such as transport).
A basic MIDI keyboard and an additional control surface
The keyboard and the control surface should be connected to separate MIDI ports (or use separate USB connections). Here, the basic MIDI keyboard is your master keyboard - it is used for playing and recording via the sequencer. You can have the control surface follow the master keyboard - this lets you tweak the parameters of the device you are playing (just like in the example above).
You can also lock the control surface to another device in the rack - this lets you play one device while adjusting the parameters of another.
A MIDI keyboard with controls plus one or more control surfaces
This is the ideal setup! Again, all keyboards and control surfaces should be connected to separate MIDI ports (or use separate USB connections). The master keyboard is routed via the sequencer track and you can use its controls to tweak the parameters of the device you are playing. The additional control surfaces could be locked to the Main Mixer or to different devices in the rack.
If you have additional MIDI keyboards locked to devices in the rack, you can also play and record on their corresponding sequencer tracks simultaneously. This is perfect if your band has several keyboard players who want to play and record their tracks simultaneously into Reason!
For example, if you lock a control surface to the Main Mixer, you will always have control over levels, pans and additional channel strip parameters - see “Remote controlling the Main Mixer” and “Remote controlling multiple mixer channels”. You could also have dedicated controls for transport, Undo/Redo, sequencer track MIDI focus selection, etc.

Remote - Playing and Controlling Devices : Setting up