Sampling : General sampling functions

General sampling functions
Setting up for sampling
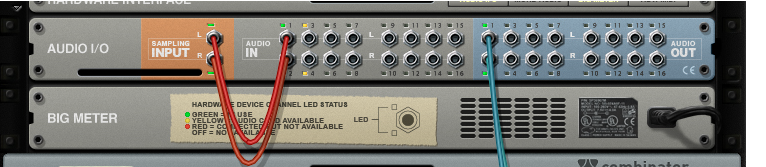
If you want to sample external audio, e.g. from a mic or an instrument connected to the audio hardware on your computer, make sure you have set up the desired audio input(s) on the Audio tab in Preferences, see “Active input and output channels”. Available audio inputs are indicated with yellow or green LEDs on the Hardware Interface in the rack:
Selecting audio input source(s)
To set up for sampling, you first need to make some connections on the Hardware Interface:
1.
2.
*
*
Audio Inputs 1&2 connected to Sampling Inputs L&R for sampling in stereo.
Setting audio input level
Once you have made the desired connections to the Sampling Input(s) on the Hardware Interface, it’s important to check the audio input level to avoid clipping. If you are going to sample external audio via the audio hardware of your computer, you have to adjust the level at the source, i.e. on the pre-amp of the audio hardware (or connected instrument). A good suggestion is to use the Big Meter on the Hardware Interface to be able to monitor the input level(s) more easily.
*
*
Monitoring and Monitor Level
To the left on the Hardware Interface are two buttons and one knob for monitoring the signals on the Sampling Inputs:
*
Monitoring will always be active, regardless of if you sample or not.
*
Monitoring will only be active during the actual sampling. When you don’t sample, monitoring will be off.
*
*

Sampling : General sampling functions