Sampling : Sampling

Sampling
The Sample buttons
The NN-XT, NN19, Redrum, Kong, Grain and RV7000 Mk II devices feature one or several Sample buttons. The Sample buttons are located on the devices as follows:
Sampling buttons on NN-XT, NN19, Redrum and Kong respectively.
Sampling procedure
1.
2.
*
When you use the “click and hold” method, sampling will be automatically terminated as soon as you release the mouse button. The sample will then end up in the device and in the Song Samples location in the Browser.
*
A waveform display shows up with a moving “play head”:
3.
As soon as any audio is present on the Sampling Inputs on the Hardware Interface, the waveform display will indicate this by drawing a wave.
*
*
The “Restart Sampling” button.
This will erase any sampled audio and force the play head to restart from the beginning.
*
4.
The “Stop Sampling” button.
The waveform display closes and the sample automatically ends up in the device, where you can play it back instantly:
By default, the sample is named “Sample ‘n’” where ‘n’ is a serial number. As you will notice, any silence preceding the actual audio in the sample will be automatically disregarded. The entire sample is preserved, but this is done so you won’t have to edit the sample start before playback.
Besides ending up in the device, the sample is also placed under the corresponding device icon in the Assigned Samples folder in the Song Samples location in the Browser:
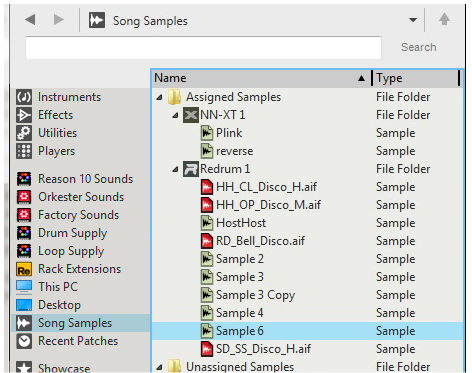
Here, all samples you use in your song are listed (see “The Song Samples location”). Here is also where you can open samples for editing (see “Editing samples”).
The Song Samples location
The Song Samples location in the Browser is where all samples in your song are listed and can be accessed for preview and editing purposes. Besides your own samples, all Factory samples and any ReFills samples used in the song are also accessible for previewing and editing!
The Song Samples location in the Browser.
The Song Samples location in the Browser contains the following items:
Here, all samples that are assigned to devices in the song are listed. All devices that contain assigned samples are listed as “sub-folders”. Each device “sub-folder” shows the samples currently assigned to it. See “Assigned Samples” for more details.
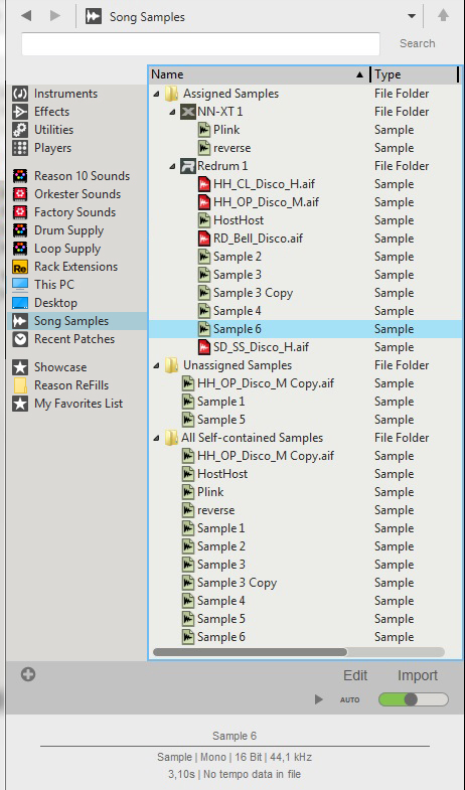
If you remove a sound you have sampled from a device, the sound is automatically moved from the Assigned Samples folder to the Unassigned Samples folder. From here you can load the sample into other devices if you like. See “Unassigned Samples” for more details.
All sounds you have sampled yourself, plus any duplicated samples from the Factory Soundbank and/or ReFills, automatically becomes self-contained and are always stored with the song. These samples are listed in the All Self-contained Samples folder. See “About self-contained samples” for more details.
Click the Edit button to open the selected sample for editing in the Edit Sample window (see “The Edit Sample window”).
Click this button to import the selected sample(s) to audio tracks in the sequencer.
To audition a sample, select it in the Browser list and click the Play button. If you click the Auto button, simply selecting a sample in the list will automatically play it back.
Adjust the preview volume of the sample with the slider. This does not affect the samples original volume.
The context menu of a selected sample contains the following functions:
Select this to open the sample for editing in the Edit Sample window (see “The Edit Sample window”). If several samples are selected, this item is grayed out.
Select this to create a duplicate of the selected sample. The duplicated sample is placed in the All Self-contained Samples and Unassigned Samples folders. Several selected samples can be duplicated in one go. See “Duplicating samples” for more details.
Select this to export the selected sample to disk. A dialog appears where you can select file format. Note that it is not possible to export samples from the Factory Soundbank or from ReFills. Several selected samples can be exported in one go. See “Exporting samples” for more details.
Select this to permanently delete the selected sample(s) from the song. Note that samples from the Factory Soundbank and from ReFills will not be deleted from their original locations - only from the song document. Several selected samples can be deleted in one go. See “Deleting samples from a song” for more details. Any samples you have recorded yourself will be permanently erased unless you have previously exported them to disk (see “Export Sample(s)” below).

Sampling : Sampling