Scream 4 Sound Destruction Unit

Scream 4 Sound Destruction Unit
Scream 4 is a very versatile stereo in/out sound destruction device, capable of warping any sound literally beyond recognition, but also capable of producing more subtle musical effects. Scream 4 features a wide range of algorithms for distortion and sound mangling which can be combined with an EQ and a resonant “Body” section to provide everything you need to add an edge to your sounds. This effect is most often used as an insert effect.
About the Patch format
Unlike most of the other effect devices, Scream 4 features programmable effect presets. Included are a number of factory Patches which can be used as they are or provide you with a good starting point for further tweaking.
Patches use the Windows file extension “*.SM4”. Loading and saving Patches is done in the same way as for instrument devices.
Parameters
Scream 4 contains three main sections; Damage (distortion and other types of sound destruction), Cut (EQ) and Body (places the sound in a resonant environment - can serve as anything from a cabinet emulator to a wah-wah to completely new special effects) which can be switched on or off independently. The parameters in each section are as follows:
Common effect device parameters
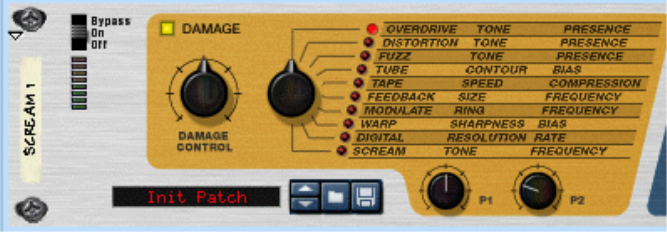
While the specific parameters for the Scream 4 effect device are described below, some features and procedures are common to all effect devices. Please, refer to “Common effect device features” for information about the Input meter, the Bypass/On/Off switch and Signal Flow Graphs on the effect device.
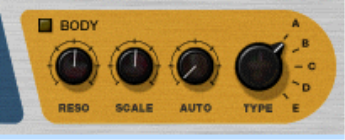
Damage section controls
The “Damage” section is where you specify the basic sound mangling algorithm and make settings to inflict the desired amount of damage to the sound. There are ten basic algorithms to chose from, ranging from classic distortion effects to digital-sounding warping and modulation effects.
There are five controls in this section, with the following functions:
Description of the various Damage Type algorithms
Here follows a basic description of the ten Damage Types available, and what parameters the P1/P2 knobs control for each type:
| Type
- The P2 knob controls Presence. Presence boosts frequencies in the high midrange before the distortion stage which in turn affects the character of the distortion. Turn clockwise for more Presence boost.
Cut section (EQ)
The sliders in the Cut section are tone controls, allowing you to cut or boost the level by up to 18dB in the low, mid and high frequency areas. The Cut section is activated with the Cut button above the sliders.
Move the slider from the middle upwards to boost the level, and from the middle downwards to cut the level of the corresponding frequency area.
Body section
The Body section is just what it says - it places the sound in a resonant “body”. Depending on the settings, the result can be similar to a speaker cabinet simulator, an auto-wah effect, or effects with no real-world counterpart. The section is based on 5 basic body types, which simulate how a sound is affected by different physical enclosures. The size and resonance of the Body types can be changed, and the section also features an envelope follower.
The Body parameters are as follows:
About the envelope follower
The Body section features an envelope follower for dynamic control of the Scale parameter. The envelope follower analyzes the amplitude of the incoming signal and changes the Scale setting accordingly - the louder the incoming signal the higher the value of the Scale parameter. The operating frequency (or size) range is set with the Scale parameter, and the envelope follower amount is set with the Auto parameter. A typical use for this is auto-wah effects - try Body Type “B” for a pronounced wah effect.
About the Master level control
The Master level control should be used when you need to increase or decrease the output level, while retaining the basic character of the effect. It can also be used to balance the level between the distorted sound and the “clean” (unprocessed) sound if the effect is to be switched in and out in the mix.
If the output level is too high, turning down the Damage Control setting would lower the output, but it would also change the character of the distortion, as would changing eq or presence settings.
Simply lowering the mixer channel level (for the channel that Scream 4 is connected to) would also work of course, but this would also mean that the level difference between the unprocessed and processed sound would increase.
So if the clip indicator lights up on the Transport, or if the distorted sound is too loud compared to the normal sound, the solution is to lower the Master output level.
As pointed out elsewhere in the manual, audio out clipping (indicated by the red clip indicator lighting up on the Transport Panel) can only happen in the Reason Hardware Interface. In other words, you never have to worry about levels passed internally from device to device. However, bear in mind that if you use high Master output settings (or a lot of boost in the Cut section) Scream 4 can quite easily cause audio out clipping - and that is most likely not a distortion effect you want!
CV inputs and outputs
On the back of the Scream 4 you will find CV inputs for controlling the following four parameters:
*
Use this for dynamically changing the amount of damage effect.
*
The use for this depends on the selected Damage Type. For example, if the Feedback effect is selected, this will control the Size parameter - connect it to the CV Out on a Matrix or synth LFO for strange, flanger-like sweeps.
*
The use for this depends on the selected Damage Type. For example, if the Scream effect is selected, this will control the Frequency parameter, producing a distorted wah wah sound.
*
Lets you control the Scale parameter in the Body section from another CV source, for wah wah-like effects, etc.
In addition, you find a CV output from the “Auto” (envelope follower) function in the Body section. By connecting this to a CV input for a parameter in another device, the level of the signal going into the Scream 4 will affect that parameter. See below for an example on how to use this.
Screamy tips and tricks
Don’t restrict yourself to using Scream 4 as a basic distortion stompbox, but try it in as many ways as possible - you may be surprised to find how often Scream 4 can add power, warmth and color to your sounds. Here are some examples:
Creating a heavy drum sound
Scream 4 is ideal for processing drums. Try connecting it as an insert effect to a Redrum device and experiment with the Damage Types and settings.
Remember that you don’t have to route the whole drum kit through the Scream device - sometimes it may be better to route the individual outputs from the bass drum, snare and/or toms to a Spider Audio Merger (see “Spider Audio Merger & Splitter”), connect the merged output of the Spider to the Scream 4 and route this to a separate channel in the Mixer. That way, hi-hats, cymbals and similar are unprocessed.
Warming up a mix with the Tape effect
If you find your mixes a bit sterile, the Tape algorithm is excellent for providing some warmth and gentle distortion:
1.
2.
Make sure the Cut and Body sections are turned off.
3.
4.
Raise the Damage Control for more tape saturation distortion, adjust P1 to get the desired brightness and raise P2 if you want a more controlled, compressed sound. If you like, you could also activate the Cut section and use the three-band EQ to further adjust the sound.
Using the Body section as a sound enhancer/phaser/wah
Nothing stops you from using the Body section on its own, without Damage. Try this:
1.
2.
It is added as an insert effect.
3.
You will find that this adds a resonant character to the sound, which will make it more “alive” and help it stand out in a mix. You should experiment with the Body settings to find the character that suits you best. You could also activate the Cut section- if you e.g. find the sound too bassy, just lower the “Lo” slider a bit.
4.
As you can hear, the Scale is modulated by the LFO.
5.
With this type of modulation setup, it’s easy to get lush, dreamy phaser effects. For a more wah wah-like sound, select Body type B and raise the Reso and Scale settings.
Emulating vintage digital gear
The first generations of digital instruments (drum machines, synths and samplers) used 8 or 12 bit sampling and processing, at low sample rates. This “lo-fi” sound is still in high demand, e.g. in hip-hop and R’n’B. Try this:
1.
2.
3.
You may also want to use the Cut section to emphasize or cut frequencies in the sound.
Creating a real dynamic wah effect with the envelope follower
As we have shown, you can get auto-wah-like effects with the Body section in Scream 4 (by using the Auto parameter). You could also use the ECF-42 envelope controlled filter and trigger this with a gate signal - this is after all a “real” filter and sounds even more like a wah effect. However, to get a “real” auto-wah effect that responds to the signal level, you need to combine both these devices:
1.
It should be velocity responsive so that the harder you play, the louder it sounds.
2.
Both these should now be connected as insert effects to the instrument device.
3.
This is of course a matter of taste - but here we will show how to use the envelope follower in Scream 4, not its sound destruction capabilities.
4.
5.
You can adjust this later if needed.
6.
7.
As you can hear, the harder (or the more notes) you play, the more the filter will open.
*
*
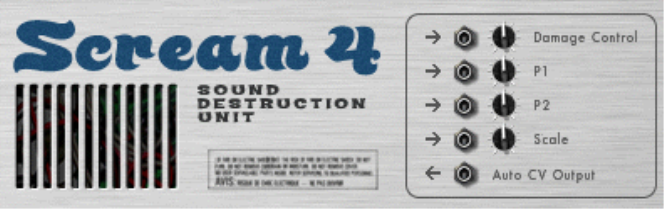
The Spider CV Merger and Splitter (see “Spider CV Merger & Splitter”) can be used to invert and split the Auto CV output for even greater flexibility.

Scream 4 Sound Destruction Unit