Sequencer Functions : Track details

Track details
Track definition
The tracks in the sequencer are where you record your audio, note and automation to create your songs. A track is always associated with a device in the rack (except for the Transport track and Blocks track). An icon with a picture of the associated device is shown in the Track List on the left hand side in the sequencer. In the Track List, the name of the associated device is shown, as well as icons and buttons related to the specific track. Each track can incorporate various lane types (depending on track type). To the right of the Track List - on the Edit/Arrangement pane - each track has its own dedicated area for recorded events.
In the picture below, six sequencer tracks are shown. From the top down are the Transport Track (which is always present and cannot be moved or deleted), two audio tracks, two instrument tracks associated with one ID8 instrument device each, and one automation track for a Mix Channel strip.
The relationship between the track, the rack and the Main Mixer
A track in the sequencer is always associated with a device in the rack; i.e. there can never be a sequencer track without an associated rack device (except for the Transport track and Blocks track). Audio Track devices and Mix Channel devices in the rack also have their corresponding channel strips in the Main Mixer. Mixer channel strips can be considered “remote controls” for their corresponding rack devices. Depending on track type, the signal chain differs somewhat. The picture below shows the signal flow in five scenarios with three different track types:
Audio track relationships
An audio track is always associated with an Audio Track device in the rack and its corresponding Audio Track channel strip in the Main Mixer. An Audio Track device can also house insert effects.
In the figure above, the audio track is associated with the Audio Track device in the rack,
which in turn is controlled from the Audio Track channel strip in the Main Mixer. The audio track
features recorded audio and mixer automation.
Instrument track relationships (for internal instruments)
An instrument track is always associated with an instrument device in the rack. The instrument device in the rack is, in most situations, connected to a Mix Channel device in the rack. The Mix Channel device in the rack is controlled from the corresponding channel strip in the Main Mixer. A Mix Channel device can also house insert effects.
In the figure above, the ID8 track is associated with the ID8 instrument device in the rack. The ID8 instrument
device is connected to the ID8 Mix Channel device in the rack, which in turn is controlled from the ID8
channel strip in the Main Mixer. The ID8 track features recorded MIDI notes and parameter automation.
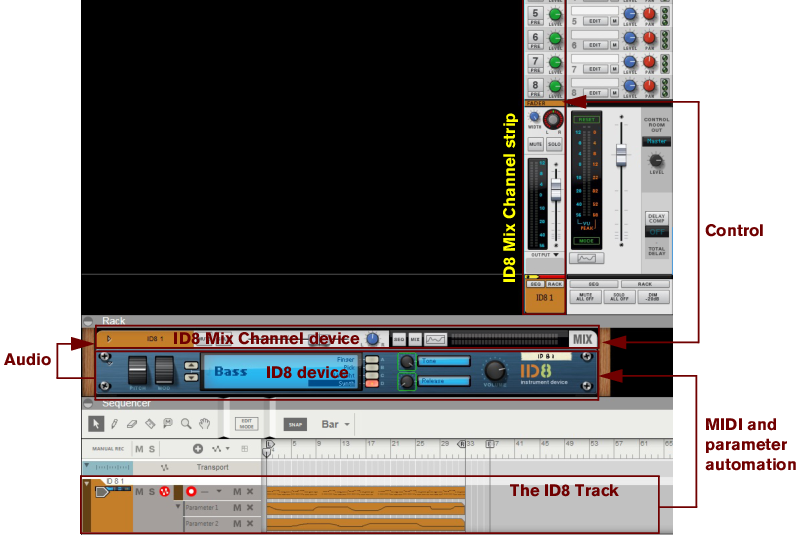
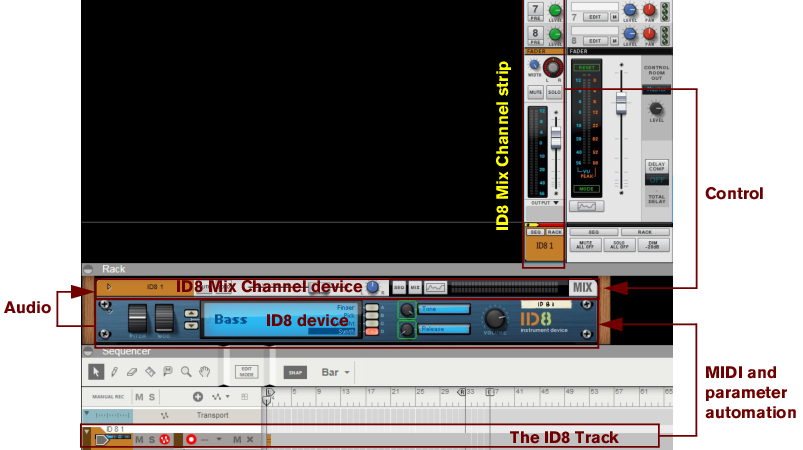
Note that when you create an instrument, the connected Mix Channel device doesn’t automatically get a track in the sequencer. If you want to record Mixer Channel automation, you have to first create a separate sequencer track for the Mix Channel device. See “Automation (non-instrument) track relationships”.
Instrument track relationships (for external MIDI instruments)
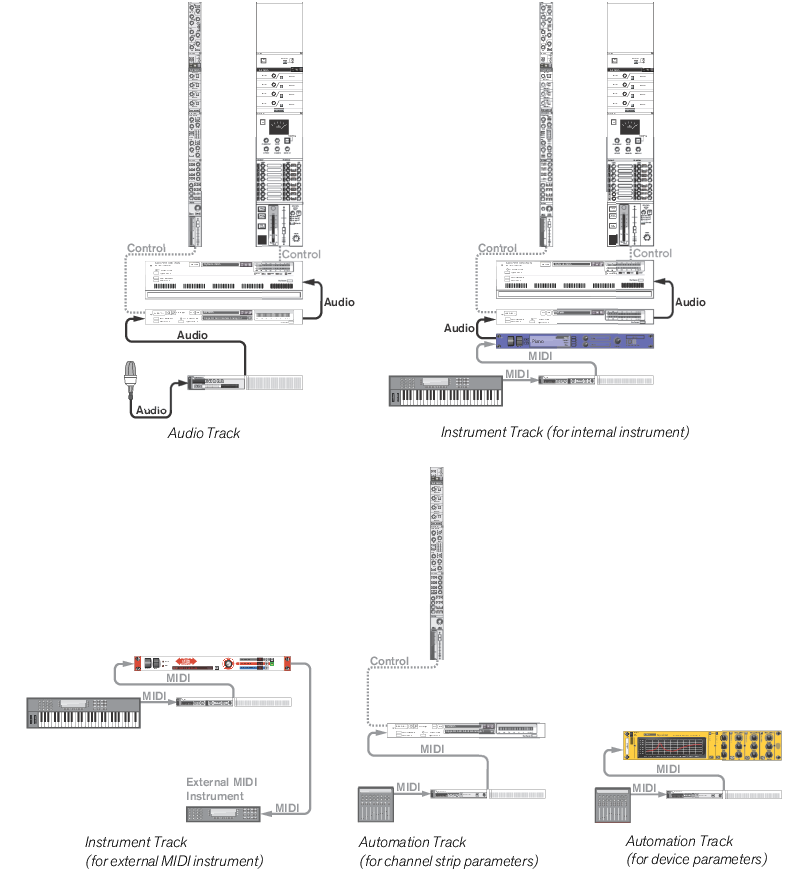
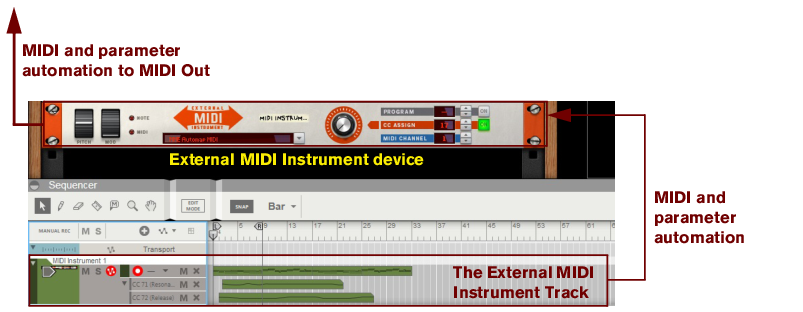
If you want to control an external MIDI instrument from the Reason sequencer you have to use the External MIDI Instrument device (“External MIDI Instrument”). The device works as a MIDI router in which you can define which MIDI Out Port and MIDI Channel you want the MIDI signals to be sent to from Reason. Since there is no internal audio involved in this setup, there is no Audio Track device or Mix Channel device present in the configuration.
In the figure above, the External MIDI Instrument track is associated with the External MIDI Instrument device in
the rack. The External MIDI Instrument track features recorded MIDI notes and parameter automation (MIDI CC#)
that is sent via the External MIDI Instrument device to the desired MIDI Out Port and MIDI Channel.
Automation (non-instrument) track relationships
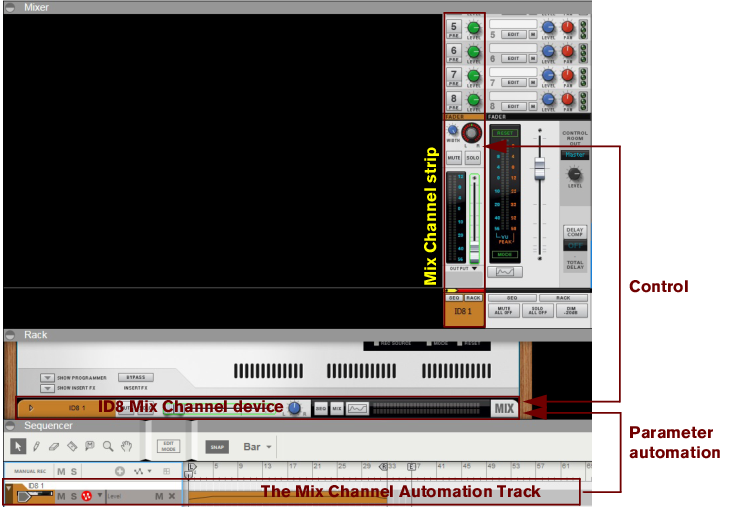
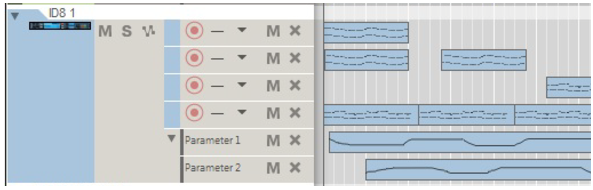
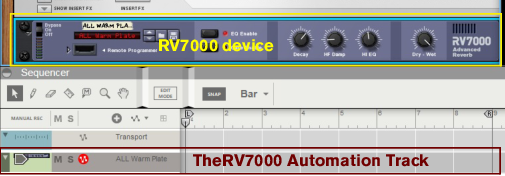
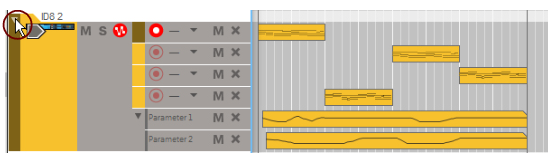
A pure automation track is always associated with a “non-instrument” device, i.e. a device which can’t receive MIDI Note information. Consequently, an automation track can only consist of parameter automation lanes. Examples of non-instrument devices are Mix Channel devices with their corresponding Mix Channel strips, effect devices, mixer devices and Spider Merger & Splitter devices. The picture below shows an example with an automated Mix Channel:
In the figure above, the Mix Channel automation track is associated with the Mix Channel device
in the rack, which in turn is controlled from the channel strip in the Main Mixer.
The picture below shows an example with an automated MClass Equalizer device. Note that no mixer channel strip is involved in this situation since the automation only concerns a non-instrument device and not any Mix Channel device:
In the figure above, the Equalizer automation track is associated with the Equalizer device in the rack.
Master Keyboard Input
The standard way of routing MIDI from a connected MIDI master keyboard or control surface to a device in the rack is to set the Master Keyboard Input in the sequencer. When MIDI is routed to a selected track in the sequencer, the notes and controller data are automatically echoed to the associated device in the rack. However, it is also possible to set Master Keyboard Input from the rack, see “Playing devices from the rack”.
By locking additional MIDI keyboards to separate devices in the rack, you will be able to play and record on several sequencer tracks simultaneously, see “Locking a surface”.
Besides the standard routing described above, it’s also possible to lock certain rack devices to specific control surfaces. See “Locking a surface” for more details.
*
Setting Master Keyboard Input
*
Master Keyboard Input set to an instrument track.
Master Keyboard Input set to an audio track.
The track gets a gray “arrow” symbol to the left, indicating that the track and associated device has Master Keyboard Input. The track and device will now respond to incoming MIDI data from a connected MIDI keyboard/control surface. By default, setting Master Keyboard Input also automatically selects the track, which is indicated by the gray color of the track in the Track List.
It’s also possible to set Master Keyboard Input and track selection independently from each other by selecting “Separated” on the “Keyboards and Control Surfaces” page in Preferences - see “Preferences – Control Surfaces”.
The relationship between tracks, lanes, clips and events
A track is the top level in the sequencer Track List hierarchy. A track can consist of one or several parallel lanes. A lane can contain clips, which in turn can contain audio recordings, note events, performance controller events, parameter automation events or pattern events, depending on track type.
An instrument track with four note lanes featuring clips with note events.
Track types
These are the different track types:
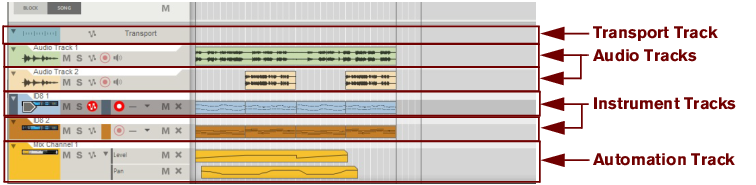
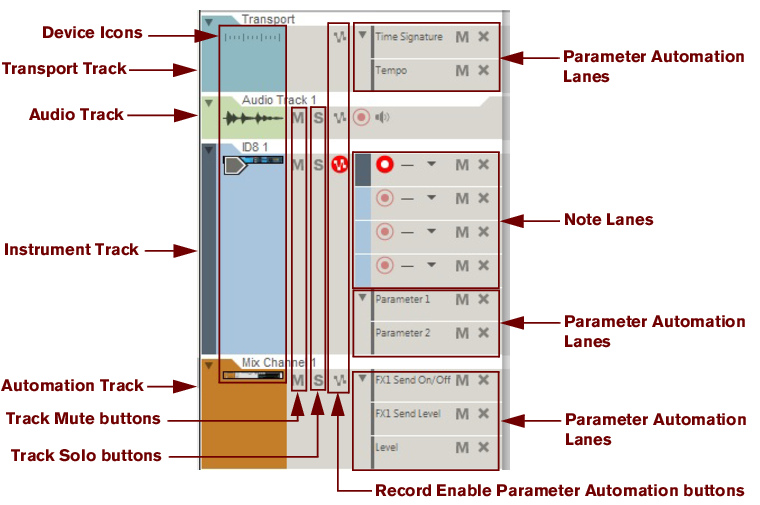
The Blocks track is present at the top of the Track List only when the Enable Blocks function on the Options menu is on. On the Blocks track you can create Block Automation clips to decide which Blocks should play back. Refer to “Working with Blocks in the Sequencer” for more information about the Blocks feature.
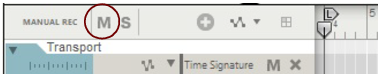
The Transport track is always present at the top of the Track List and cannot be moved or deleted. The Transport Track can have a maximum of two lanes: one containing time signature automation, and the other containing tempo automation. See “Automating time signature” and “Editing tempo automation” for more details.
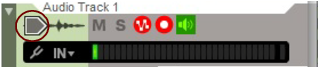
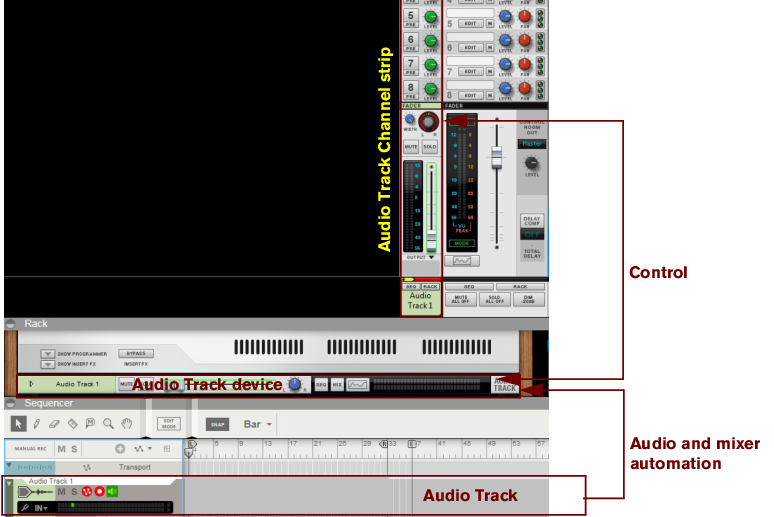
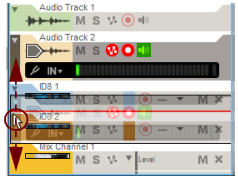
An audio track can only have a single audio lane containing clips with mono or stereo audio recordings. However, each audio clip can contain several recordings, i.e. different "takes". You can view and comp these takes in the Comp Editor. See “Audio Editing in the Sequencer” for more details. An audio track can also have parameter automation lanes containing automation for the Audio Track Channel strip parameters in the Main Mixer.
Devices that can receive MIDI notes, such as the ID8 device, will automatically be assigned a record enabled track when created. On an instrument track you can create a number of separate note lanes that can incorporate clips containing a combination of note and performance controller events. Multiple lanes are perfect if you, for example, are recording a drum track and want to record each drum sound on a separate lane. An instrument track can also have a number of parameter automation lanes that can contain clips with instrument parameter automation events.
Tracks for devices that do not receive MIDI note data (e.g. effects and mixer devices and mixer channels in the Main Mixer) can only contain parameter automation lanes. These “non-instrument” devices are not automatically assigned a track when created. To automate parameters for non-instrument devices you need to manually create a track for these. The number of available lanes is limited by the number of parameters of each device. There can be one lane for each automatable parameter in the device.
Track List elements
In the picture below, a Track List with four different tracks is shown. From the top down are the Transport Track (which is always present and cannot be moved or deleted), an Audio Track associated with an Audio Track device, an Instrument Track associated with an ID8 Instrument device and an Automation Track associated with the Mix Channel device.
The Transport Track in the picture features two parameter Automation Lanes (for Time Signature and Tempo) that have been manually created for the track. The audio track features only a single audio lane. The ID8 1 track features four note lanes and has two parameter automation lanes added. The Mix Channel 1 track is associated with the Mix Channel 1 device and has three parameter automation lanes added.
Depending on track type, the elements shown in the Track List can vary. The only common element for all track types is the "Record Enable Parameter Automation" button which should be enabled when you want to record parameter automation for the associated device. This and the other track elements will be described in detail later in this chapter.
Creating tracks
Regardless of the desired track type, you can always click the Add Track button at the bottom of the Track List and select the desired track type from the pop-up menu that appears:
Creating an audio track
An audio track can be created as follows:
1.
*
2.
By default, the audio track is set up in mono. You can easily change to stereo by selecting “Stereo Input” in the “Audio Input” drop-down list - see “Selecting audio input(s) and defining mono or stereo”. If you select “Stereo Input”, the Audio Track channel strip in the Main Mixer automatically switches to a stereo channel.
Creating an instrument track
To create an instrument track, you need only create the instrument device. An instrument track is automatically created when you create a device which can receive MIDI notes:
1.
*
Alternatively, to select an Instrument patch and automatically load the patch into the appropriate device type, hold down [Ctrl](Win) or [Cmd](Mac) and press [I], or select “Create Instrument” from the “Create” menu to bring up the Patch Browser. Under Windows, you can also press [Insert] to open the Patch Browser. In the Patch Browser you can select and preview patches before loading them into the instrument.
2.
In addition, a Mix Channel device for the instrument is automatically created in the rack and its channel strip is created in the Main Mixer. All devices are automatically connected. The Mix Channel device automatically adapts its inputs to the created instrument type - if the instrument is in mono, the Mix Channel device will be in mono, and if the instrument has stereo outputs, the Mix Channel device will be in stereo.
*
*
An External MIDI Instrument device is created in the rack and the associated track is automatically created in the sequencer. See “External MIDI Instrument” for more details on how to configure the External MIDI Instrument device for controlling external MIDI instruments.
Creating a parameter automation track for a non-instrument device
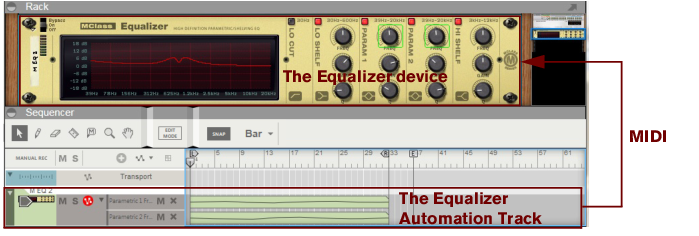
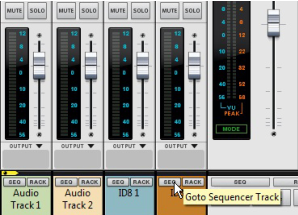
For non-instrument devices, such as effects devices and Mix Channel devices, you need to manually create a track if you want to record parameter automation. You can do that either by following the description below or by following either of the two last descriptions in “Creating/adding parameter automation lanes”.
The track creation procedure described below also applies if you have manually deleted a track for an instrument device or an Audio Track device and want to create a new track for the device:
1.
A border around a device in the Rack indicates that it has been selected.
2.
*
*
*
Short-cut for creating a Mix Channel track or Audio track
A faster way of creating a track for a Mix Channel device, or to create a new audio track (if you deleted the original one), is to go via the corresponding mixer channel strips in the Main Mixer:
1.
2.
A new track will be automatically created in the sequencer for the selected channel strip.
*
Selecting tracks
*
A selected track gets a darker gray background color.
*
*
See “About Device Groups” for information about device groups.
*
*
This allows you to e.g. move or delete several tracks in one go.
Moving tracks
*
A red insertion line is shown, indicating where the track will be placed after releasing the mouse button. All clips on all lanes of the track will be moved along with the track.
You can use the same technique to move several selected tracks at once. Use standard [Shift]-select or use [Ctrl](Win) or [Cmd](Mac) to select non-adjacent tracks.
About sorting devices and channel strips according to the track order
Note that the order of the tracks in the sequencer Track List is totally independent from the device order in the rack - and from the channel strip order in the Main Mixer. However, it’s possible to re-order devices and channel strips according to the track order in the Track List:
1.
2.
The associated devices and channel strips are now re-ordered, in the rack and Main Mixer respectively, according to the order of the selected tracks in the Track List.
*
Deleting tracks
The most common scenario would probably be to delete a track together with its associated device(s). However, it’s also possible to delete only the track while keeping the associated device(s) in the rack.
Deleting tracks together with their associated devices
*
An alert appears which prompts you to confirm or cancel the deletion of the track(s) and device(s).
*
See “About Device Groups” for more information about device groups.
Deleting tracks only
*
The tracks will be deleted without an alert but you can always use the Undo function. See “Undo and Redo”.
*
If you have deleted a track for a device and want to create a new track for the device, follow the descriptions in “Creating a parameter automation track for a non-instrument device” or “Short-cut for creating a Mix Channel track or Audio track”.
Duplicating/copying tracks and devices
As it is not possible for a specific instance of a device to have more than one track, you cannot copy or duplicate only a track. These operations will instead duplicate/copy both the track (including all clips on the track) and its associated device(s) (with all settings). The duplicated/copied devices are really just like separate devices but with the same name and settings as the original devices, although their names will have the extension “Copy” to differentiate them from the original.
To make copies of tracks and their associated devices, complete with all lanes and recorded clips, use any of the following methods:
*
See “About Device Groups” for more information about device groups.
*
*
The duplicated track(s) will be inserted below the original track.
*
To bring up the context menu, right-click (Win) or [Ctrl]-click (Mac) on the track in the Track List. The duplicated track(s) will be inserted below the original track.
*
This allows you to insert the copied track(s) and device(s) by selecting “Paste” from the Edit menu or from the track’s context menu. The copied track(s) will be pasted below the currently selected track.
*
*
*
Coloring tracks
A track can be assigned a color in the sequencer as follows:
*
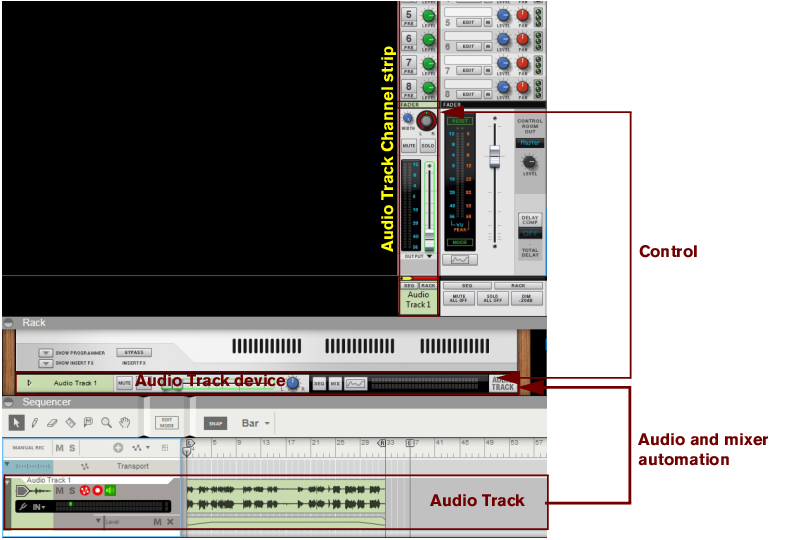
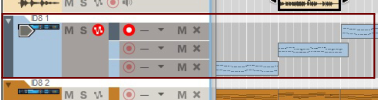
The track color is shown in the track background in the Track List. The associated Audio Track device or Mix Channel device in the rack and its corresponding channel strip in the Main Mixer will also be assigned the new color. The selected track color will be reflected in all new clips you record or draw on this track.
*
*
The track color will be automatically selected from the palette when you create a new track.
Naming tracks
Devices (and tracks) get the name of their loaded patch by default, but you can override this by manually renaming:
*
Note that naming/renaming a track also changes the name of the associated Source Device in the rack (and vice versa). Furthermore, renaming an audio track also changes the name of the associated Audio Track device in the rack as well as its corresponding channel strip in the Main Mixer. If you rename the track of a source device in a device group, its Mix Channel will get the same name. If you want a separate name for the Mix Channel, double-click in the Mix Channel name tag, in the rack or Main Mixer, type in a new name and press [Return].
See “About Device Groups” for more information about device groups.
Folding tracks
To minimize the visible height of the track, and thus allow for a better overview of the tracks in the sequencer, it’s possible to fold tracks.
*
An unfolded track.
The same track folded.
A folded track will not show the individual lanes in the Track List, and on the Edit/Arrangement Pane the clips are shown as horizontal strips. If the folded track has several lanes, all the clips on the lanes will be shown as vertically stacked strips on the Arrangement Pane. No events in the clips are shown.
*
*
*
Muting tracks
To mute a track means to silence it, so that no data is sent from the track during playback. This can be useful when you are trying out different versions of an arrangement, for bringing elements in and out of the mix during playback.
*
*
Everything present on the track will be muted.
A red “M” button in the Track List indicates that the track is muted.
*
*
*
Soloing tracks
To solo a track means that all tracks in the sequencer, except for the soloed track, are muted.
*
*
This mutes all other (un-soloed) tracks. Soloed tracks have green S buttons.
Here, the “Filmscore Pad” track is soloed (indicated by the green “S” button).
All other tracks are automatically muted (indicated by red “M” buttons).
*
*

Sequencer Functions : Track details