See the “On-screen Piano Keys” chapter for more information.
Refer to “The ReGroove Mixer” chapter for more information.
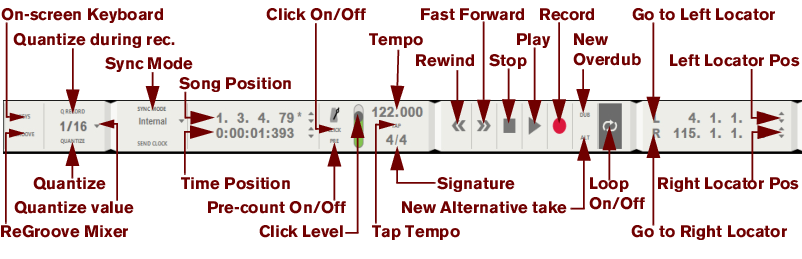
When the Q Record button is on, all recorded MIDI notes will be quantized to the currently selected quantization grid. Refer to “Quantize” for more information on quantization.
Refer to “Quantize” for more information on quantization.
Refer to “Quantize” for more information on quantization.
Here you can set the desired synchronization mode for the Reason sequencer: Internal, MIDI Clock (if applicable), Ableton Link (if applicable) or ReWire (if applicable). You can also choose “Send MIDI Clock” to sync other applications/instruments from Reason (if applicable). See the chapter “Synchronization and Advanced MIDI” for more information about synchronization.
The current song position is shown in the display. The song position is where the Song Position Pointer in the Ruler (see Ruler details) is at the moment. The display is divided into Bars, Beats, 1/16th Note and Ticks (there are 240 Ticks for each 16th note) segments. You can edit the position of the Song Position Pointer, and thus change the song playback position, according to the descriptions in “Transport Panel segment displays”.

The current position of the Song Position Pointer in the Ruler (see Ruler details) is shown in time format (hours, minutes, seconds and milliseconds) in the display. You can change the position in time of the Song Position Pointer, and thus change the song playback time position, according to the descriptions in “Transport Panel segment displays”.
The click will sound on every beat, with the first beat in every bar accented (higher pitched). See “Click and Pre-count” for more details.
Pre-count will only be present before recording - not before regular playback. See “Click and Pre-count” for details about selecting number of pre-count bars etc.
See “Click and Pre-count” for more details.
The current song tempo is shown in the display in BPM (Beats Per Minute) and 1/1000 of a BPM. You can edit the tempo according to the descriptions in “Transport Panel segment displays”. The Tempo range is 1.000-999.999 BPM.
The current song time signature is shown in the display. You can edit the time signature according to the descriptions in “Transport Panel segment displays”.
|
•
|
|
•
|
Alternatively, press [*] on the numeric keypad or hold down [Ctrl](Win) or [Cmd](Mac) and press [Return] on the computer keyboard. If Pre-count has been activated (see Pre(-count) On/Off above), the recording will begin after the set number of pre-count bars.
Clicking on any of these buttons will add additional audio tracks or note lanes for overdub purposes. Refer to “Overdubbing audio using the “Dub” function” and “Recording notes using the “Dub” and “Alt” functions” for more details about these functions.
The current positions of the Left and Right Locators in the Ruler (see Ruler details) are shown in the displays. The display is divided into Bar, Beat, 1/16th Note and Ticks (there are 240 Ticks for each 1/16th Note). You can change the positions of the Locators, and thus change the loop playback region, according to the descriptions in “Transport Panel segment displays”.
|
| Function
|
|