Song File Handling : Saving Songs

Saving Songs
Saving a Song
You will always be able to save your Songs in Reason. It doesn’t matter if you’re running in authorized or unauthorized (Demo) mode.
The “Save” function
To save a Song, proceed as follows:
1.
If this is the first time you’re saving the song, a file dialog will appear where you can specify a name and destination.
2.
Once you have saved a song, selecting “Save” will simply save it under the same name and in the same location, without showing a dialog.
*
*
*
The “Save As...” function
To save an existing Song under another name and/or in another location:
1.
The “Save As” dialog appears.
2.
*
Saving and optimizing a Song
When you record audio in the Sequencer, the recordings are stored in your Song document. If you remove recordings in your song while editing, there might be “empty” areas left in the document, similar to a fragmented hard disk. To “defragment” the Song document, and thus reduce the file size, you can use the “Save and Optimize” command on the File menu. Note that the “Save and Optimize” command can only be used on previously saved Song documents.
*
The Song will be optimized and saved at the original location.
*
*
*
Including Song Information
Selecting “Song Information” on the File menu opens a dialog in which you can add information about your song. For example, if you plan to send the song to other Reason users, this dialog allows you to add contact information, comments about the song, etc.
*
The Song Information dialog opens.
The Song Information dialog contains the following items:
The text you add here will be displayed directly after the file name in the song window’s title bar.
This is where you could add notes and comments about your song.
This allows you to add a picture to the song. The picture will be displayed when the song is opened.
*
*
*
*
Here, you can type in your web site URL. When a user opens your song, he/she can go directly to your web site by clicking the Browse button that appears in the splash (provided there’s an Internet connection available).
Here, you can specify your e-mail address if you want other Reason users to e-mail you their comments, etc.
About Self-Contained Songs
The Song is the main file format in Reason. A Song contains the device setup and all settings and connections in the Rack, all Main Mixer Channel settings as well as everything you have recorded in the Sequencer. However, this is not always sufficient. If you want to open your song on another computer, or send it to another Reason user, you will also need to include all samples and REX files used by the Reason devices in the Song. To make this easier, Reason allows you to create “self-contained” songs. A self-contained song contains not only the references to the used samples and REX files, but also the files themselves. You can choose exactly what files should be included in the self-contained song.
*
To specify what files should be included in the self-contained song, proceed as follows:
1.
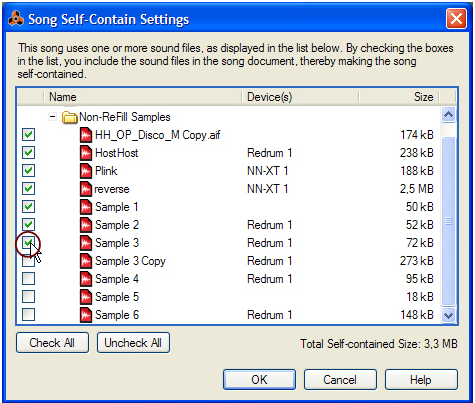
The “Song Self-Contain Settings” dialog appears, listing all samples and REX files used in the song:
2.
Note that samples and REX files from ReFills can also be self-contained (but not un-self-contained, see below).
*
Similarly, the “Uncheck All” button unchecks all checkboxes.
3.
The next time you save your Song, the specified sounds will be automatically included in the Song file.
*
“Un-self-containing” a Song
If you have a self-contained song which contains one or several sounds embedded in the song file, you may want to extract these sounds and make the song refer to them on disk as usual. This is done in the following way:
1.
The “Song Self-Contain Settings” dialog appears.
2.
3.
Now, Reason will check for each “extracted” sound file whether it is available (at its original, stored location) or not.
This would be the case if you made the song self-contained yourself, and un-self-contain it on your own computer (provided that you haven’t removed the original sound files from disk since you made the song self-contained).
The extracted file will be saved in the specified folder, and the path in the song will be adjusted. This would be the case if you were given the self-contained song by another user, for example.
*
*
If you un-self-contain samples that were modified in the Edit Sample Window and feature Start and End Markers and/or loop crossfades, the Lossy Sample Export dialog appears. The available options are described further down in the “Exporting samples” section in the Sampling chapter. Note that the option you select in the Lossy Sample Export applies to all samples you have deselected in the Song Self-contain Settings dialog!
Making a Song appear as a Template Song
If you want Songs you have created to appear on the “New from Template” sub-menu, and be available for selection when you use the “New from Template” command (see “Creating a new Song from a template”), you need only move or copy the Song(s) to the Template Songs folder in the Music folder on your hard drive. The easiest way to get to this folder is by selecting File > New from Template > Show Template Folder. This brings up the Template folder in Windows Explorer or Finder on Mac.
A note about saving Songs as audio files
It’s also possible to export your Songs as audio files in WAV or AIFF format. Refer to “Exporting Songs or parts of Songs” for more information.

Song File Handling : Saving Songs