The Main Mixer : Managing mixer channels

Managing mixer channels
Creating and deleting channels
Mixer channel strips are automatically created when you create Audio Track and Mix Channel devices. In most situations, a Mix Channel device (with its channel strip) is also automatically created when you create an instrument device (see “Creating devices”).
To delete a channel, proceed as follows:
*
Alternatively, select “Delete Channels and Tracks” from the Edit menu or context menu.
This will delete the channel strip, device and associated track. An alert appears asking you to confirm deletion.
If there are devices connected to the Mix Channel device you delete, and “Auto-group Devices and Tracks” is selected on the Options menu, the alert will ask if you want to delete only the selected device, or all devices in the Device Group (see “About Device Groups” for more information).
Selecting channels
To select channels in the mixer you can use any of the following methods:
*
If you are not editing parameters but want to select a channel, the channel header is a good place to click. You could also click anywhere on the channel strip background (where there are no parameters or displays).
*
The selection will move to the next adjacent channel (left or right) with each keystroke.
*
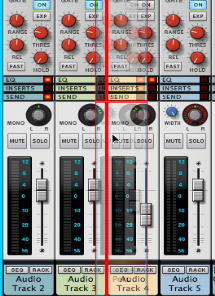
This allows you to e.g. change the Fader levels of all selected channels simultaneously (see “Changing Fader section parameters on multiple channels simultaneously”), or move or delete several channels in one go. The last selected channel will be given edit focus which is indicated by a red strip in the channel header (see “Channel Header section”).
*
The Main Mixer must have focus for this item to be available.
Moving channels
To move channels in the Main Mixer, simply select them and use standard drag and drop method. A red insertion line will show the insertion point, exactly like when moving devices in the rack or tracks in the sequencer.
Moving a channel. The thicker red line indicates where the moved channel will be inserted.
Displaying channels, devices and tracks in the same order
Channel strips in the mixer, Audio Track and Mix Channel devices and tracks can be independently re-ordered. This allows you to set up the main work areas according to your preferences.
Should you wish to display mixer channels, devices in the rack and tracks in the same order, proceed as follows:
1.
This could either be the Main Mixer, the sequencer or the rack.
2.
This menu item would be “Select All Devices” if the rack is selected, or “Select All Channels” if the mixer is selected. You could also select channels, tracks or devices manually.
3.
Channels, devices and tracks will now all be presented in the same order as the area you selected in the first step.
Copying and duplicating channels
Cut, Copy and Paste functions
Selected channels can be moved or copied using the “Cut/Copy/Paste Channels and Tracks” functions on the Edit menu or channel strip context menu. This allows you to copy one or several channels from one Song document to another. The following rules apply:
*
Cut moves the channels to the clipboard, removing them from the rack, sequencer, and mixer, while Copy creates copies of the channels on the clipboard, leaving the originals as they were.
*
*
If a channel is selected when pasting, the copied channel(s) will be inserted to the right of the selected channel.
Duplicating channels
*
Several selected channels can be duplicated. You can also select “Duplicate Channels and Tracks” functions on the Edit menu or mixer context menu.
*
Copy channel settings
If you wish to copy mixer channel settings from one channel to another you can use this function.
1.
Copy channel settings only works when a single channel is selected, if several (or no) channels are selected the function is not available.
2.
On the submenu you can select to copy channel settings from a single section (Dynamics, Filters and EQ, Insert FX or FX Sends), or “All”, which copies everything including any Insert FX devices with their settings.
3.
The type of settings you copied will be reflected in the paste menu item, e.g. “Paste Channel Settings: EQ” if you only copied the EQ section.
*
This can only be done with one selected channel at a time - pasting channel settings is not possible if several channels are selected.
*
The procedure is the same. You can copy settings from a device to a mixer channel or vice versa.
Resetting channel settings
Resetting channel settings initializes all channel strip parameters to default values and removes any insert effects (see “Insert FX section”) from the channel.
*
Channel settings reset is not possible if several channels are selected.
*
Naming mixer channels
New Audio Tracks will by default be named “Audio Track + number”. When creating an Instrument, the Mix channel will take its name from the patch of the connected Instrument device.
*
A text field opens allowing you to enter a name for the channel.
Channel names are reflected - and can be changed - in all areas; the Track List., the Main Mixer and in the device. Mix Channel source devices and tracks have independent names from the Mix Channel device/channel strip. By default, a Mix channel takes its name from its source device (typically, the instrument device connected to it). If you change the name of the source device, the Mix channel name will change too.
If you want the source device and Mix channel to have different names, change the name of the Mix channel. To return to the default state (and use the source device name for the Mix channel), just delete the Mix channel name.
*
Coloring mixer channels
Mixer channels are shown with the same color as their corresponding rack devices and tracks. The color is shown in the channel header and channel strip section headings:
A channel strip with all sections folded, except for the Fader section.
This is true regardless of whether you change the color in the mixer, in the rack or in the sequencer.
For example, this is useful if you have a Redrum with separate outputs connected to different Mix Channels, and want these to have different colors in the mixer.
*

The Main Mixer : Managing mixer channels