RV7000 Advanced Reverb

RV7000 Advanced Reverb
The RV7000 Advanced Reverb
The RV7000 is a high quality reverb processor. It features nine different reverb and echo algorithms, ranging from rooms and halls to special effects. Since the RV7000 comes with a number of useful reverb presets, you could simply select one and tweak the most important parameters on the main panel - or you could use the Remote Programmer panel to fine-tune the reverb in great detail.
The RV7000 also contains an equalizer and a gate section. Both of these are for processing the actual reverb sound, making it possible to get virtually any kind of reverb character, including gated reverb.
About the Patch format
The RV7000 features programmable effect presets. In the Factory Sound Bank you will find a number of preset Patches which can be used as they are or provide you with a good starting point for further tweaking.
Patches use the Windows file extension “*.RV7”. Loading and saving Patches is done in the same way as for instrument devices.
Connections
Typically you connect the RV7000 as a send effect, as this allows you to use it for processing several different mixer channels. However, it’s also possible to use it as an insert effect - use the Dry/Wet control on the main panel to adjust the balance between the dry, unprocessed sound and the reverb. Note:
*
It’s also possible to use it as a mono in - stereo out effect. Which type of connection to use (mono or stereo in) depends on the material. If the audio sources are in mono (or in stereo but with no important difference between the left and right channel) using a mono input is sufficient.
*
If you want to use RV7000’s Reverse reverb effect, you should consider connecting it as an insert effect or using a Send on the Mixer, with Pre-fader mode selected (and the channel fader lowered).
This is because you typically don’t want to hear the dry sound when using the Reverse effect. See “The Gate section”.
The main panel
The RV7000 main panel.
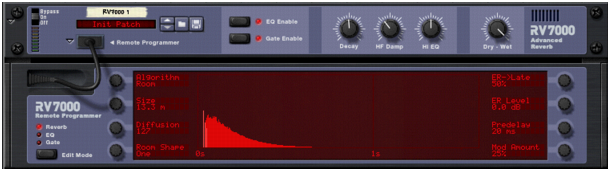
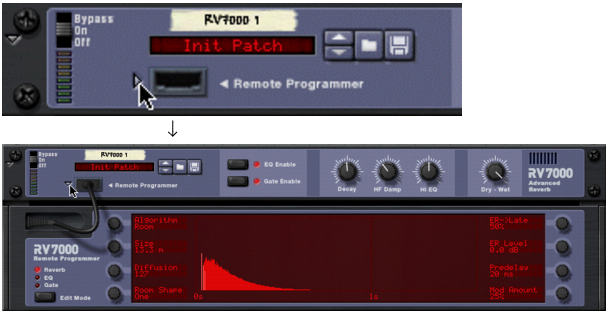
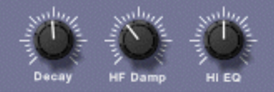
When you create an RV7000, only the main panel will be shown. This contains a section for handling patches, on/off buttons for the EQ and Gate sections, the most important reverb parameters and a dry/wet mix control. To select a reverb patch and make coarse adjustments, this is all you need.
The remote programmer
Clicking the arrow button next to the “cable slot” on the main panel brings up the remote programmer panel.
This is where you make detailed settings for the reverb. Note:
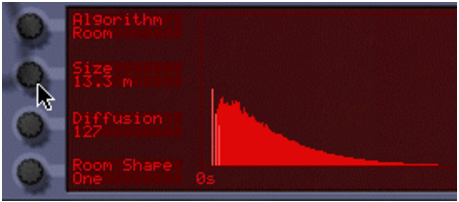
Settings are made with the eight dials around the graphic display. The functions of the dials differ depending on the selected Edit Mode and the selected reverb algorithm. Next to each dial, the display shows the name and value of the corresponding parameter.
Reverb algorithms and parameters
Common effect device parameters
While the specific parameters for the RV7000 effect device are described below, some features and procedures are common to all effect devices. Please, refer to “Common effect device features” for information about the Input meter, the Bypass/On/Off switch and Signal Flow Graphs on the effect device.
About the main panel parameters
On the main panel you find three parameters that are available for all algorithms:
This is a high-shelving EQ that works much like a typical treble control on a mixer or amplifier. Lower the setting for a softer reverb sound or raise it to get more high frequencies.
Selecting an algorithm
You select a reverb algorithm in the remote programmer panel:
1.
2.
3.
The selected algorithm is shown in the display next to the dial.
Here’s a quick overview of the nine algorithms - for details and parameter descriptions, see below.
Small Space
This algorithm places the sound in a small enclosed space, ranging from a tiny resonant body to a room. The parameters are:
Adjusts the positioning of the emulated walls in the small space. The lowest setting emulates two directly opposed walls while higher settings emulate more walls and angles, for a more complex resonance.
Room
Emulates a medium-sized room, with the following parameters:
The first “answers” in the reverb are called early reflections (ER) and are typically more pronounced than the actual reverb tail. This parameter sets the time between the early reflections and the reverb tail. This is set as a percentage - the actual delay time depends on the Size setting.
Hall
Emulates a hall. The parameters are the same as for the Room algorithm above (but the Hall algorithm offers larger Size settings).
Arena
Emulates the ambience in an arena or concert hall, with long pre-delay times (separate for left, right and center):
Plate
A classic plate reverb, excellent for vocals for example. The parameters are:
Spring
An emulation of a spring reverb as can be found in guitar amplifiers, organs, etc. The spring reverb has the following parameters:
When sending a signal to a real-life spring reverb, the initial transient will produce a quick, characteristic sweeping tonal noise. This is because different frequencies in the sound are delayed by different amounts (a phenomenon called dispersion). This parameter controls the frequency of that sound.
Echo
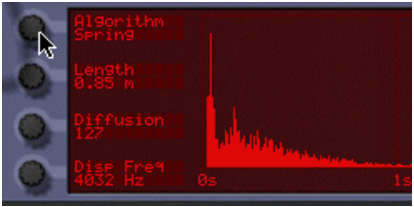
This is an advanced echo effect, with diffusion controls and tempo sync. When Echo is selected, the Decay control on the main panel controls the echo feedback (the number of echo repeats). The parameters are:
Sets the time between each echo.
When Tempo Sync (see below) is off, the echo time is set in milliseconds (10 - 2000 ms); when Tempo Sync is on you set the echo time as a number of 1/16 notes or 1/8 triplet notes, in relation to the current song tempo.
When this is set to 0, the echo will sound as a standard delay with clear, precise repeats. Raising the Diffusion setting will introduce additional echoes very close to the “main” echo repeats, causing a “smeared” echo sound. This will also expand the echo stereo image.
Adjusts the spacing of the additional echoes added by the Diffusion parameter. For a very smeared echo (sound more like a reverb), set both Diffusion and Spread to their maximum values.
Multi Tap
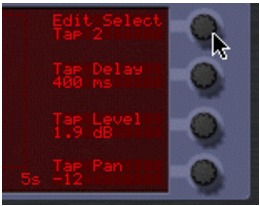
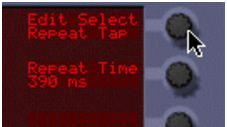
The Multi Tap delay produces up to four different delays with separate delay times, panning and level. The whole set of four delay taps can then be repeated at a given rate. Again, the Decay control on the main panel controls the feedback (the number of repeats for the whole multi tap set). All delay times can be tempo synced.
Note: this algorithm is handled a bit differently since you make separate settings for each delay tap:
Tap 2 selected for editing.
With short Repeat times, the first tap may be repeated before the last tap has sounded. This can be used to create very complex multiple delay effects.
The common parameters (to the left) are:
When Tap 1 - 4 is selected with the Edit Select parameter, you can make the following settings for the selected delay tap:
Sets the delay - the time from the source signal to the tap.
When Tempo Sync is off, the delay time is set in milliseconds (10 - 2000 ms); when Tempo Sync is on you set the delay as a number of 1/16 notes or 1/8 triplet notes, in relation to the current song tempo.
When Repeat Tap is selected with the Edit Select parameter, there is only one parameter to the right in the display:
Sets the time between each repeat of the whole multi tap set. The number of repeats is set with the Decay control on the main panel.
When Tempo Sync is off, the repeat time is set in milliseconds (10 - 2000 ms); when Tempo Sync is on you set the repeat time as a number of 1/16 notes or 1/8 triplet notes, in relation to the current song tempo.
Reverse
The Reverse reverb algorithm in RV7000 is special in that it actually “moves” the source audio as well. Sounds fed into the Reverse reverb are “sampled”, a reverse reverb is created and played back and finally the “sampled” original sound is played back. For example, if you feed a snare drum hit into the Reverse reverb, you will hear a rising “backwards” reverb, followed by the snare drum hit.
Therefore, you probably don’t want to hear the first, original (dry) sound. There are two ways to set this up:
*
*
Connect the RV7000 as a send effect using one of the Sends on the Mixer, activate the Prefader (PRE) switch for the send and lower the mixer fader completely for the source signal.
That way, the signal will be sent to the reverb but the dry sound from the Mixer channel isn’t heard. Again, the Dry/Wet control should be set to “Wet”.
Note that with this algorithm, raising the Decay setting on the main panel will make the reverse reverb start earlier and build up under a longer time. Similarly, the HF Damp parameter affects how fast the high frequencies are built up in the reverse reverb. In the remote panel, the Reverse algorithm has the following parameters:
This sets the time from when the source signal is fed into the reverb until it is played back again. It is during this time you will hear the reverse reverb, as shown in the display.
Note: As stated above, the Decay setting determines the length of the actual reverse reverb - in essence how soon it starts after the source signal. But of course, the reverse reverb cannot start before the original source signal! If you set Decay to a longer time than the Length setting, the reverse reverb will start abruptly, immediately when the source signal is fed into the reverb. If this sounds complicated, just take a look at the RV7000 display and try the settings - you will soon see how it works.
Density governs the “thickness” of the Reverse effect. If this parameter is turned down to zero, the effect produces individual delays rather than a dense “wash”, which can be used as a special effect. Worth noting is that if Density is set to around 50%, this can considerably reduce the CPU load without altering the sound of the effect too much. Exactly how much the Density parameter can be reduced without altering the sound depends on the source material.
The EQ section
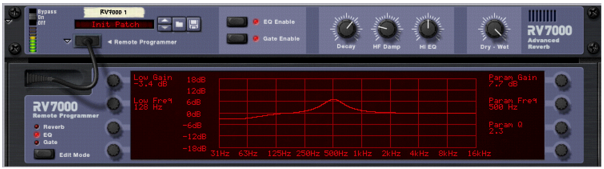
The equalizer in RV7000 affects the wet reverb sound only and is used for shaping the character of the reverb. There are two EQ bands, one for low frequencies (shelving) and one full-range parametric EQ.
*
*
*
The parameters are:
*
The reason why this is on the main panel and not in the EQ section is simply that it’s a setting you may want to adjust often, without having to open the remote programmer panel.
The Gate section
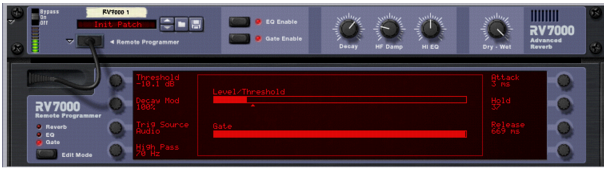
The Gate section allows you to create gated reverb effects with a lot of options and possibilities. You can either trigger the gate from the source audio signal or via MIDI or CV.
When triggering the gate from the source audio signal, it works like this:
When the source signal level drops below the threshold level, the gate closes after a time that depends on the Hold parameter and the level of the source signal (see the parameter table).
*
In audio trigger mode, the actual gate time will vary depending on the source signal.
When triggering the gate via MIDI or CV, it works like this:
Whenever the gate receives any MIDI note (sent to the RV7000) or a gate signal (connected to the Gate Trig CV input on the back of the RV7000), the gate opens for the duration of the note or gate signal.
Note:
*
*
*
This is useful for checking what happens, how the gate triggers, etc.
The parameters for the Gate section are:
This modulates the reverb Decay parameter so that the decay time is lowered when the gate closes. When this is set to zero, no decay modulation happens - this means that if the gate is closed and then opened again, you may hear “previous” reverb tails that are still ringing. If you raise the Decay Mod setting, the decay will automatically be lowered when the gate is closed, eliminating this effect.
A high-pass filter that affects the audio that triggers the gate (only active when Trig Source is set to “Audio”). If you raise this setting, sounds with low frequencies only will not open the gate. Note that this setting doesn’t affect the sound of the reverb, only the triggering mechanism.
Internally, the gate is controlled by an envelope follower that analyzes the source signal level and generates a “level CV signal” accordingly. This signal is compared to the Threshold level to determine whether the gate should be opened or closed. The Hold parameter affects how quickly the envelope follower responds when the source signal level drops - you could say that this is the decay control for the envelope follower. The higher the Hold setting, the longer it will take for the envelope follower signal to drop below the threshold level and close the gate. But the resulting time also depends on the source signal level - with a loud signal, it will take longer time for the envelope follower to drop to the threshold level. Therefore, the actual gate time depends both on the Hold setting and on the character of the source audio.
CV Inputs
On the back of the RV7000 you find three CV inputs. These are:

RV7000 Advanced Reverb