Inline editing, including stretching of audio slices, can only be performed on Single Take clips. If you have Comp clips that you want to edit inline, you first have to convert the Comp clips to Single Take clips, see “Turning Comp clips into Single Take clips”.
|
|
If you plan to comp the audio in your clips in the Comp Editor, always do that before you start to work with slice stretching etc. inline. It will save you a lot of work if all the comping has been done beforehand!
|
|
|
|
|
To get the best sound quality when you are stretching and quantizing audio it’s important that you have selected the correct Stretch Type for the audio track, see “Selecting Stretch and Transpose Type”.
|
|
|
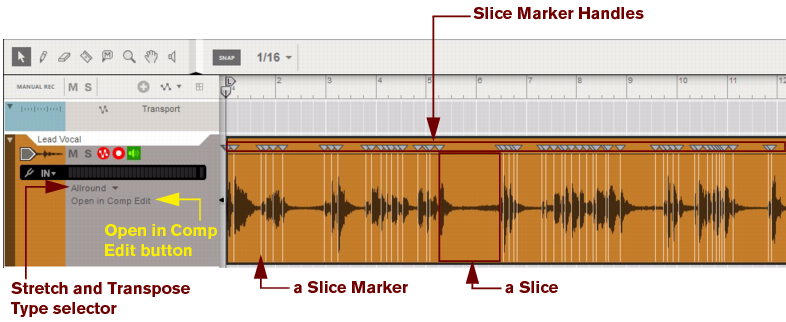
When a Single Take audio clip is opened inline, Reason automatically detects the transients in the sound and marks these with vertical white lines - Slice Markers. By moving Slice Markers left or right you stretch (warp) the audio between the nearest Slice Markers on either side, i.e. you change the timing without affecting the pitch. You can manually add and remove Slice Markers. It is also possible to “decouple” and move the Slice Markers without stretching the audio.
|
•
|
Here is where you can select the most suitable Stretch and Transpose Type for the audio on the track. See “Selecting Stretch and Transpose Type” for more details.
When editing audio inline, some of the Toolbar tools have different functionality than when editing note and automation clips. There are also some additional tools that are unique to inline editing of audio.
The Slice is played back once in its entirety, from the start Slice Marker to the end Slice Marker of the desired Slice, each time you click.
|
|
A Slice is the portion of audio between two adjacent Slice Markers. A Slice Marker indicates the beginning of a Slice - and consequently the end of the preceding Slice (if it’s not the first Slice in the clip).
As you hover over a Slice Marker or a Slice Marker Handle, the arrow switches to a double-arrow. A selected Slice Marker is indicated by a black Slice Marker Handle.
|
|
If more than one Slice Marker has been selected, a Slice Group Handle appears below the waveform. You could then click and drag the Slice Group Handle sideways to move all selected Slice Markers as a group, see “Moving several Slice Markers”.
|
|
To select a range of Slice Markers, draw a rectangle with the Selection Tool (Arrow), in the Slice Marker Handles area or in the waveform area, that touches the desired Slice Markers:
|
The range of Slice Markers can then be moved as a group by clicking and dragging the Slice Group Handle sideways. You can also stretch the range in an “accordion style” fashion by clicking and dragging any of the selected Slice Marker Handles in the range, see “Stretching a range of Slices”.
|
|
Under Windows it’s also possible to select a range of Slice Markers by clicking a Slice Marker and then holding down [Shift] and clicking the first or last Slice Marker in the desired range.
|
Now, you can move all Slice Markers as a group by dragging the Slice Group Handle sideways (see “Moving several Slice Markers”), or stretch the entire range of Slices (see “Stretching a range of Slices”).
When you open a clip, there will be a Slice Marker at each transient, plus one at the start and one at the end of the clip. If you are not satisfied with Reason’s automatic Slice Marker assignments you can add Slice Markers manually:
|
|
If you are not satisfied with the position of the Slice Marker, you can reposition it afterwards, see “Repositioning Slice Markers”.
|
|
Stretching can be used for adjusting the timing of the transients in the audio clip. You can also use stretching to create special effects such as increasing or decreasing the lengths of the Slices. Stretching can be applied on single Slices as well as on a selection of Slices.
|
|
To get the best sound quality when you are stretching audio it’s important that you have selected the correct Stretch and Transpose Type for the audio track, see “Selecting Stretch and Transpose Type”.
|
|
|
Reason features very sophisticated audio stretch and transpose algorithms for pristine results. Reason always performs audio stretching in two parallel steps:
Since the high quality stretch is performed in the background, you can still continue to work with your song without any interruption. When the high quality stretch data has been calculated, the Calc indicator goes out and the high quality audio data will be heard on playback.
All selected Slice Markers will be moved as a group. The Slices between the selected Slice Markers and their closest unselected Slice Markers will be stretched.
|
•
|
It’s also possible to move a range of Slices by selecting a range of Slice Markers as described in “Selecting Slices and Slice Markers” and then dragging the Slice Group Handle sideways.
|
|
|
If you drag a Slice Marker within the selected range, all selected Slices will be stretched proportionally against the start and end Slice Markers of the selected range:
|
Audio quantizing can be made in the Quantize section on the Transport Panel, in the Tool Window or from the context menu or Edit menu.
|
|
To get the best sound quality when you are quantizing audio it’s important that you have selected the correct Stretch Type for the audio track, see “Selecting Stretch and Transpose Type”.
|
|
|
The difference between quantizing audio and MIDI notes is that several Slice Markers cannot be quantized to the same position. Instead, only the Slice Markers closest to the quantization grid will be moved - the remaining Slice Markers will be left unaffected.
|
|
|
This alternative is very handy if you only want to quantize to a set quantization value, and don’t need the extra options featured in the Tool Window.
The Split at Slices function allows you to create separate audio clips out of a Single Take clip. Splitting can be useful if you, for example, want to reverse parts of the original clip or if you want to export single or multiple Slices as separate samples for use in any of Reason’s sampler devices. The split point(s) will be located at the selected Slice Markers in the clip.
If you like, you can now select the desired clip(s) and move, reverse (see “Reversing Clips”) or choose to bounce the clip(s) to samples (see “Bounce Clip(s) to New Sample(s)”).
A great feature with Single Take clips is that you can bounce them to REX Loops. You could then load your bounced REX file for further processing in a Dr Octo Rex device, for example! Here is how:
|
|
This way you make sure that the REX Loop will sound the same as the original audio clip. If the clip is not adjusted to a full Beat, Reason will automatically expand the clip end to the closest full Beat during the bounce operation.
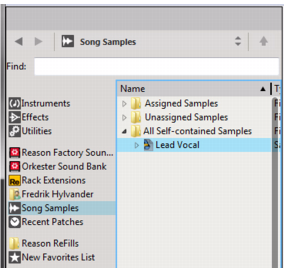
The bounced REX file ends up in the “All Self-contained Samples” folder in the Song Samples location in the Browser, and is named after the original clip name:
|
5.
|
To load the bounced REX file in a new Dr Octo Rex device, either double click the REX file or select the REX file and click the “Create” button at the bottom of the Browser.
|
This is a shortcut for creating a Dr Octo Rex device and loading the selected REX Loop in Slot 1 of the Dr Octo Rex device in one go.
|
|
Refer to the “Dr. Octo Rex Loop Player” chapter for information on how to work with REX Loops in the Dr Octo Rex device.
|
|
|
If you want to load your REX Loop in another sampler device, you first have to un-self-contain the REX file, see ““Un-self-containing” a Song”. Then, create the sampler device and load the un-self-contained REX file from disk.
|
|
1.
|
|
3.
|
If you get lost in the inline Slice editing, there is a handy command for reverting back to the clip the way it was before you started editing the Slice Markers:
This will revert all slice edits and the clip will play back with its original timing. Any manually removed Slice Markers will appear again, and any manually added Slice Markers will be removed.


