|
|
To be able to control external MIDI instruments from Reason it is required that you have installed a MIDI interface on your computer. Refer to the documentation of your specific MIDI interface for installation instructions.
|
|
1.
|
Connect your external MIDI instrument to the MIDI interface on your computer: MIDI Interface MIDI Out to MIDI instrument's MIDI In.
|
If you want to play and/or record MIDI from your MIDI instrument to Reason, connect your instrument’s MIDI Out to your computer’s MIDI In as well, see “Recording MIDI Controller automation from the controlled MIDI instrument”.
|
|
If you are using the same MIDI instrument also as MIDI Master Keyboard for Reason, you will need to set it to “MIDI Local Off”. Otherwise you will get doubled notes when you play your MIDI instrument.
|
|
|
To be able to hear your external MIDI instrument in Reason, connect your instrument’s audio output(s) to the desired audio input(s) of your audio interface. Then, create an Audio Track, select the appropriate audio inputs and make sure the Monitor button on the Audio Track in the sequencer is on.
|
|
2.
|
Create an External MIDI Instrument device from the “Instruments >” sub-menu in the Create menu or from the Instruments tab on the Device Palette in the Tool Window.
|
|
|
Make sure that the MIDI instrument controlled by the External MIDI Instrument device does NOT transmit the MIDI data back to Reason (e.g. via “MIDI soft through” or “MIDI throughput”). This could cause MIDI feedback loops that could result in MIDI overflow in Reason.
|
Refer to the user manuals for your MIDI instruments for information on how to set the instruments to MIDI Local Off and how to prevent MIDI feedback loops.
|
4.
|
Besides the keyboard note control, you can also control the sound of your external MIDI instrument by using the Pitch (bend) and Mod (wheel) controls, as well as Keyboard Velocity and Aftertouch.
How your sound responds to these controls is totally dependent on how the sound was programmed in your external instrument. For example, Pitch Bend range, Mod Wheel modulation destination, Velocity and Aftertouch modulation need to be defined on your external MIDI instrument.
The Program Change MIDI message is used for selecting the desired sound/program/preset on MIDI instruments that have memory locations for stored sounds. The External MIDI Instrument device has a dedicated control for this, the Program control.
|
2.
|
Click the up/down arrow buttons to select the Program number that corresponds to the sound you want to recall on your external MIDI instrument.
|
As soon as you load your Reason song, the External MIDI Instrument device will automatically send out the selected MIDI Program Change message on the set MIDI Port. This ensures that your connected instrument will play the correct sound/program/preset.
If you like, you can automate the Program parameter to change sound/program/preset of your external instrument during playback of your Reason song.
|
2.
|
Now, you can edit the Program Change lane in the sequencer and insert Program Change automation points wherever you like in your song.
|
|
|
It’s recommended to place the Program Change automation points slightly before the positions where you want the new sound/program/preset to appear in your song. This is to allow for the time it takes to load the new sound in your external instrument.
|
The MIDI Bank Select message is used for selecting specific banks of sounds/programs/presets in MIDI instruments that feature several sound banks.
There is no specific panel control for MIDI Bank Select in the External MIDI Instrument device. However, you can use the regular MIDI Controller automation described below for inserting Bank Select automation points. MIDI Bank Select normally uses MIDI CC #0 and/or #32. Refer to the MIDI documentation of your specific instrument for details.
|
|
Note that MIDI instruments that have several banks of sounds usually expect a Bank Select message to be immediately followed by a Program Change message in order to change the bank and program/preset. In these situations, sending only a Bank Select message - without a subsequent Program Change message - will not change anything.
|
|
|
Note that Reason only sends out MIDI CC data when they actually change. This means that you might have to send a different “temporary” MIDI CC value just before you send the actual MIDI CC value. For example, if you want to resend the value “1” for MIDI CC#32, first send another value (e.g. “0” or “2”) and then send the value “1” immediately afterwards. You can do this by adding and/or moving automation points in the automation clip for MIDI CC#32 in the sequencer, see “Editing parameter automation”.
|
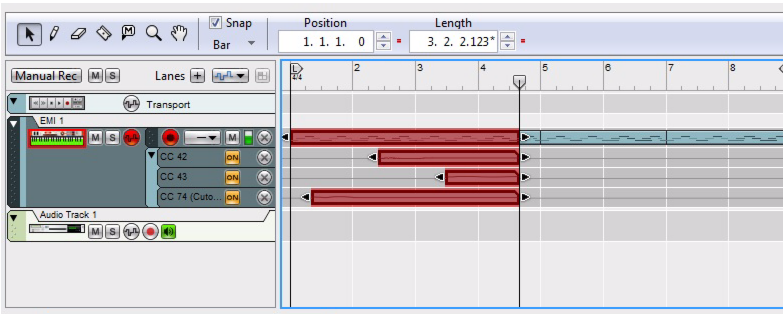
Besides automation of the panel controls, the External MIDI Instrument device allows you to record automation of MIDI Controllers 0-119. Each recorded MIDI CC# shows up on separate automation lanes in the sequencer and can be edited in the same fashion as regular “internal” parameter automation.
An automation lane, named according to the selected MIDI CC#, is created on the sequencer track and automation points are inserted as you turn the CC Assign knob. When you stop the sequencer, the CC Assign knob displays a green automation frame.
|
4.
|
The green automation frame around the CC Assign knob disappears as soon as you select a non-automated MIDI CC#. If you click back to the automated MIDI CC#, the automation frame appears again around the CC Assign knob.
|
•
|
You could also draw parameter automation points in parameter automation clips the same way as with internal Instrument devices in Reason, see “Automation editing”.
|
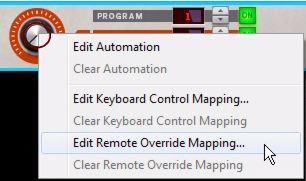
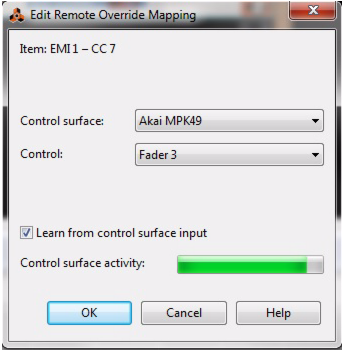
If you have a MIDI keyboard or control surface with knobs or sliders, you can use these to control parameters on your MIDI instrument and record automation. This is done using Remote Override Mapping:
|
5.
|
When you're done mapping, you can record parameter automation by clicking Record in the sequencer and moving the assigned knobs and sliders on your MIDI keyboard/control surface.
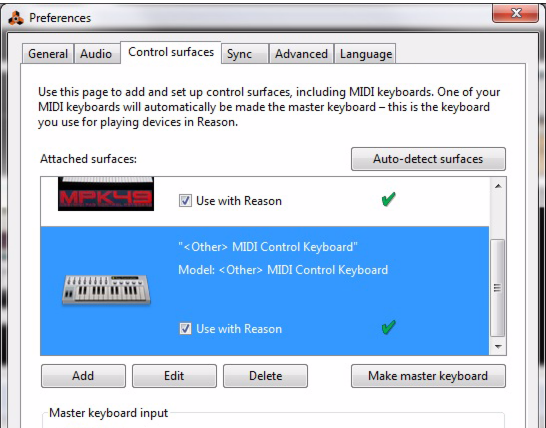
If your MIDI instrument has a panel with knobs/buttons/sliders etc. that can send MIDI Controller data, you might want to record the MIDI CC# automation from that panel instead of from Reason or from your control surface. To be able to do this, you have to add your MIDI instrument as a MIDI Control Keyboard in Reason. This can be done as follows:
|
1.
|
If you haven’t already, connect a MIDI cable from your MIDI instrument’s MIDI Out to a MIDI In jack on your computer’s MIDI interface.
|
|
2.
|
Make sure you have set your MIDI instrument to “MIDI Local Off” as well as disabled any MIDI “soft thru” so that you don’t get any MIDI feedback loop.
|
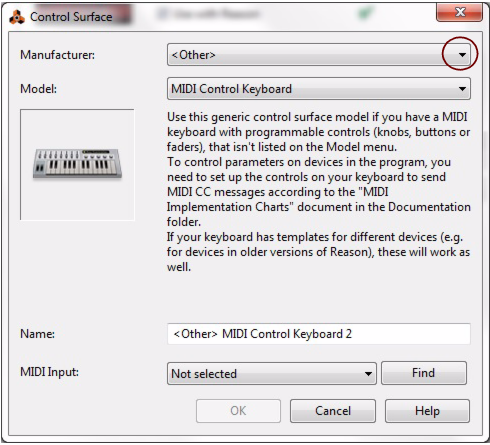
Selecting “<Other>” as Manufacturer automatically activates the generic MIDI map, which is designed to detect standard MIDI Note and Controller data, regardless of instrument model.
Alternatively, click the “Find” button and turn a knob on your MIDI instrument. Reason will then auto-detect the correct MIDI In port and automatically select it.
|
7.
|
If you turn or press a panel control (knob, slider, button, etc.) on your MIDI instrument during recording, each parameter will automatically create a new automation lane and record the corresponding MIDI CC data in a parameter automation clip, just like when you record parameter automation from an internal instrument device:


