The NN-Nano can handle samples or sets of samples for each of the four different Hit Types described in “Assigning Hit Type to Pads”. Each Hit Type can contain one or several samples which can be layered and/or altered and controlled individually via velocity.
|
2.
|
If you like you can load additional samples, either into another Hit or into a new Layer in the same Hit. To load a new sample in a new Layer in the same Hit, proceed as follows:
|
2.
|
SoundFonts are an open standard for wavetable synthesized audio, developed by E-mu systems and Creative Technologies.
REX files are music loops created in the ReCycle program or when editing audio clips inline in Reason (see “Bounce Clip to REX Loop”). The NN-Nano lets load separate slices from REX files as individual samples.
|
|
The sampling procedure is generic for all devices that can sample (Kong, NN-19, NN-XT and Redrum). The sampling and sample editing procedures are described in detail in the “Sampling” chapter.
Refer to the “Sampling” chapter for details on how to set up and use the sampling feature.
If you click the Edit Sample button with a sample selected in the display, the sample will open in the generic Edit Sample window. In this window you can edit the sample and save as a self-contained Song Sample. See “The Edit Sample window” in the Sampling chapter for details about editing samples.
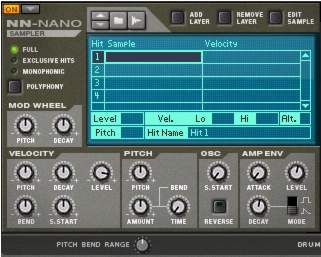
There are a number of parameters that are unique to each individual sample and Hit in the NN-Nano. These parameters are visible in the display for the selected (highlighted) sample:
|
•
|
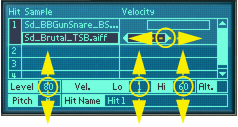
The Velocity range can be set, either by clicking and dragging the Velocity bar sideways to the right of the sample, or by clicking and dragging the Vel Lo and Hi values vertically at the bottom of the display.
|
•
|
|
•
|
|
•
|
|
•
|
Edit the Hit Name if you like by clicking in the Hit Name box, typing in a new name and then pressing [Enter]. The name will appear in the Hit Type display on the main panel (see “Assigning Hit Type to Pads”).
“Full” is, as the word implies, full polyphony. This means that all Hits can sound with full polyphony. Several Hits can also sound together if controlled from separate Pads that are assigned to different Hit Types.
“Exclusive Hits” means that when one Hit plays it will automatically mute any other sounding Hits. The polyphony is still full within each Hit, though.
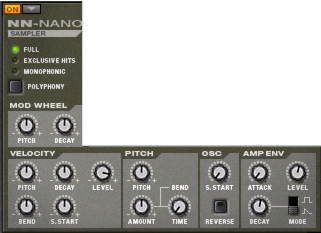
If you want the Mod Wheel to affect the pitch and/or decay of the sound, you can set this with the Mod Wheel -> Pitch and/or the Mod Wheel -> Decay knobs. Both parameters are bipolar (+/-).
|
•
|
In the Velocity section you can control how the velocity should affect a number of parameters. The parameters are: Pitch, Decay, Level, Bend and Sample Start. All parameters are bipolar (+/-).
|
•
|
Here you can set the global Pitch, Pitch Bend Amount and Pitch Bend Time for all samples. The Pitch and Pitch Bend Amount parameters are bipolar (+/-).
|
•
|
|
•
|
The Amp Env section contains an Attack-Decay Envelope and the global Level parameter for all samples. There is also an envelope trig mode selector for choosing between Gate and Trig mode. In Gate mode (the square symbol), the Decay time defines the minimum gate time. If you hold down a key or pad on your MIDI keyboard/control surface, the Decay stage will set in after you released the key/pad.
The Nurse Rex Loop Player is based on the Dr. OctoRex Loop Player but has been modified to be ideal for playing and triggering drum and percussion sounds.
The Nurse Rex can load standard REX files and play back the loops and/or slices in a variety of ways depending on the selected Hit Type (see “Assigning Hit Type to Pads”).
Depending on selected Hit Type, the REX loop will play back differently. The editing possibilities also differs depending on selected Hit Type for the assigned pad.
In Loop Trig mode, you trig the REX loop to play one single cycle every time you hit the assigned pad. Loop Trig can also be used together with the “Stop” mode on another pad to immediately stop the loop playback, see “Stop” below.
|
|
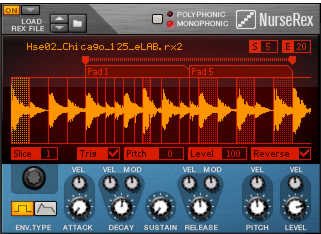
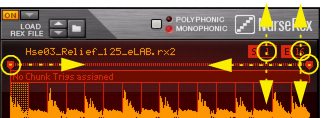
Set Start and End slice, either by clicking and dragging the S and E numerical values up/down in the boxes, or by clicking and dragging the handles sideways in the “ruler” above the REX loop in the display.
|
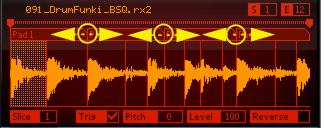
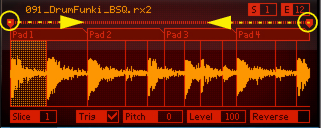
In Chunk Trig mode, you can assign several pads to play back shorter sections - chunks - of the REX loop. The number of chunks is determined by the number of pads you have assigned to the REX loop using the Chunk Trig Hit Type. The chunks are distributed in equal sections across the REX loop. Chunk Trig can also be used together with the “Stop” mode on another pad to immediately stop the chunk playback, see “Stop” below.
In the picture below, we have assigned four pads to the same REX loop and we have selected “Chunk Trig” as Hit Type on all four pads:
Doing so will automatically move the start position of the subsequent chunk so that the chunks will always be adjacent to each other.
|
|
In Slice Trig mode, you can assign a pad to play back one single slice of the REX loop - or several slices alternatingly. By default, Slice 1 of any REX loop loaded into the Nurse Rex is set to play back when you have selected “Slice Trig” as Hit Type.
|
|
Change the slice to play back by first removing the tick in the Trig checkbox and then clicking on another slice in the display and ticking the Trig checkbox for that slice.
|
Another way of assigning a slice for playback, or to assign several slices to play back alternating, is by using the mouse in combination with the [Ctrl](Win)/[Cmd](Mac) key.
Selected slices are displayed with a red background. The currently “focused” slice is displayed with an orange background. Selected slices also get their corresponding Trig checkbox ticked automatically.
|
•
|
The fourth Hit Type is named “Stop”. The Stop mode can be used if you want to use a pad for immediately stopping the currently playing REX loop or Chunk. The Stop mode should be used in combination with any of the Hit Types “Loop Trig” or “Chunk Trig”, otherwise it won’t be useful.
Now, when you play the first pad, the loop or chunk will play. Once you hit the second pad, the loop/chunk playback will immediately stop.
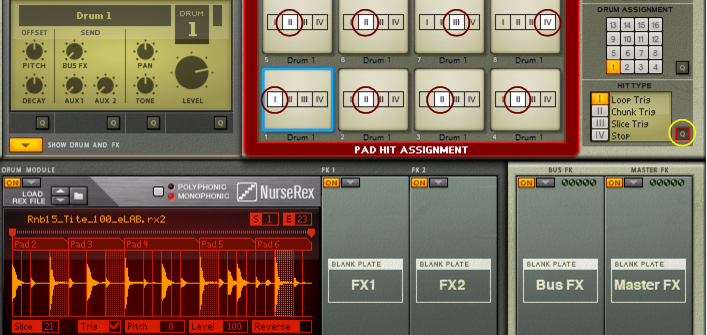
By combining the different Hit Types for the Nurse Rex module you can create really interesting setups. For example, you could load a REX loop and assign a couple of pads to the “Chunk Trig” Hit Type, one pad to Loop Trig, another one to Slice Trig and another pad to Stop. Playing the different pads can now generate really inspiring results. The picture below shows an example of this type of setup:
If we click the Hit Type Quick Edit button, we can see that Pad 1 is set to Loop Trig, Pads 2-6 are set to Chunk Trig, Pad 7 is set to Slice Trig and has four slices set to Trig in the REX loop display for alternate playback. Finally Pad 8 is set to Stop so we could stop the loop and chunks playback whenever we like.
|
•
|
Click the Trig check box for the slices you want to alternate between using the Slice Trig Hit Type.
|
•
|
|
•
|
|
•
|
On the Nurse Rex panel you can edit parameters that are common to all slices in the loaded REX loop:
|
•
|
Sets the amplitude envelope type to “Gate” or “ADSR” (Attack, Decay, Sustain, Release). In Gate mode, the gate time is set with the Decay parameter.
Sets the attack time for the amplitude envelope when ADSR is selected as Env Type. The attack time can also be velocity controlled according to the sensitivity set with the Vel knob.
Sets the decay time for the amplitude envelope when ADSR is selected as Env Type. When Gate is selected as Env Type, the Decay parameter sets the gate time. The decay/gate time can also be velocity controlled according to the sensitivity set with the Vel knob. You can also control the decay/gate time from the Mod Wheel with the amount set with the Mod knob.
|
•
|
Sets the sustain level of the amplitude envelope when ADSR is selected as Env Type. In Gate mode, the Sustain parameter has no effect.
Sets the release time for the amplitude envelope when ADSR is selected as Env Type. The release time can also be velocity controlled according to the sensitivity set with the Vel knob. You can also control the release time from the Mod Wheel with the amount set with the Mod knob. In Gate mode, the Release parameter has no effect.
Sets the overall pitch of all slices in the REX loop. The pitch can be velocity controlled according to the Vel knob setting. A negative Vel setting will lower the pitch with increasing velocity and a positive setting will raise the pitch with increasing velocity.
Sets the overall level of all slices in the REX loop. The level can be velocity controlled according to the Vel knob setting. A negative Vel setting will lower the level with increasing velocity and a positive setting will raise the level with increasing velocity.
|
•
|
The Physical Bass Drum, Snare Drum and Tom Tom use very faithful mathematical models for generating acoustic drum sounds. The sounds of the PM drums are generated using physical modelling; mathematical real-time calculations of physical acoustic phenomena. The physical modelling technique allows for a lot more creative freedom, and much wider sonic ranges, compared to sample playback.
|
•
|
This controls the overall output level of the Drum module to the FX1 and FX2 Slots (see “Signal flow”). The Level is also affected by velocity.
|
•
|
Sets the overall pitch of the drum. The Pitch parameter can be considered the total size of the drum and affects all other head and shell parameters.
The Tune 1 and Tune 2 parameters set the drum’s harmonic character, similar to the effect of individually adjusting the rim tension screws of the top drum head.
|
•
|
|
•
|
This controls the head tuning when Hit Type 4 (Edge Hit) is selected for the pad (see “Assigning Hit Type to Pads”).
The Synth Bass Drum, Snare Drum and Tom Tom use analog modelling to generate classic synth drum sounds. The Synth Tom Tom was faithfully modelled after a famous hexagonal shaped analog drum system from the 80’s.
|
•
|
This controls the overall output level of the Drum module to the FX1 and FX2 Slots (see “Signal flow”). The Level is also affected by velocity.
|
•
|
|
•
|
Sets the Decay time of the drum sound. This also affects the Noise decay on the Synth Bass Drum and is added to the Noise Decay parameter on the Synth Snare and Synth Tom Tom drums. It is also added to the Harmonic Decay value on the Synth Snare Drum. The Decay time is also affected by velocity.
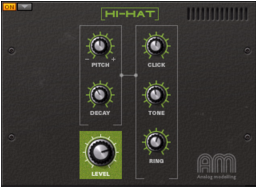
The Synth Hi-hat uses analog modelling to generate sounds. The Synth Hi-hat can be used for generating the typical hi-hat sounds of the early analog drum machines.
|
•
|
|
•
|
|
•
|
This controls the overall output level of the Synth Hi-hat module to the FX1 and FX2 Slots (see “Signal flow”). The Level is also affected by velocity.
|
•
|
|
•
|
|
•
|
