Notes can be edited using the mouse in Edit Mode. It’s also possible to edit notes by using the functions on the Tools tab in the Tool Window. Notes can also be numerically edited in the Inspector, as described in “Note and automation editing in the Inspector”.
|
|
To select several notes, hold down [Ctrl](Win) or [Shift](Mac) and click on the desired notes, one after the other. You can de-select individual notes by [Ctrl](Win)-clicking or [Shift](Mac)-clicking them again. In Windows it’s also possible to select a range of notes by [Shift]-clicking the first and last note in the range.
|
|
|
To select all notes of the same pitch (note value) in a clip, first select one or several notes and then use the function "Select Notes of Same Pitch" on the Edit menu or context menu.
|
|
|
To select all notes in the open clip, use the “Select All” function on the Edit menu. Alternatively, hold down [Ctrl](Win) or [Cmd](Mac) and press [A].
|
Notes are usually drawn and edited in Key Edit Mode on the Note Edit Lane, but the actions described below also apply to the Drum Edit Mode and the REX Edit Mode.
|
|
If you want to restrict note input to certain note values (e.g. 1/16th notes), activate Snap (see “Snap”) and set the snap value accordingly.
|
This will create a note with the length of the current Snap value setting (e.g. 1/16th note). To create longer notes, double click, keep the mouse button pressed and drag to the right.
|
|
With the Selection (Arrow) tool selected, you can toggle temporarily between the Selection tool and the Pencil tool by holding down [Alt](Win) or [Cmd](Mac).
|
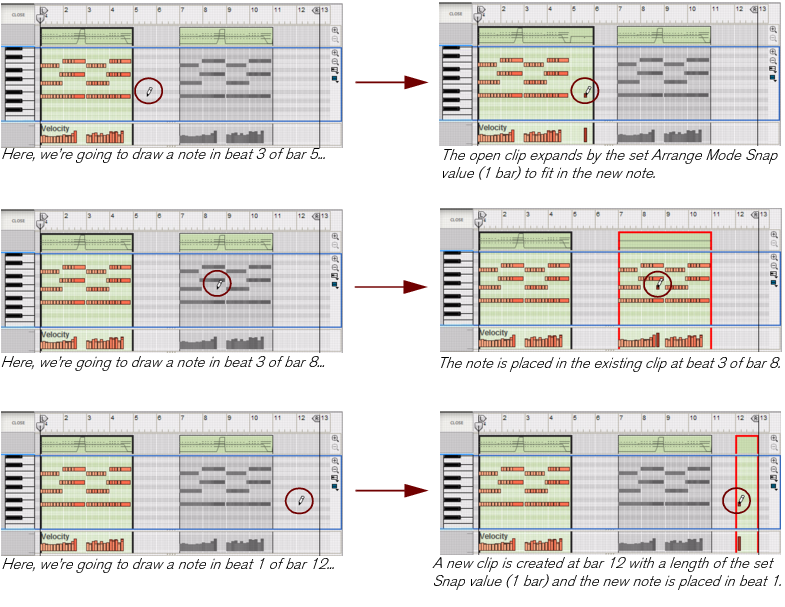
A note will be inserted at the closest Snap value position. By default, the note will be given the Velocity value ‘100’. (This can be edited afterwards according to the descriptions in “Editing note velocity”). If an open or closed clip is already present on the Note Lane, at the position where you draw the note, the note will be placed in that clip. If no clip is available, refer to “About drawing notes outside an open clip” and “About drawing notes outside a closed clip” below.
|
|
If you draw notes outside the boundaries of an open clip, the result depends on the setting "Keep Events in Clip While Editing" on the Options menu:
|
•
|
If the “Keep Events in Clip While Editing” option is active, the notes will belong to the open clip after they have been drawn, but become masked since they are drawn outside the clip boundaries.
|
|
•
|
If "Keep Events in Clip While Editing" is deactivated and you draw notes outside the clip, the notes will be placed in an existing clip - or in another new clip on the lane, depending on where you draw.
|
The picture below shows three scenarios when drawing a note outside an open clip with the “Keep Events in Clip While Editing” option off:
If you draw notes outside the boundaries of a closed clip in Edit Mode, i.e. where there are no clips available on the lane, a new clip will be automatically created and opened. The clip length is determined by the Song/Block View Snap value, if Snap is activated.
|
|
This works best with "Keep Events in Clip while Editing" turned OFF because then you can continue drawing notes - the clip will be resized to fit the new notes.
|
|
|
Select one or several notes with the Selection (Arrow) tool and press [Backspace] or [Delete], or select “Delete” from the Edit or context menu.
|
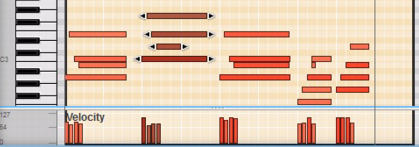
When you select a note on the Edit Pane, a handle appears on either edge of the note. You can click any of these handles and drag sideways to make the note shorter or longer.
|
•
|
If Snap is on (see “Snap”), the beginning and/or end of the note will be magnetic to the (absolute) Snap value positions.
|
|
•
|
If several notes are selected, the note you resize with the mouse will be magnetic to absolute Snap value positions. The other selected notes will be resized by the current Snap value relative to their original positions or lengths.
|
As long as the start position of events is inside the clip, the note will play for the whole duration, i.e. it won’t be cut off when the clip ends.
|
|
If a note is resized to the left, outside the clip start position, the note will no longer belong to that clip and will thus be masked (silent). to unmask the note, resize the clip to the left so that the note’s start position gets inside the clip.
|
Redrum drum notes can be resized, just like any other notes. However, the audible result of this depends on the settings of the Decay/Gate switch and the Length knob for the drum sound on the Redrum device panel:
However, the maximum length of the sound is determined by the Length knob setting - the sound will be cut off after this length, regardless of the note length in the sequencer. Also, even if the Length knob is set to its maximum value, the sound will not play longer than the length of the drum sample.
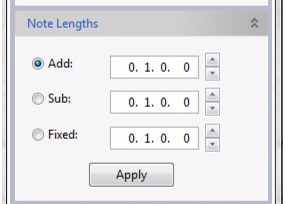
The “Note Lengths” function on the Sequencer Tools tab in the Tool Window allows you to add or subtract length values to the selected notes.
|
|
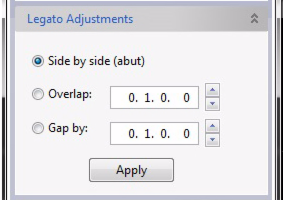
The “Legato Adjustments” function can be used to extend each selected note so that it reaches the start position of the next selected note. You can also shorten the note length for the first of two selected overlapping notes and set a gap between them. You specify the desired gap or overlap in the displays. Only the note length is affected by Legato Adjustments - note start positions are never changed.
You can also edit the length of notes numerically in the inspector. See “Note and automation editing in the Inspector”.
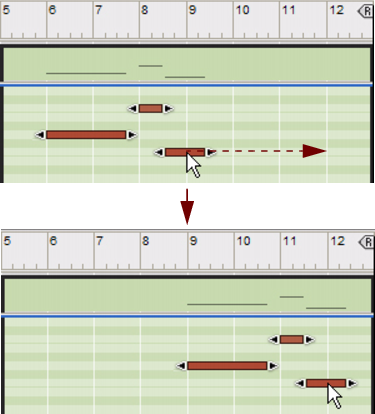
If several notes are selected, all will be moved. If Snap is on (see “Snap”), the moved events will keep their relative distance to the Snap value positions. For example, if the Snap value is set to “Bar”, you can move the selected notes to another bar without affecting their relative timing.
|
•
|
By default, when manually moving notes to new pitches (note numbers), the notes will trigger and sound. This makes it easier to move (transpose) the notes to where you want them.
|
If you don’t want notes to sound during editing, it’s possible to disable the function in the Preferences dialog by deselecting the “Trigger Notes While Editing” box:
This helps you move notes without accidentally transposing them, or transpose notes without accidentally changing their position.
|
|
You can also move selected notes to a new note clip, on a new additional note lane, by right-clicking (Win) or [Ctrl]-clicking (Mac) and selecting “Move Selected Notes to New Lane” from the context menu.
|
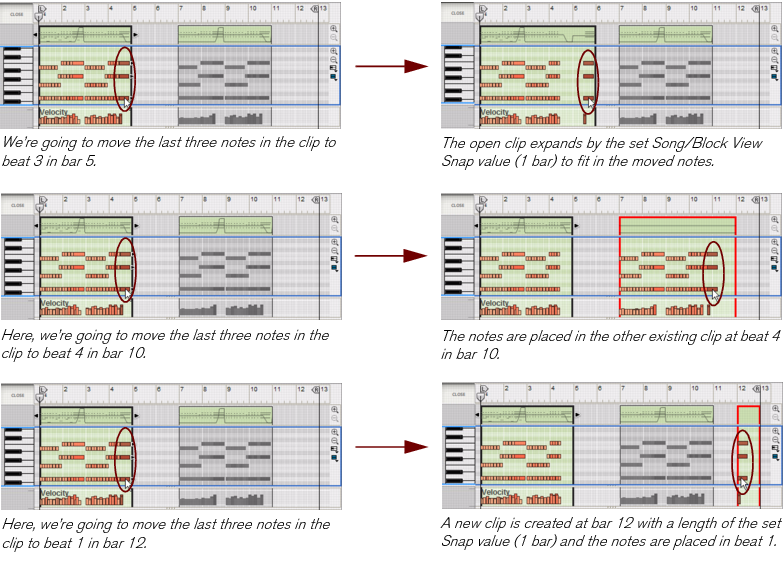
If you want to move notes outside the boundaries of an open clip, the result depends on the setting "Keep Events in Clip While Editing" on the Options menu:
|
•
|
If the “Keep Events in Clip While Editing” option is active, the notes will belong to the open clip after they have been moved, but become masked since they are moved outside the clip boundaries.
|
|
•
|
If "Keep Events in Clip While Editing" is deactivated and you move notes outside the clip, the notes will be placed in an existing clip - or in a new clip on the lane, depending on to where you move them to.
|
The picture below shows three scenarios when moving three notes outside a clip with the “Keep Events in Clip While Editing” option off:
|
|
|
|
Hold [Ctrl]+[Alt](Win) or [Cmd]+[Option](Mac) and use the left or right arrow key to move the position back or forward in Tick increments.
|
There are 240 ticks per 1/16 note so this allows for very fine editing. Check the Tick value in the Inspector when you nudge because typically you won’t see the position changes on the Edit Pane, unless you have zoomed in a lot.
|
|
Hold [Ctrl]+[Shift](Win) or [Cmd]+[Shift](Mac) and use the left or right arrow key to move the position back or forward in Beat increments.
|
If you nudge notes outside the boundaries of an open clip, the notes will belong to the open clip, but become masked since they are nudged outside the clip boundaries. The “Keep Events in Clip While Editing” setting has no effect when nudging notes. If you want to move notes between clips, or to a new clip, you have to do that using the Selection Tool as described in “About moving notes outside or between clips”.
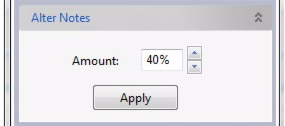
The “Alter Notes” function on the Sequencer Tools tab in the Tool Window alters the positions between the selected notes, in a random fashion.
|
|
This function is especially useful for experimenting with rearranging Dr. Octo Rex loop slices. Select some slices on a Dr. Octo Rex track and use Alter Notes to rearrange the slices and create instant variations, without losing the timing and rhythmic feel of the loop.
|
It’s possible to move defined notes in a clip to new clips on new, additional lanes. See “Extract Notes to Lanes”.
You can also edit the note positions and pitches numerically in the inspector. See “Note and automation editing in the Inspector”.
This will duplicate the selection and place it after the selection, at the closest Snap value after the last note in the selection. Repeat the command to continue the duplication for as many times as you like.
|
|
To duplicate selected notes, hold down [Ctrl](Win) or [Option](Mac) and click and drag a copy of the selection, similar to when moving notes manually (see “Moving notes”).
|
|
|
You can also duplicate selected notes to a new note clip by right-clicking (Win) or [Ctrl]-clicking (Mac) and selecting “Duplicate Selected Notes to New Lane” from the context menu.
|
It’s possible to duplicate defined notes in a clip and automatically place them on new, additional lanes. See “Extract Notes to Lanes”.
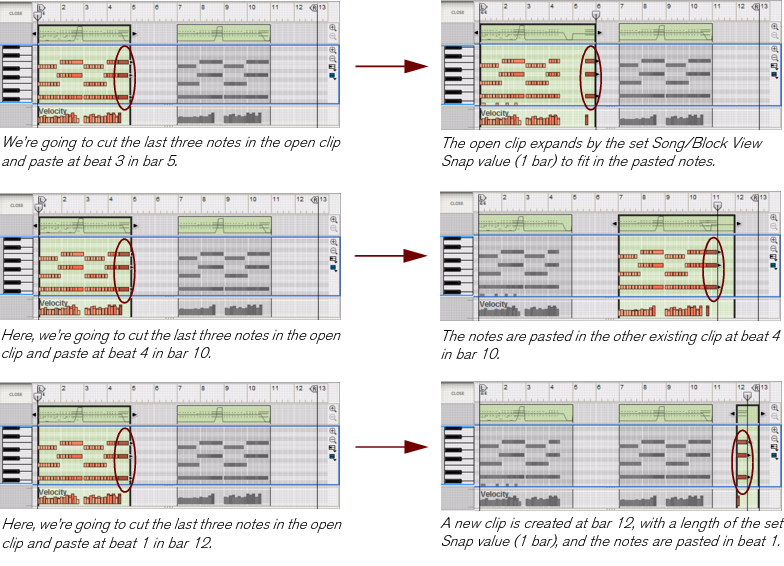
When you use the Paste command, the events will appear at the Song Position Pointer, on the original lane. Depending on the “Keep Events in Clip While Editing” setting in the Preferences dialog, the following rules apply:
|
•
|
If the “Keep Events in Clip While Editing” option is active, the notes will belong to the open clip after they have been pasted, but become masked since they are pasted outside the clip boundaries.
|
|
•
|
If "Keep Events in Clip While Editing" is deactivated and you paste notes outside the clip, the notes will be placed in an existing clip - or in another new clip on the lane, depending on where you paste them.
|
The picture below shows three scenarios where three notes are being cut and pasted at different positions outside the open clip with the “Keep Events in Clip While Editing” option off. We determine the paste positions by moving the Song Position Pointer:
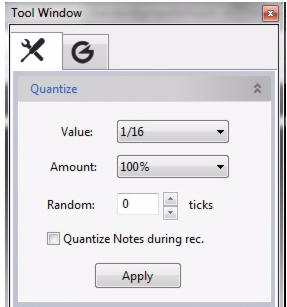
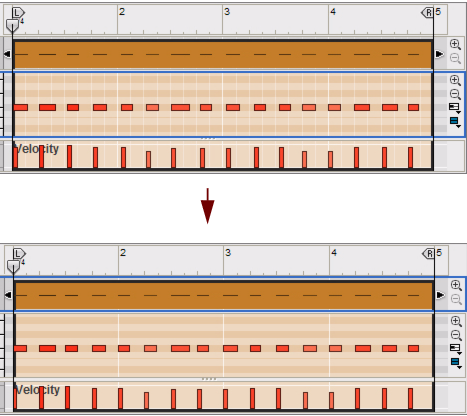
The “Quantize” function on the Transport Panel and on the Sequencer Tools tab in the Tool Window is normally used for applying quantization to notes - but can also be used for quantizing recorded audio. Clicking the Quantize or Apply button will automatically align the start positions of the selected notes or audio slices to a pre-defined, absolute grid. You can also choose to automatically quantize notes as they are being recorded - see “Quantizing notes during recording”.
The quantization grid is selected in the Quantize Value drop-down list on the Transport Panel and/or in the Quantize pane on the Tools tab in the Tool Window:
In most situations the Quantize functions on the Transport Panel are probably sufficient. However, if you want more in-depth quantization functionality, perform the quantization in the Tool Window instead.
|
1.
|
|
2.
|
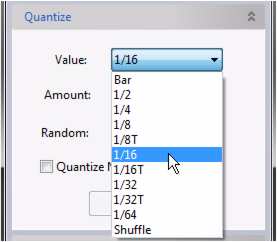
Select a quantize value from the Quantize Value drop-down list on the Transport Panel, or from the Value drop-down list in the Tool Window.
|
This determines to which note value grid the notes/audio slices will be moved when you quantize. For example, if you select 1/16, the notes/audio slices will be moved to (or closer to) the closest sixteenth note position.
|
|
Since several audio slices cannot be quantized to the same position, only the slices closest to the quantize grid will be moved - the other slices will be ignored.
|
A ‘T’ letter next to some quantization value means Triplets. The effect of using triplets is that three notes are equally distributed over the same time period as two “regular” (non-triplet) notes of the same note value.
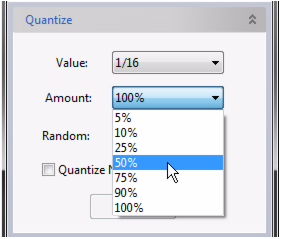
This is a percentage, governing how much each note or audio slice should be moved. If you select 100%, the notes/audio slices will be moved all the way to the closest Quantize value positions; if you select 50%, the notes/audio slices will be moved half-way, etc.
|
|
Quantization can also be applied to note(s), audio slice(s), clip(s) and track(s) by right-clicking(Win) or [Ctrl]-clicking(Mac) and selecting “Quantize” from the context menu.
|
You can offset the quantized notes/audio slices using the Random function. The notes/audio slices will be quantized according to the Value and Amount settings, but the note/slice positions will be randomly offset by the set tick value. E.g. if you set Random to 10 ticks, the notes/slice positions will randomly vary within a +/- 10 tick range after applying quantization.
In the Value drop-down list, you will also find an option called “Shuffle”. If this is selected when you quantize, the notes/audio slices are moved towards sixteenth note positions, but with Shuffle applied.
Shuffle creates a “swing feel” by delaying the even-numbered sixteenth notes (the sixteenth notes that fall in between the eighth notes). The amount of Shuffle is set with the Global Shuffle control in the ReGroove Mixer. Quantizing to Shuffle is useful if you want to match the timing with pattern devices in the song (if Shuffle is activated in their patterns).
A more flexible way of doing this for notes and note clips is to use the ReGroove mixer - see “The ReGroove Mixer” chapter for details.
It’s also possible to quantize input notes directly during recording. Activation of this function can be made in the Tool Window and/or on the Transport Panel:
It doesn’t matter where you activate or deactivate this function - the current state is automatically mirrored at the other location.
Any notes recorded after having activated this function will be automatically quantized to the current settings on the “Quantize” pane in the Tool Window, see “Quantize”.
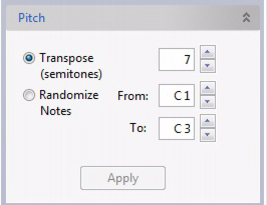
The “Pitch” function in the Tool Window transposes selected MIDI notes, or all notes in selected note clips, or the audio recordings in selected audio clips, up or down in whole semitone steps.
|
|
Click the “Transpose (Semitones)” radio button and then select the number of semi-tones to transpose the selected notes, note clips and/or audio clips up or down. Click “Apply” to transpose.
|
|
|
For MIDI notes and note clips the transposition is “absolute”, i.e. the notes are permanently moved to new note positions in the clip.
|
|
|
For audio clips the transposition is non-destructive, i.e. the audio is transposed relative to their original pitch/key without affecting the original audio. For audio clips the relative Transpose amount is also displayed in the Transpose display in the Inspector for the selected audio clip(s). See “Transposing Audio Clips” for more details about transposing audio clips.
|
|
|
|
|
|
|
Click the “Randomize Notes” radio button and then select the note range to which to transpose the selected MIDI notes. Click “Apply” to transpose.
|
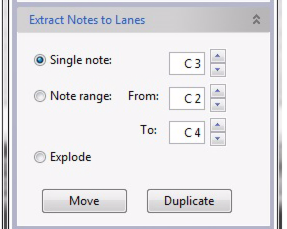
The “Extract Notes to Lanes” function on the Sequencer Tools tab in the Tool Window is used for moving or duplicating user-defined notes of a certain pitch, or notes within a defined pitch range, to a new note clip on a new, additional note lane. This function is very useful if you, for example, have recorded a drum track, with all notes in the same clip, and then want to extract individual drum sounds (note pitches in this case) to separate lanes to be able to edit them more easily - or to apply ReGroove channels (see “The ReGroove Mixer”).
If the clips are on the same lane, this can be done in Edit Mode. If the clips are on separate lanes, this has to be done in the Song/Block View.
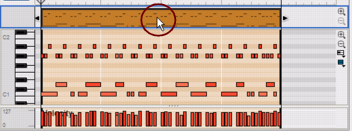
We have recorded a 4-bar drum beat, consisting of kick, snare and open+closed hi-hat, in a single clip on a note lane. Now, we want to extract the open and closed hi-hat sounds to a new separate note lane. Normally, this could be done in the Song/Block View, but to better show what happens with the individual note events, we will show this in Edit Mode:
Since the Extract Notes to Lanes function applies to selected clips and not to selected notes, you have to click in the Clip Overview to enable the function. (In the Song/Block View, you just select the clip by clicking on it).
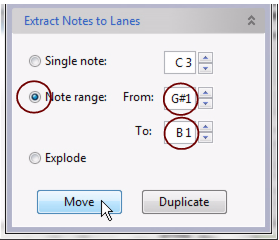
We want to move the open and closed hi-hat notes, i.e. the note range from G#1 to B1. We therefore click the “Note Range” radio button and then select the note range in the “From:” and “To:” displays.
The open and closed hi-hat notes are now moved to a new clip on a new note lane. If we click in the Note Edit lane and scroll, we can see the moved hi-hat notes in the new clip:
|
|
If you want to move or duplicate notes of a certain note number only, click the “Single Note” radio button and select the note pitch in the display. Then click, the “Move” or “Duplicate” button.
|
|
•
|
The “Extract Notes to Lanes” function is available both in Edit Mode and the Song/Block View, since it’s applied to defined notes in clips and not to manually selected notes.
|
|
|
Notes of the same note number will be moved or duplicated to new separate clips on separate note lanes. A new lane will be created for each of the used note numbers in the original clip
|
|
The “Explode” function is perfect if you have recorded a drum track and want to move, or duplicate, each individual drum sound to a separate note lane for further editing. Applying different ReGroove channels to each of the generated note lanes could provide extremely nice grooves to the rhythm! See “The ReGroove Mixer” for more details.
|
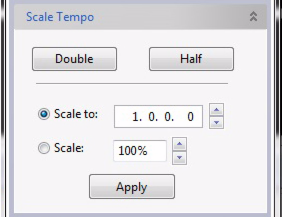
The “Scale Tempo” function in the Tool Window can be applied to selected notes and/or automation events. It can also be applied to selected note, audio and automation clips. The Scale Tempo function will make the selection play back faster (Scale factor above 100%) or slower (Scale factor below 100%). For notes and automation events, this is achieved by changing the position of the events (starting from the earliest selected event) and adjusting the length of the notes accordingly. For audio clips, high-quality stretching is applied to all audio recordings in the clip.
|
•
|
The “Scale to” function can be used for scaling selected clips, or selected events in an open clip, to a fix length. The segments in the “Scale to” box are divided into, bars, beats, 1/16th notes and tics.
|
|
|
The Scale Tempo function affects note, performance controller, parameter automation, pattern change, tempo automation events and audio clips! It does NOT affect time signature automation.
|
|
|
When you are tempo scaling audio clips, make sure you have selected the appropriate Stretch Type, otherwise the sonic result might not be what you’d expect, see “Selecting Stretch and Transpose Type”.
|
|
|
Note that Pattern Automation Clips will only be resized - the pattern tempo in the source device will NOT be scaled but will still be synced to the main sequencer tempo!
|
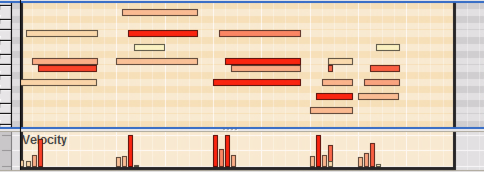
The velocity values are shown as bars, with taller bars indicating higher velocity.
Note also that the color intensity of the notes and velocity bars reflect the velocity values.
Note also that the color intensity of the notes and velocity bars reflect the velocity values.
|
|
To change the velocity of a note, click on its velocity bar with the Pencil tool and drag the bar up or down. Clicking above or below a bar immediately adjusts the velocity to the level at which you click.
|
|
|
This is the Line Tool which is a special tool only available on the Velocity Edit Lane. By dragging across the velocity “bars”, at the desired height, you can quickly draw velocity ramps.
The Line Tool is probably the preferred method for creating regular, smooth ramps, or for giving all the notes the same velocity (by drawing a straight line), while the Pencil tool can be used for creating more irregular curves.
This can be very useful, especially in “crowded” sections with lots of notes.
Consider for example if you have a busy drum beat, and want to adjust the velocity of the hi-hat notes only. Simply dragging with the Line- or Pencil tool would change the velocity of all other drum notes in the area too, but if you first select the hi-hat notes on the Drum Edit lane and press [Shift] as you draw, you can edit their velocity without affecting any other notes.
Consider for example if you have a busy drum beat, and want to adjust the velocity of the hi-hat notes only. Simply dragging with the Line- or Pencil tool would change the velocity of all other drum notes in the area too, but if you first select the hi-hat notes on the Drum Edit lane and press [Shift] as you draw, you can edit their velocity without affecting any other notes.
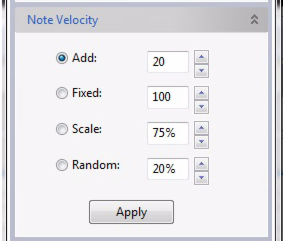
The “Note Velocity” function in the Tool Window can be used for adjusting the velocity of selected notes in a number of different ways.
Scaling by a factor of more than 100% will increase the velocity values, but also make the difference between soft and hard notes bigger.
Scaling by a factor of less than 100% will decrease the velocity values, but also make the difference between soft and hard notes smaller.
Scaling by a factor of less than 100% will decrease the velocity values, but also make the difference between soft and hard notes smaller.
|
|
By combining the “Add” and “Scale” functions, you can adjust the “dynamics” of the notes in various ways. For example, by using a Scale factor below 100% and adding a suitable value in the “Add” display, you can “compress” the velocity (decreasing the difference between the velocity values without lowering the average velocity level).
|

