A modulation bus is used to connect a modulation source to a modulation destination. Both audio signals and control (CV) parameters are available. This creates a flexible routing system that complements the pre-wired routing in the Voice panel.The Init patch is a simple 1 oscillator/1 filter setup, which produces sound when you play, and will serve the purpose of this tutorial.
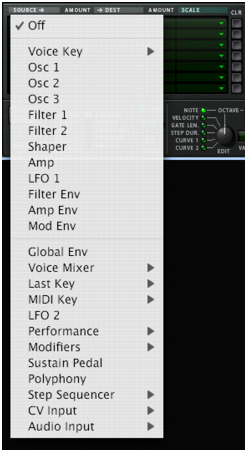
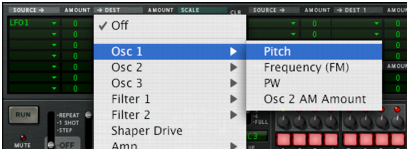
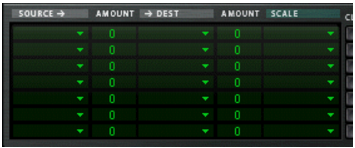
• Below the column headers there are 7 rows. Each row is a modulation bus where you can have a Source to Destination modulation assigned.The upper half of the menu contains Voice section source parameters, and the lower half contains various global play and performance-oriented source parameters and the Global Envelope, as well as the Step Sequencer, CV and Audio inputs.A pop-up menu appears listing all available modulation Destinations. The upper half of the menu contains Voice section destinations, and the lower half contains Global section destinations, as well as the Step Sequencer, CV and Audio outputs.This means that Osc 1 pitch is now assigned to be modulated by LFO 1. Next step is to set the amount of modulation to be applied.
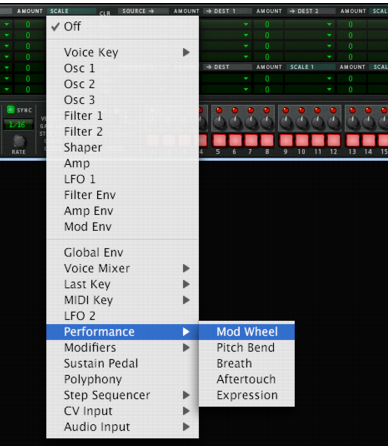
6. Click in the top row Amount column to the right of the Source column, and move the mouse pointer up and down to set an Amount value.But the vibrato will be constant, which you probably don’t want. This is solved by assigning a Scale parameter, which allows you to assign another parameter to control the modulation Amount.A pop-up menu appears listing all available Scale parameters. The upper half of the menu contains Voice section parameters, and the lower half contains various play and performance-oriented parameters and the Global Envelope, as well as the Step Sequencer, CV and Audio inputs.This means that Osc 1 pitch is now assigned to be modulated by LFO 1, and the amount of modulation is controlled by the Mod wheel. How much the Scale parameter controls the Amount is set using the “Amount” column for the top row (to the left of the Scale column).
9. Both positive and negative Scale Amount values can be set (+/- 100%). To fully control the LFO modulation so that there is no vibrato when the Mod wheel is set to zero, set the Amount to 100%.
• How much modulation will be applied when the Scale parameter is set to maximum is governed by the Source to Destination Amount parameter.
• Optionally, you have a Scale parameter controlling the Modulation Amount, and a Scale Amount that governs how much the Scale parameter controls the Modulation Amount.These are the four top rows in the right half of the Modulation section. This works after the same principle but the Source parameter can affect two different Destination parameters (with variable Amount settings) and a Scale parameter that affects the relative modulation Amount for both Destinations.An example: You have the Mod Envelope as Source and Oscillator Pitch as the Destination (Amount set whatever you like). As the first Scale parameter we use the Mod Wheel (Amount set to 100 so that no modulation is applied when the Mod wheel is at zero), and LFO 1 as the second Scale parameter (Amount set to whatever you like). When you move the Mod wheel, the pitch modulation amount will be modulated by both the Mod Envelope and LFO 1 simultaneously.
• Note - this is keyboard tracking. If a positive Amount value is used and the destination is filter frequency, the filter frequency will track the keyboard, i.e. increase with higher notes.
• Note2 - this works similarly to Note but within a repeated octave range. E.g. if Note2 modulates Amp Pan the pan position will move from left to right within an octave range then start over. If you play chords normally over the keyboard the effect will be that notes are randomly spread across the stereo field.
• Velocity - this applies modulation according to velocity (how hard or soft you strike the keys).
• Gate - this is Gate on/off. E.g. if applied to oscillator pitch you will get one pitch value (set by Amount) when a key is pressed, and another value (the unmodulated pitch) when the key is released.
This is the audio output of the Shaper module. Note that anything connected to the Shaper, e.g. Filter 1, affects the Shaper output, and thus the resulting modulation.
This will apply modulation according to the last note played (monophonic), either via MIDI, or from the Step Sequencer. For example, you can use Last Key to make a filter’s frequency track notes played by the Step Sequencer.
This applies modulation according to notes globally, not per-voice so in other words it is monophonic. E.g. if you use MIDI Note as Source and a self-oscillating filter’s frequency as the destination, the filter will track but you will only be able to play one voice at a time. MIDI Note is handy for transposing Step patterns in real time.
• Note - this is keyboard tracking. If a positive Amount value is used and the destination is filter frequency, the filter frequency will track the keyboard, i.e. increase with higher notes.
• Velocity - this applies modulation according to velocity (how hard or soft you strike the keys).
• Gate - this is Gate on/off. E.g. if applied to oscillator pitch you will get one pitch value (set by Amount) when a key is pressed, and another value (the unmodulated pitch) when the key is released.
On this sub-menu you can assign the one of the standard Performance controllers to modulate/scale parameters; Mod Wheel/Pitch Bend/Breath/AfterTouch/Expression.
This is where you assign parameters and functions to be controlled with the virtual 2 Rotary and 2 Button controls on the Controller panel.
This allows you to apply modulation according to how many notes you play. E.g. you could have a short envelope attack when you play single notes, and a long attack when you play chords.
On the sub-menu you can chose to apply modulation according to Gate/Note/Curve 1 and 2/Gate Length/Step Duration settings for each step.
In addition you have Start and End Trig, which sends a gate trigger at the start and end of the Step sequence, respectively.
These are CV inputs on the back panel which facilitates the use of external modulation sources, (e.g. the Matrix) in Thor. If connected you can freely assign the external CV to any modulation destination in Thor.
These are Audio inputs on the back panel which allows you to connect external audio signals and process these using Thor parameters, or use them as modulation sources. See “About using the Audio inputs”.
The difference between Pitch and FM is that if a high frequency audio signal (i.e. an oscillator or an external audio signal) is the source, FM will not alter the basic pitch of the source, only the timbre. If Pitch is used both the pitch and the timbre will be affected.
• There is also a modifier parameter, which differs depending on what oscillator type is selected. See “The Oscillator section” for details.
• Audio In - this allows you to connect an audio source (e.g. an oscillator or an external audio signal) to the filter input.
The difference between Frequency and FM is that if a high frequency audio signal (i.e. an oscillator or an external audio signal) is the source, FM will not alter the basic frequency of the source, only the timbre. If Frequency is used both the pitch and the timbre will be affected.
• Input - this allows you to connect a source (e.g. an oscillator or an external audio signal) to the Amp input.
• Pan - this controls the Pan for each voice. Modulating this parameter with for example LFO 1 means that the Pan position will modulate differently for each voice you play.
• Osc 1:2 Balance - you can modulate the level balance between oscillator 1 and 2, e.g. to sweep from one oscillator to the other.
• Gate - this is the gate input of the envelope. A gate signal applied to this input will trigger the envelope.
•
•
•
•
•
• Transpose - this enables control over the Step Sequencer base pitch. E.g. if you apply MIDI Note as a source to this parameter you can transpose the sequence by playing notes.
• Gate Length - this enables control over the Step Sequencer Gate Length response.
This will allow you to send signals to the CV outputs on the back of the device. Note that you can send CV signals to audio outputs and vice versa.
This will allow you to send signals to the audio outputs on the back of the device. Note that you can send CV signals to audio outputs and vice versa.
• You need to send a gate trigger for the audio signal to be heard. This can be done in three ways; by playing notes, via notes played by the Step sequencer or from CV gate signals.