In this section we will describe audio editing procedures that are common for Single Take clips and Comp clips when edited in the Comp Editor. Comp clip specific procedures are described in “Comping audio”.
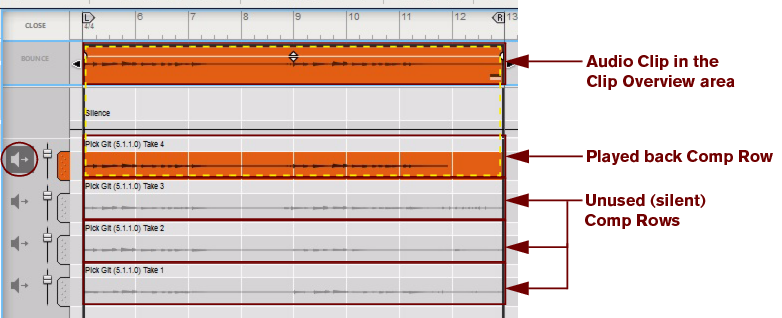
When an audio clip is open for editing in the Comp Editor, its contents are shown on the Edit Pane below the Clip Overview area. An open audio clip can have one or several Comp Rows on which the audio recordings reside. The number of Comp Rows depends on how you recorded your audio clip. If you only recorded once in the clip, there will only be one single Comp Row. If you have recorded several times in the same clip, or several cycles in Loop Mode, there will be one Comp Row for each take, or cycle.
There are vertical zoom controls for resizing the Clip Overview area and the Comp Row area. You can also scroll in the Comp Row area by using the scroll bars on the right hand side of the Edit Pane.
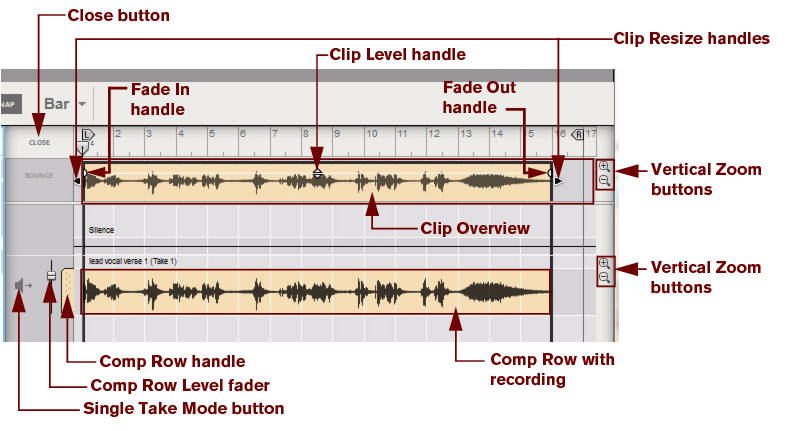
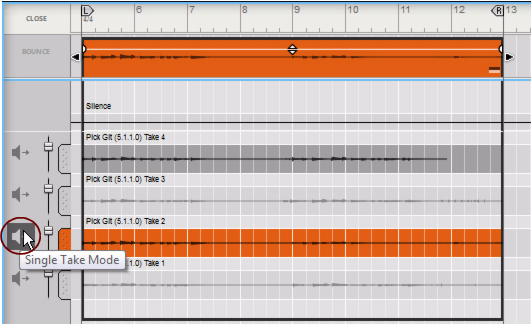
For Single Take clips, only the recording on the selected Comp Row is played back. If there is only one single Take (Comp Row) in the clip, this will play back by default. This is how an open Single Take clip with only one recording on one Comp Row could look like when opened in the Comp Editor:
The Clip Overview area at the top shows the clips on the selected audio track. In the Clip Overview area, selected audio clips are displayed in the same fashion as in Arrange Mode, i.e. with Clip Resize handles, Level handle and Fade handles. You can select one or several audio clips in the Clip Overview and perform clip-based editing (e.g. moving and resizing) - just like in Arrange Mode.
Click and drag these handles horizontally to introduce a fade in and/or fade out of the audio in the clip. The fading is non-destructive and can be changed at any time. If Snap is activated (see “Snap”), the set (Arrange Mode) Snap value is taken into account when moving the Fade Handles.
Click and drag this handle vertically to adjust the audio level of the recordings in the clip. The level adjustment is non-destructive and can be changed at any time.
|
•
|
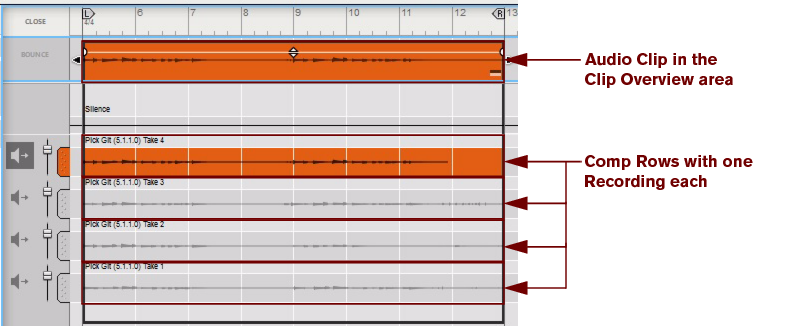
Depending on how you recorded the audio clip, there can be one or several Comp Rows, containing one audio recording each. Comp Rows can be described as “virtual tracks” in the sense that you can have many parallel Comp Rows in an audio clip but only play back from one Comp Row at a time (see “Creating a comped audio clip”). In Single Take clips, only the audio recording on the currently selected Comp Row will play back.
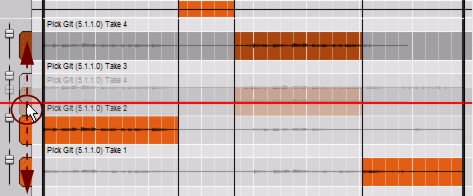
If there are several Comp Rows in the audio clip, it’s possible to rearrange the order of the Comp Rows by clicking and dragging the Comp Row handles vertically.
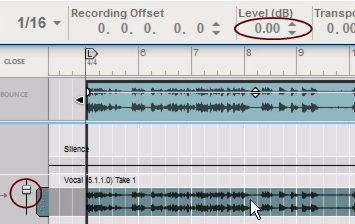
Use the Comp Row Level fader to adjust the volume of the recording on the corresponding Comp Row. This is especially useful in Comp Mode, when you want to trim and balance the levels of the recordings on several Comp Rows.
|
|
If the clip only has one single Comp Row, this is automatically selected “in the background” by default - i.e. its Single Take Mode button is not depressed.
|
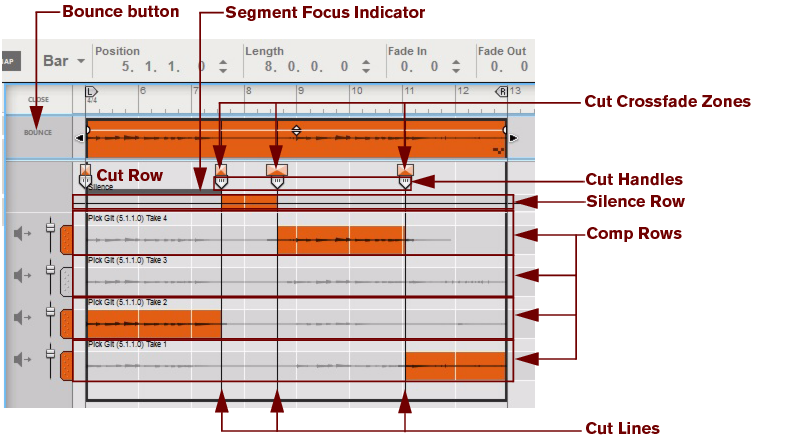
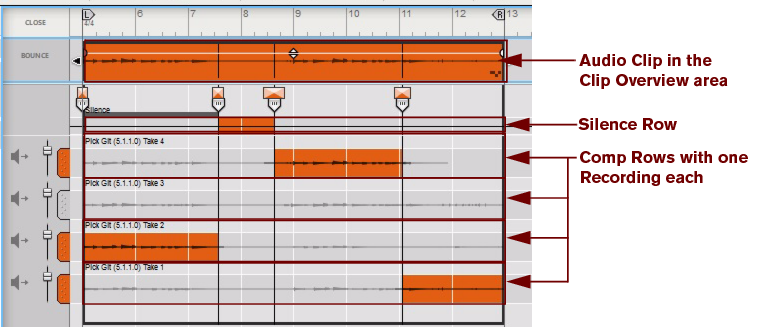
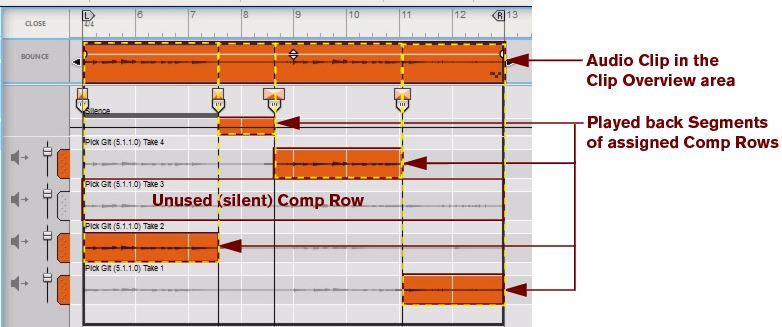
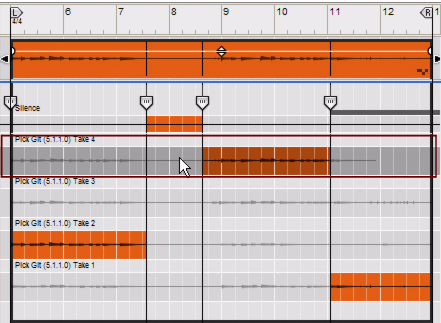
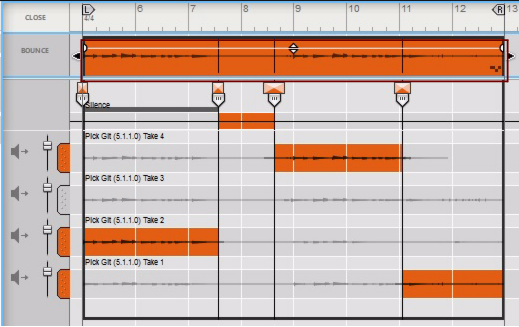
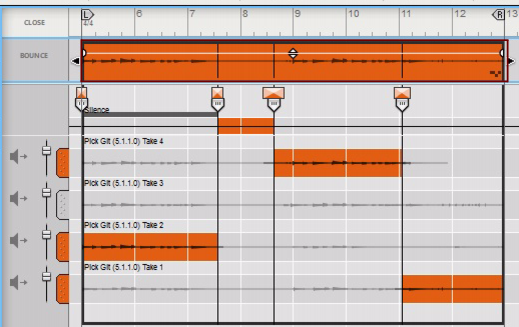
A Comp clip consists of several Comp Rows, with one recording on each Comp Row. If you have recorded several takes in an audio clip and want to cut out sections of the various takes and comp into a final clip, this can be done in the Comp Editor (see “Creating a comped audio clip”). This is how an already comped audio clip could look like in the Comp Editor:
Clicking this button will bounce the recordings of the comped clip to a new recording, automatically select the bounced recording’s Comp Row - and thus set the clip to Single Take Mode. Then, you can open the Single Take clip inline and work with slices, audio quantizing etc. Clicking this button is usually the last thing you do after you have comped your clip.
|
•
|
The area between the Clip Overview and the topmost Comp Row is called the Cut Row. This is where the Cut Handles are placed.
The gray Segment Focus Indicator appears if you click on the Cut Row, or if you double-click on a Comp Row. A Segment is the area between two Cuts. The Segment Focus Indicator shows which segment currently has edit focus. Edit focus is required for editing using keyboard short-cuts (see the “Keyboard Commands” pdf document).
When you have comped an audio clip by creating cuts and assigning different Comp Rows to the resulting segments, it’s possible to set individual crossfades between the segments. This makes it possible to get smooth transitions between the audio recordings in the different segments. Any crossfades are indicated by boxes. The widths of the boxes indicate the crossfade times.
Each cut in a comped audio clip is indicated by a Cut Handle and a Cut Line. The Cuts indicate where the playback changes from one segment to another (in most situations from one Comp Row to another). You can edit the Cut positions by clicking and dragging any of the Cut Handles or Cut Lines sideways.
The Silence Row can be used for inserting silent segments in the comped audio clip, e.g. for removing breath noise between vocal phrases.
All of your audio recordings reside on Comp Rows. Depending on how you recorded the audio clip, there might be one or several Comp Rows, each containing one audio recording. The most recent take is on the topmost Comp Row. In a Comp clip, the colored part(s) of each Comp Row (or Silence Row) will play back. All Comp Rows used in the clip have colored Comp Row Handles. Any unused Comp Rows in the clip are indicated by gray Comp Row Handles.
The number of Comp Rows and their position can be unique for each individual audio clip. Any edits you make in an audio clip will never interfere with other clips in the Song.
|
•
|
If the clip was recorded in one single take, it will have a single Comp Row. If the clip was recorded in several takes one after another, or recorded in Loop Mode, it will contain one Comp Row for each take or loop. Also, if you imported audio files to a clip, each audio file will end up on a separate Comp Row.
In a Single Take clip with more than one Comp Row, only the Comp Row you have selected by clicking the Single Take Mode button will play back. In a Comp clip, you can alternate the playback between the Comp Rows by assigning regions of the different Comp Rows to different Segments in the Clip. What you hear when you play back an audio clip is displayed in the Clip Overview area at the top on the Edit Pane. (The Clip Overview area displays the same content as the clip in Arrange Mode.)
This means that you could move Comp Rows up or down on the Edit Pane, change Comp Row Levels and Crossfades, or move Recordings back and forth on the Comp Rows, without affecting any neighboring audio clips.
|
•
|
If you duplicate a Clip, or a Comp Row with its Recording, you can freely edit the duplicated Clip, Comp Row or Recording without affecting the original.
|
However, the actual audio data is not duplicated. Reason Essentials features a very sophisticated internal audio management system which re-uses Recordings throughout the entire Song whenever necessary. This means that the Song file size won’t increase when you duplicate audio clips or Comp Rows.
|
|
|
|
|
|
|
|
|
|
|
•
|
For extensive editing, you may want to maximize the Sequencer and/or detach the Main Mixer and Rack so that the sequencer covers the entire computer screen. Refer to “Areas, windows and basic navigation”.
|
When editing audio in the Comp Editor, some of the Toolbar tools have different functionality as when editing note and automation clips. There are also some additional tools that are unique to audio editing.
When editing audio in the Comp Editor, the Razor Tool on the sequencer Toolbar is used for creating Cuts. When you place the Razor Tool over the Comp Rows, Silence Row or Cut Row, it changes into a “Cut Tool”.
See “Adding Cuts” for more details on how to use the Cut Tool.
The Razor Tool can also be used for assigning a complete Segment, with a start and end Cut, by clicking and dragging (swiping) the Razor Tool horizontally on the desired Comp Row. See “Adding Segments” for more details on how to swipe with the Cut Tool.
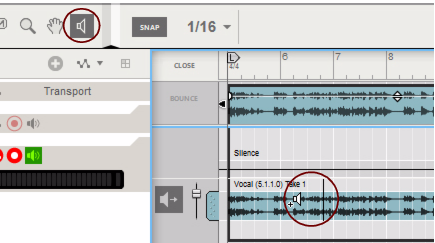
It’s possible to audition individual recordings on Comp Rows, without needing to start playback of the sequencer. This is very useful when you’re going to select what Comp Rows to use in the clip:
|
1.
|
The playback starts at the current crosshairs position and proceeds for as long as you keep the mouse button depressed. The playback position is indicated by a vertical moving line on the auditioned Comp Row.
|
|
|
|
Note that auditioning recordings on Comp Rows will play back the unprocessed sound of the recording -
bypassing any settings in the Main Mixer. |
|
|
Using the Speaker Tool, it’s possible to audition recordings anywhere on any Comp Rows. The Comp Row doesn’t have to be selected - it’s even possible to audition recordings on masked Comp Row segments.
|
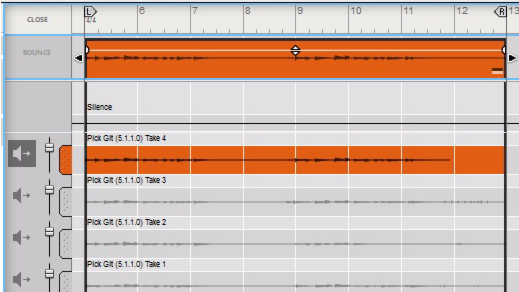
In a Single Take clip, only the selected Comp Row will play back throughout the entire clip length. It’s also possible to change Comp Row Levels and Recording Offsets in a Single Take clip. The picture below shows an open Single Take clip in the Comp Editor. The clip consists of four separate takes, each on a separate Comp Row. When played back, the recording on the selected “Take 4” Comp Row will play back:
|
|
To select a Comp Row, e.g. for moving, cutting, copying, duplication or deletion, click (don’t double-click!) with the Selection Tool anywhere on the Comp Row, or on the Comp Row Handle.
|
|
|
Select a range of Comp Rows by holding down [Shift] and clicking with the Selection Tool on the first and last Comp Row in the desired range.
|
|
|
Don’t double-click on a Comp Row to select it. Double-clicking on a Comp Row will automatically assign the recording on it to the segment at the current click position.
|
|
|
Select one or several Comp Rows (see “Selecting Comp Rows”) and then press [Backspace] or [Delete], or select “Delete” from the Edit menu or context menu.
|
Moving Comp Rows up or down on the Edit Pane can be useful to make it faster and easier and to access the desired Comp Rows when editing a comped clip. Let’s say you have recorded six takes but you’re only going to edit takes 1, 3 and 5. In this case, it would be more practical to have these Comp Rows right below one another at the top of the Edit Pane.
|
|
To move several Comp Rows in one go, select them and then click and hold one of the selected Comp Row Handles and drag to the new destination.
|
A red insertion line is shown, indicating where the Comp Rows will be placed after you release the mouse button. Note that if you move non-adjacent Comp Rows, they will be placed as a group (adjacent) on the Edit Pane.
|
|
|
|
Duplicating Comp Rows can be useful if you want to re-use the same part of a take several times in a comped clip. Duplicate the Comp Row and then adjust the Recording Offset (see “Adjusting the Recording Offset”) in the duplicated Comp Row to access the same part of the recording in another segment of the comped clip. Duplicating Comp Rows will not use up any more space on your hard disk, so you can do this as many times as you like.
|
|
To duplicate one or several Comp Rows, select them and hold [Ctrl](win) or [Cmd](Mac) and press [D], or select “Duplicate Comp Rows” from the Edit menu or context menu.
|
The duplicated Comp Rows will be placed below the lowest selected Comp Row. Note that if you duplicate non-adjacent Comp Rows, they will be placed as a group (adjacent) below the lowest selected Comp Row.
|
|
You can also duplicate a Comp Row and assign the duplicated Comp Row to a new segment in one go. With the Razor (Cut) Tool selected, hold down [Ctrl](Win) or [Option](Mac) and click, or swipe, on a Comp Row to assign a new segment to a duplicate of the recording on a new, additional Comp Row.
|
|
1.
|
Select one or several Comp Rows and then hold [Ctrl](Win) or [Cmd](Mac) and press [X] to cut or [C] to copy the Comp Rows to the clipboard memory.
|
|
3.
|
To paste the cut or copied Comp Rows, hold down [Ctrl](Win) or [Cmd](Mac) and press [V] - or select “Paste” from the Edit menu or context menu.
|
The pasted Comp Rows will be placed at the top of the Edit Pane. Note that if you paste non-adjacent Comp Rows, they will be placed below each other, starting at the top of the Edit Pane.
|
|
If you paste Comp Rows into another song, the actual audio recordings will be added to that song as well and consequently increase the file size.
|
|
2.
|
|
|
In some situations you might want to move, or nudge, the entire recording on a Comp Row to make it play back exactly when you want. Maybe you just need to fine tune the position by a couple of Ticks:
The Recording Offset display is divided into Bars, Beats, 1/16th notes, Ticks and Subticks. There are 240 Ticks for each 1/16th note and 16 Subticks for each Tick.
|
|
|
|
After you have edited your audio clips in the Comp Editor, there might be unused recordings left on Comp Rows that you don’t plan to use. To reduce the file size of your song, you can choose to delete all unused recordings in one or several audio clips.
|
|
Select the clip(s) in the Clip Overview area in the Comp Editor, or select the clip(s) in Arrange Mode, and then select “Delete Unused Recordings” from the Edit menu or context menu.
|
|
•
|
If a clip is in Single Take Mode, only the selected Comp Row will be played back - all other Comp Rows are per definition “unused”. However, there may still be Cuts and assigned Segments among these Comp Rows, visible and audible if you switch the clip to Comp Mode.
|
As a safety measure, if you use the “Delete Unused Recordings” function on such a clip, you will be asked to confirm that you really want to remove all Comp Rows other than the selected one.
|
•
|
After deleting audio recordings, you will have to use the “Save and Optimize” function on the File menu to minimize the Song file size - see “Saving and optimizing a Song”.
|
You can bounce one or several Audio Clips to new Song Samples. You could then edit the samples in the Edit Sample window and then load into a sampler device for playback. Proceed as follows:
|
|
Select the clips in the Clip Overview area in the Comp Editor, or select them in Arrange Mode, and then select “Bounce > Bounce Clip(s) to New Sample(s)” from the Edit menu or context menu.
|
The Audio Clips are bounced to new Song Samples and named according to the Audio Clip name (if the clip was named) or according to the Audio Track name with serial numbers. The bounced Audio Clips then end up as sample files in the Song Samples location in the Browser. Refer to “Sampling” for more details about sampling and sample editing.
The “Bounce > Bounce Clip to Disk” function on the Edit menu and clip context menu allows you to export the audio of a selected clip to disk as a single WAV or AIFF file. This might be useful if you want to process an audio clip in an external application and then re-import the clip to the track again. See “Bouncing Audio Clips” for more details.
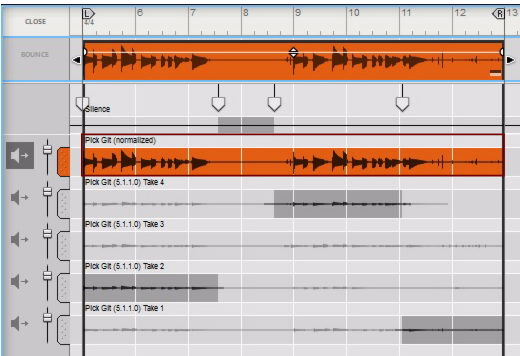
Normalizing means increasing the overall audio level so that the loudest peak in the sound touches 0 dB. Normalizing can be made on any audio clips, regardless of if they are Single Take clips or Comp clips.
A new Comp Row is automatically created at the top and named after the Audio Track, with the extension “(normalized)”. The new Comp Row contains the “bounced” normalized audio and the Audio Clip has also automatically switched to Single Take Mode. The original audio is preserved on their original Comp Rows.
|
|
When you normalize a Single Take clip, Reason Essentials automatically re-analyzes the audio and distributes new Slice Markers at the detected transients.
|
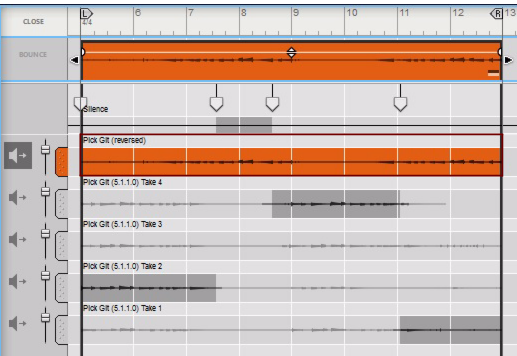
Reversing an audio clip means playing it backwards, from the end to the start. Reversing can be made on any Audio Clips, regardless of if they are Single Take clips or Comp clips.
A new Comp Row is automatically created at the top and named after the Audio Track, with the extension “(reversed)”. The new Comp Row contains the “bounced” reversed audio and the Audio Clip has also switched to Single Take Mode. The original audio is preserved on their original Comp Rows.
|
|
When you reverse a Single Take clip, Reason Essentials automatically re-analyzes the audio and distributes new Slice Markers at the detected transients.
|
