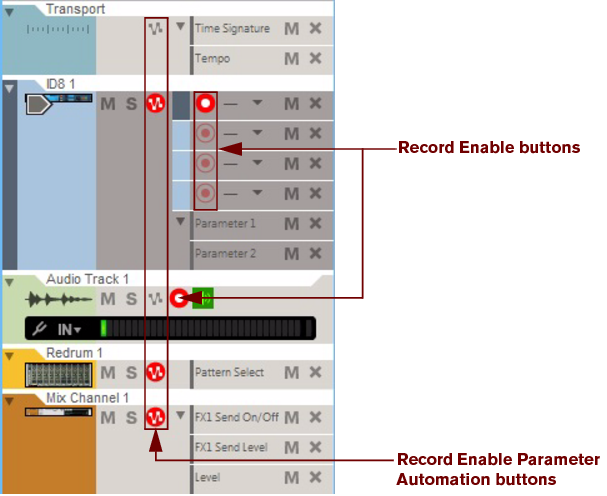
Before you can start recording on a track in the sequencer, the track needs to be record enabled. There are two types of buttons for record enabling: the Record Enable button, which is used when recording audio clips and note clips, and the Record Enable Parameter Automation button, which is used when recording device/channel strip parameter automation and tempo automation:
Activated Enable Record and Enable Record Parameter Automation buttons are indicated with a red color. Recording can be simultaneously enabled on an unlimited number of audio tracks (limited only by the computer’s processing and hard disk performance) - plus one note lane on an instrument track. However, if you have locked several MIDI keyboard controllers to specific instrument devices in the rack - using Remote (see “Locking a surface”) - you can record MIDI on these instrument tracks simultaneously. Recording of parameter automation can be simultaneously enabled on as many tracks as you like.
Selecting an audio track will automatically record enable the track if you have selected “Standard” mode in the “Master Keyboard Input” section on the “Keyboard and Control Surfaces” page in the Preferences dialog (see “The Master Keyboard Input setting”) - and if the Manual Rec button in the Track List is Off, see “About the Manual Rec function”.
Also, depending on the setting in the “Monitoring” section on the “Audio” page in Preferences, monitoring of the input signal to the audio track may, or may not, be automatically activated - see “Monitoring”.
|
|
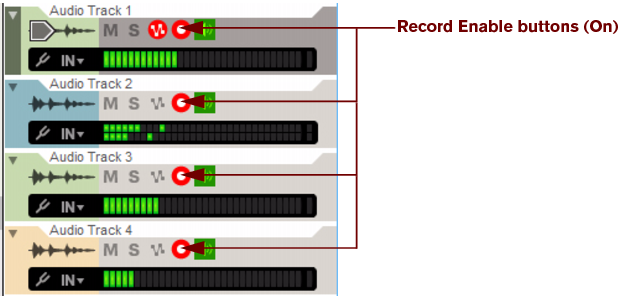
If you want to record audio from separate audio inputs on several tracks at once, click the Record Enable buttons on all desired audio tracks in the Track List.
|
Each record enabled audio track will automatically unfold to show the Tuner button, the Select Audio Input drop-down list and the Input Meter. When recording audio on several tracks simultaneously, it doesn’t matter which audio track has Master Keyboard Input.
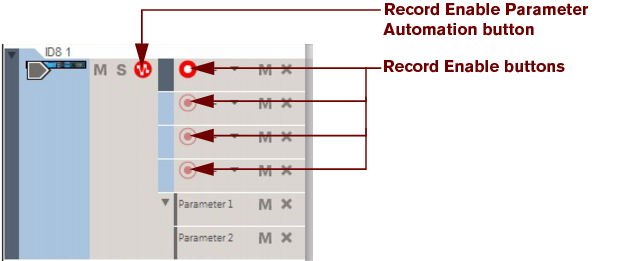
If you have selected “Standard” mode in the “Master Keyboard Input” section on the “Keyboard and Control Surfaces” page in the Preferences dialog (see “The Master Keyboard Input setting”), selecting an instrument track will automatically set Master Keyboard Input to that track - if the Manual Rec button in the Track List is Off, see “About the Manual Rec function”. An instrument track that has Master Keyboard Input will automatically be record enabled, and will also be enabled for parameter automation recording, indicated by the red Record Enable Parameter Automation button.
|
|
|
|
Only one note lane on one instrument track can have Record Enable active at a time, unless you have locked additional MIDI keyboard controllers to specific instrument devices in the rack (see “Locking a surface” in the Remote chapter). If you only have one MIDI keyboard controller (assigned as Master Keyboard), you can only record notes on one note lane at a time (see “Setting Master Keyboard Input”).
|
If you have locked additional MIDI keyboard controllers to specific instrument devices in the rack (see “Locking a surface” in the Remote chapter), the corresponding tracks for all these locked devices are automatically record enabled - if the Manual Rec button in the Track List is Off, see “About the Manual Rec function”. These additional record enabled tracks are all displayed with the gray “Master Keyboard Input” symbol to the left of the device icon in the track list, and their Record Enable buttons are also automatically switched on. The track with “normal” Master Keyboard Input is also indicated with the gray Master Keyboard Input symbol to the left of its device icon.
The “Combinator 3” track with Master Keyboard Input and the “Combinator 1” and “Combinator 2” tracks controlled from additional MIDI keyboards locked to the corresponding devices in the rack.
|
|
To manually enable/disable any additional record enabled instrument tracks that are locked to specific MIDI keyboard controllers, click the Record Enable buttons on a note lane on any of these tracks.
|
The Manual Rec function in the Track List can be used if you don’t want automatic record enabling of a selected track. For example, when you are finished recording your audio tracks and want to proceed with recording channel strip parameter automation, you probably don’t want the audio tracks to be record enabled for audio.
If you change your mind and want to record audio on an audio track, you have to manually record enable it by clicking its Record Enable button as described in “Record enabling an audio track”. Alternatively, switch off the Manual Rec button to enable the automatic record enabling again.
|
|
Click on the Record Enable Parameter Automation button(s) on the desired track(s) in the Track List to enable parameter automation recording.
|
All tracks enabled for parameter automation recording will be indicated by red Record Enable Parameter Automation buttons.
|
|
Setting Master Keyboard Input to a track will automatically enable parameter automation recording, as indicated by the red Record Enable Parameter Automation button.
|
Pattern automation can be recorded on tracks associated with pattern based devices such as the Redrum Drum Computer, Dr. Octo Rex Loop Player or Matrix Analog Pattern Sequencer. Enabling pattern automation works in the same way as enabling regular parameter automation (see “Record enabling parameter automation”).
|
|
Note that enabling the Record Enable Parameter button on a track featuring a pattern based device will also allow automation recording of other device parameters besides the Bank and Pattern select buttons. Any additional device parameters will be recorded on separate parameter automation lanes just like with non-pattern devices.
|
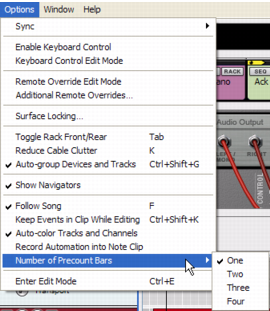
During recording and playback it’s possible to have a metronome-style click sound to indicate the tempo of the song. In recording mode it’s also possible to have the metronome click sound appear a selectable number of bars before the start of the actual recording, a so called pre-count. Activation of click and pre-count are managed on the Transport Panel:
|
|
|
|
Feel free to experiment with different pre-count settings. For up-tempo (faster) songs it’s generally more convenient to have a little longer pre-count (3 or 4 bars) whereas for slower songs it’s often sufficient with 1-2 bars.
|
|
|
Note that since the click sound is also routed via the selected audio card/interface on your computer - but not through the Reason Essentials mixer - the click sound will be summed to the rest of the sounds playing in your song. A high Click Level setting could therefore cause the Audio Output Meter on the Transport Panel, and the “Big Meter” in the Reason Essentials Hardware Interface, to indicate clipping. If this should occur, either lower the Click Level or deactivate Click to determine if it’s the click sound or the recorded sounds that cause clipping.
|
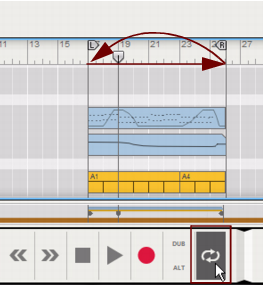
In loop mode, the song is automatically looped between the Left and Right Loop Locators on the Edit/Arrangement Pane during playback and/or recording:
The behavior when recording in loop mode differs depending on what you’re recording - audio, MIDI or parameter automation. Refer to “Recording audio in Loop mode”, “Recording notes in Loop mode” and “Recording parameter automation in Loop mode”.
The following description applies to all types of recording: audio, MIDI and parameter automation. For specific details of audio, MIDI and parameter automation recording, refer to “Recording audio”, “Recording notes”, “Recording performance controller automation” and “Recording parameter automation”.
|
1.
|
|
2.
|
|
3.
|
Click the Record button on the Transport Panel. Alternatively, press [*] on the numeric keypad, or hold down [Ctrl](Win) or [Cmd](Mac) and press [Return].
|
The Record button turns red. If Pre-count is enabled, wait for the set number of pre-count bars before starting to record audio, MIDI or parameter automation. During pre-count, nothing will be recorded.
If the lane is currently empty, a new clip is automatically created on the record enabled lane on the track. As the recording progresses, the clip expands following the Song Position Pointer. The clips are shaded in red during recording according to the picture below:
|
5.
|
When you’re done recording, click the Stop button on the Transport Panel. Alternatively, press [Spacebar], [0] on the numeric keypad, or hold down [Shift] and press [Return].
|
The Record and Play buttons turn gray, the Song Position Pointer stops and the red shading of the clip(s) disappears. The clip(s) show the recorded events as different types of graphical objects, depending on clip type.
|
|
|
|
If you’re not satisfied with the finished recording, you can select “Undo Record Track” from the Edit menu or select the clip on the Edit/Arrangement Pane and press [Delete] or [Backspace].
|
This will delete the current note clip and all its contents and at the same time create a new clip starting at the current song position. The sequencer will continue recording during the entire process.
If you are going to record complex/difficult takes, a good suggestion is to lower the song tempo during recording and then speed up the song to normal tempo again during playback. For audio tracks, Reason Essentials features very sophisticated functions for audio stretching. Audio stretch enables you to alter the song tempo up or down without changing the pitch of the recorded audio. See “About tempo changes and tempo automation of audio tracks” for more details.
