Configuring the Combinator panel This is the default Combinator panel - the one that appears after you have selected “Reset Device” from the Edit/context menu. Like standard instrument devices it features Pitch and Mod wheels and various controls. About the virtual controls • The default four Rotary knobs and buttons in the middle of the Control panel are “virtual” controls that can be assigned to parameters and functions in devices contained in the Combi. These controls are by default not assigned to any parameters in new Combis. • You can also add or remove controls, to design your own custom panel, see “Adding and positioning controls on the front panel”. • You assign parameters to the controls in the Modulation Routing section of the Editor panel (see “Using Modulation Routing”). • Movements of the virtual controls can be recorded as automation. • Each control can be assigned to any number of parameters. • Up to four virtual controls can be modulated from the Control CV inputs on the rear panel, see “Control CV In”. • Double clicking on the label for a control lets you type in an appropriate name for it. The Pitch Bend and Modulation wheels The Pitch and Mod wheels on the Control panel will mirror the corresponding actions on your master keyboard, just like for standard instrument devices. • When a Combinator device has Master Keyboard input and the Combi contains several instrument devices these will all receive pitch bend and modulation data. The settings in the instrument devices determines what happens when applying pitch bend or modulation. • For example, moving the Mod wheel could apply vibrato for one device and change the filter cutoff frequency for another device. • Pitch Bend will also be applied according to individual settings in the Range field for all instrument devices in a Combi. Opening the Configuration panel 1. Open the Editor by clicking the Editor button at the top of the Combinator front panel: 2. Click the Configure button to open the panel Configuration panel: Setting the front panel size Select the desired panel height from the “Panel size” drop-down list. You can choose from 1U (rack unit) to 6U. Selecting front panel background color Select the desired panel background color from the Background Color drop-down list. Selecting a backdrop image This function allows you to change the “skin” of the Combinator front panel. You can design your own labels for the assignable controls, and change the color and look of the whole panel. Click the Backdrop drop-down on the Config panel in the Editor: The Backdrop drop-down features the items “None”, “Default” and “Load...” • “None” leaves the panel with the selected background Color (see “Selecting front panel background color”). • “Default” is a semi-transparent texture which gives a higher quality look to the front panel. Since the texture is semi-transparent the selected background Color will shine through. • Selecting “Load...” will open the image browser. Here you can select image file in JPEG (.jpg) or PNG format. Instead of selecting “Load...” from the drop-down you could select the Combinator device and choose “Select Backdrop...” from the Edit/context menu. Transparent PNG files are also supported, if you want to layer a backdrop image on top of a background color. • For full hi-res support the width of the image should be 3770 pixels. The height depends on what front panel size you have selected, see “Setting the front panel size”. These are the optimal height dimensions for each of the front panel sizes: 1U: 345 pixels2U: 690 pixels3U: 1035 pixels4U: 1380 pixels5U: 1725 pixels6U: 2070 pixels If you select an image with other pixel dimensions, the image will be automatically scaled. • The knobs, buttons, patch name display and patch buttons cannot be redesigned using a backdrop. If you wish to design your own text labels for the virtual controls, you should first remove the original text labels: 
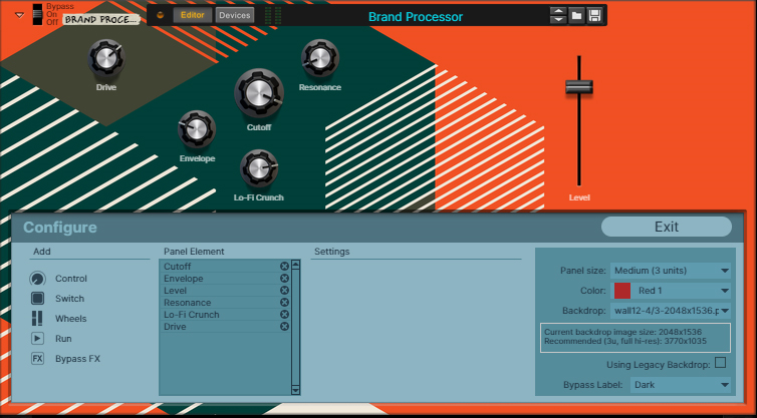
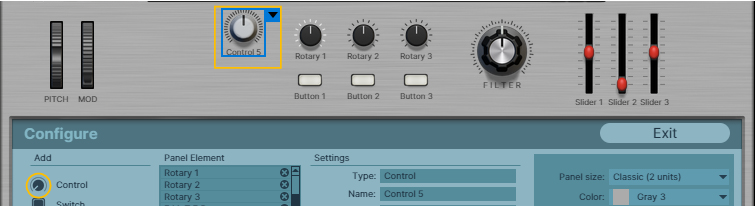
Double click on a control label, remove the current text and press [Enter]. Alternatively, uncheck “Show Label” in the Configuration panel in the Editor, see “Changing the appearance of the controls”). To remove a Backdrop, select “Remove Backdrop” from the Combinator context menu - or select “None” in the Backdrop drop-down on the Config panel in the Editor. The currently selected Background Color of the Combinator panel is restored. About “Using Legacy Backdrop” This is automatically turned on when you load a legacy Combi patch with a backdrop, and will show buttons in the same way as on the original Combi (including Show Editor/Show Devices buttons on the panel) and hide the Bypass/On/Off label as this is expected to be in the backdrop. About the “Bypass Label” The “Bypass Label” item is available only when the “Using Legacy Backdrop” is de-selected. Select the desired color (or presence) of the Bypass/On/Off text from the drop-down. The setting affects the color of the text on the top left of the Combinator panel: About the “Combi Layout Templates” folder In Factory Sound Bank/Combinator Patches/ there is a folder named “Combi Layout Templates”. This folder contains a selection of pre-made Combinator panel configurations and layouts that can serve as starting points/inspiration for your own Combinator designs. Selecting, positioning and editing front panel controls 1. Open the Editor by clicking the Editor button at the top of the Combinator front panel. 2. Click the Configure button to open the panel Configuration panel. Adding and positioning controls on the front panel To the left on the Editor Configuration panel are a selection of pre-made knobs, faders, buttons and wheels that can be freely laid out on the Combinator front panel: Controls selector on the Configuration panel. 1. Click a desired control icon on the Configuration panel. The control shows up with a frame around it on the Combinator front panel. Adding a new control to the front panel. 2. Click and drag the control to the desired position on the Combinator front panel. Visual guides appear as you move the control so you can easily place the control aligned with other controls already on the panel. Use the [Arrow] keys on the computer keyboards to adjust the position, if desired. Double click the label and type in a new name, if desired: 3. Click a new control to add another one. You can also select multiple controls, by dragging or by [Shift]-clicking on the panel, and move them together on the front panel. Alternatively, [Command]/[Ctrl]-click the controls in the Panel Elements list to select multiple controls. The maximum number of controls that can be placed on a Combinator panel is 32 knobs/faders plus 32 buttons, 2 wheels (pitch and modwheel), 1 Run button and 1 Bypass FX button. It’s also possible to align and distribute a selection of controls, to get perfect position with even spacing on the panel. Select the group of controls you want to align/distribute, click the black arrow button on the control you want to use as reference, and select action from the pop-up: About the “Run” and “Bypass FX” buttons The “Run” button can be used to start/stop all (Reason) pattern devices included in the Combi. This works exactly as pressing the Run button on the pattern device panel. The on/off status of this button is not saved with the Combi patch. Pressing play on the transport panel in the Sequencer will automatically activate “Run Pattern Devices”. In the Reason Factory Sound Bank, Combi patches containing pattern devices have “(run)” at the end of their patch names. The “Bypass FX” button allows you bypass all effect devices in a Combi. It works as follows: • All insert effect devices in the Combi are switched to Bypass mode. • All effects connected as send effects to a mixer device are switched off. • Clicking this button will not affect effect devices that were bypassed or turned off already. Changing the appearance of the controls It’s possible to change the appearance of the controls. 1. Click the control you want to edit, either on the Combinator front panel or in the Panel Element list on the Configuration panel. The characteristics of the selected control is now displayed in the Settings section: • The control type is shown in the Type display. The Name display shows the control name. (To edit the name, double click the name label on the Combinator panel.) Select control style from the Style drop-down list. Select the Scale appearance (if the control features a scale) Click the check mark to show/hide the control name label on the Combinator front panel. Select the label text color from the Text Color drop-down list. Choose where you want the text label positioned around the control from the Position drop-down list. Deleting controls on the front panel 1. Select a control (or multiple controls, by dragging or by [Shift]-clicking the controls on the front panel). 
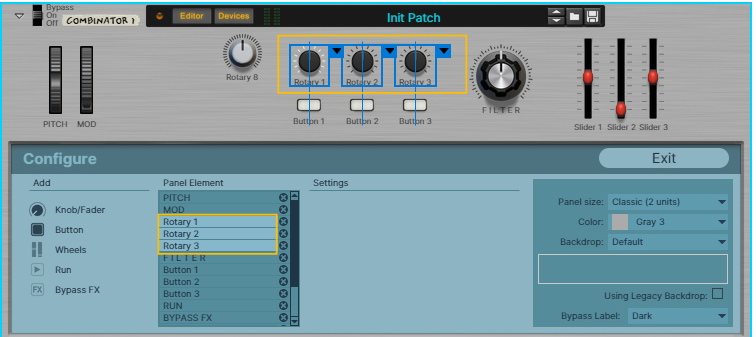
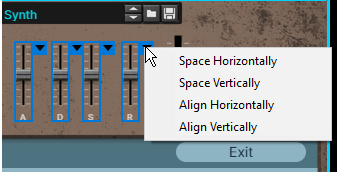
Alternatively, click in the Panel Element list ([Command]/[Ctrl]-click to select multiple controls). 2. Press [Delete]/[Backspace] on the computer keyboard to delete the selected control(s) Alternatively, click the X next to the control name in the Panel Elements list to delete one control at a time: