Monotone Bass Synthesizer : Panel reference

Panel reference
The Oscillator section
Here is where you choose oscillator waveforms and set the pitches for the two oscillators. You can also add noise and frequency modulate Oscillator 1 from Oscillator 2.
Waveform selector
*
The wave shapes are:
Also known as sawtooth. Generates a rich tone with both even and odd harmonics (overtones).
The square wave has a symmetric square shape and contains only even harmonics. The Pulse wave is basically a square wave with non-symmetrical shape, i.e. a duty cycle that is not 50%. The Pulse wave generally sounds a little thinner than a perfect square wave.
The Triangle wave only contains odd harmonics, and at lower intensities than the square wave overtones. This makes it sound a little “rounder” and with less bite than the square wave.
The Sine wave doesn’t contain any overtones - only the fundamental. This makes it sound dull and makes it perfect as a sub bass an octave or two below another waveform in the other oscillator.
Oct
*
Range: 5 octaves.
Osc Mix
*
Noise
*
Detune
*
Range: +/- 50 cents (down or up half a semitone).
LFO
*
FM Env
*
Range: 0% (no tracking (constant pitch)) to 100% (1 semitone per note).
Osc 2 Semi
*
Range: +/-12 semitones (two octaves).
The Filter section
The Filter in Monotone is a classic 24 dB/octave lowpass ladder filter. If you raise the Resonance high enough, the filter will start to self-oscillate.
The picture below shows the lowpass filter’s basic characteristics at four different resonance levels:
Drive
*
Freq
*
The cutoff frequency is where the filter starts to cut out/dampen the higher frequencies of the signal.
Resonance
*
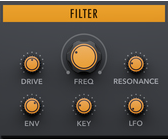
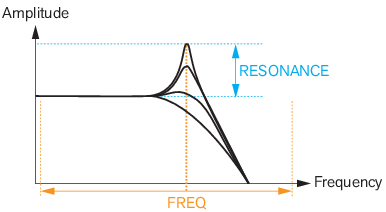
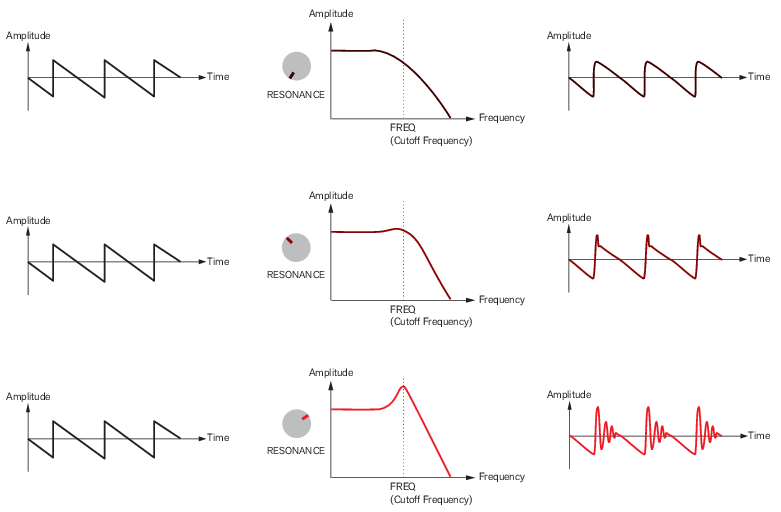
This controls the resonance peak level at the currently set cutoff frequency (see “Freq” above).
The picture below shows a ramp oscillator signal lowpass-filtered at three different Resonance levels:
*
Env
*
Key
*
At 0% the filter cutoff frequency is static and doesn’t track the keyboard at all.
At 100% the filter cutoff frequency tracks the keyboard 1 semitone per note.
LFO
*
The Amplifier section
The Amplifier section contains a standard ADSR envelope, which controls the amplitude of the audio signal.
The picture below shows the various stages of the ADSR envelope:
The ADSR envelope stages.
A(ttack)
When you play a note on your keyboard, the envelope is triggered. This means it starts rising from zero to max level. How long this should take, depends on the Attack setting. If the Attack is set to “0”, maximum level is reached instantly. If the Attack value is raised, it will take longer time before the maximum level is reached.
D(ecay)
After maximum level has been reached, the level starts to drop. How long this should take is governed by the Decay parameter.
If you want to emulate the volume envelope of a note played on a piano for example, the Attack should be set to “0”, the Decay parameter should be set to a medium value and the Sustain level should be set to “0”, so that the volume gradually decreases down to silence, even if you keep holding the key down. Should you want the decay to drop to some other value than zero, you raise the Sustain parameter.
S(ustain)
The Sustain parameter determines the level the envelope should rest at, after the Decay stage. If you set Sustain to full level, the Decay setting is of no importance since the volume of the sound is never lowered.
If you want to emulate the volume envelope of an organ, you theoretically only really need to use the Sustain parameter set to full level, as a basic organ volume envelope instantly goes to the maximum level (Attack “0”) and stays there (Decay “0”), until the key is released and the sound instantly stops (Release “0”).
But often a combination of Decay and Sustain is used to generate envelopes that rise up to max level, then gradually decreases to finally land to rest on a level somewhere in-between zero and maximum level. Note that Sustain
represents a level, whereas the other envelope parameters represent times.
R(elease)
The Release parameter works just like the Decay parameter, except it determines the time it takes for the volume to drop back to zero after you release the key.
Vel
*
The harder you play, the louder the maximum volume.
Chorus
This is a stereo Chorus effect, which can be used for generating a fatter and wider sound.
Amount
*
Set to 0% for a completely dry (unprocessed) signal.
Rate
*
Spread
*
Set to 0% for a if you want the signal to be in mono.
Delay
This is a stereo delay, which generates delayed copies of the original signal.
Amount
*
Set to 0% for a completely dry (unprocessed) signal.
Time
The delay time is synced to the main sequencer tempo.
*
Range: 1/16, 1/8T, 1/8, 2/8T, 3/16, 1/4, 5/16, 4/8T, 7/16 and 2/4.
Feedback
*
Ping Pong
*
The LFO section
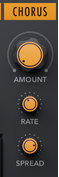
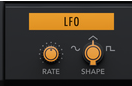
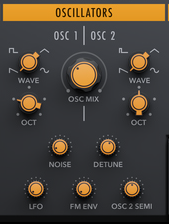
An LFO (Low Frequency Oscillator) is used for generating cyclic modulation. A typical example is to have an LFO modulate the pitch of a signal to produce vibrato, but there are also other applications for LFOs. The LFO section features an LFO which can be set to control Oscillator pitch (see “LFO”) and/or Filter frequency (see “LFO”).
Rate
*
Range: 0.06-94.0 Hz
Shape
*
The wave shapes are: Sine, Triangle and Square.
The Envelope section
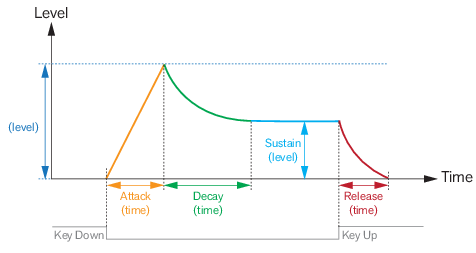
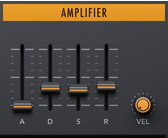
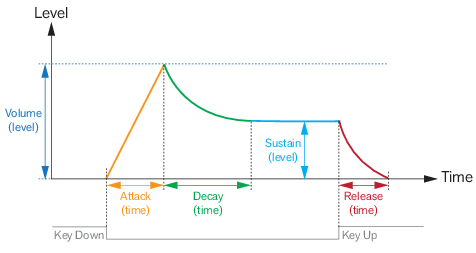
The Envelope section features a standard ADSR envelope, which can be used for controlling Oscillator Frequency Modulation (see “FM Env”) and/or Filter Frequency (see “Env”).
The various envelope stages work exactly like those of the Amplifier, see “The Amplifier section”.
The ADSR envelope stages.
A(ttack)
*
D(ecay)
*
S(ustain)
*
R(elease)
*
Vel
*
The harder you play, the higher the maximum level.

Monotone Bass Synthesizer : Panel reference