Working with Players : Beat Map

Beat Map
The Beat Map Algorhythmic Drummer is a Player that generates drum patterns based on built-in beats, algorithms and simple but powerful controls. It's normally used with a drum instrument such as Kong, Rytmik or Umpf, but can also be used with melodic instruments for interesting results.
Included content
To browse the content of Beat Map, click "Rack Extensions" in the Browser and then double click the Beat Map folder:
Beat Map comes with a number of patches, both for the Player itself and for several different drum devices. The drum device patches are tailored to work well with Beat Map, but you can of course use any patch from the Factory Sound Bank, or make your own.
If you want immediate results, start by loading one of the patches in the Combinator Style Patches folder! These combine Beat Map with drum devices and effects for instant rhythmic goodness.
If you want a taste of what can be done with multiple Beat Maps in combination with other devices, check out the Demos and Song Starters folder.
*
Finally, the Template Key Mappings folder contains Beat Map patches where the keys (note numbers) have been adapted for other drum configurations such as GM, Reason Drum Kits and various 3rd party drummers.
The front panel
The central item on Beat Map's panel is the Map display. This is where you select a basic rhythm, by clicking and dragging the cross-hair.
Each integer XY position corresponds to a different beat. The map graphics are there for visual reference and for the nice looks – there is no particular rhythmic significance to the elements on the map. However, as a general rule, moving the position to the right will make the bass drum pattern more syncopated and moving the position upwards will make the snare pattern more syncopated.
Map Select
1.
They contain beats in different styles – click on a map to see some info about it in the display.
2.
Density
The beats consists of four different rhythmic patterns, for kick, snare, hi-hat and percussion. Once you've found a beat that you like, you can adjust the Density of each drum. This means reducing or increasing the number of notes. Turning Density down to zero will mute that drum. The Density parameters can be automated or CV controlled, for continuous variations.
Lock Position
You may find a beat where for example the kick is perfect, but not the other drums. Then you can click Lock Pos for the kick. This will put a "pin" on the map – the kick beat will stay at this position but you can continue exploring the map for the other instruments.
This can be done independently for all four drums, locking them to different map positions. This way you can combine rhythms from different basic beats, for infinite variations.
*
Mirror notes
Each of the four drums has a "Mirror" function, which plays a note in between two note positions from it's main drum. For example, if the kick beat plays like this:
... then its Mirror notes (dark red) will play like this:
This means that the Mirror notes will be affected by the Density of the main drum, creating interesting counter-rhythms or ghost notes.
Use the Mirror knobs to set the velocity (typically level) of the Mirror notes. Turning the knob down completely will turn off the Mirror note.
Setting MIDI note numbers
Each drum and Mirror function sends out notes on a separate MIDI note number, meaning that Beat Map can control eight different drum sounds.
The Perc drum sends out MIDI Note F#1
Alternatively, use the Learn function:
1.
2.
3.
4.
5.
This is required for the changes to stick when you save the patch or song.
Global settings
To the right are three settings that affect the overall playback:
You can set it manually from 50-75% or select “Global” to use the Global Shuffle setting (found in the Groove mixer in Reason).
The default is 64, but it can be useful to lower this to make a beat less varying or to impose some structure on a chaotic rhythm.
Beat Map and the sequencer
You can click the Run button manually for auditioning the beat, but the Run function is normally controlled by the Play function in the main sequencer.
However, if you want Beat Map to play in certain parts of your song but not in others, it's also possible to control this using Pattern automation. Here's how to do this in Reason:
1.
This creates a sequencer track for the Beat Map device.
2.
 
This creates a Pattern lane on the Beat Map track. Since there are no pattern clips on the lane, Beat Map will be stopped. This will be indicated in the map display:
3.
 
Unlike other pattern devices, there is only one pattern to select from here – Pattern 1. This is just a nifty way to control playback – you can also use pattern offset to start playback with an upbeat or in the middle of a bar.
In addition, most Beat Map parameters can be automated. For example, you can record map movements or Density changes.
A couple of special features:
This allows you to lock a single drum to a rhythm but change it with automation:
Switching to another map can be useful as a break or fill.
Editing the drum notes
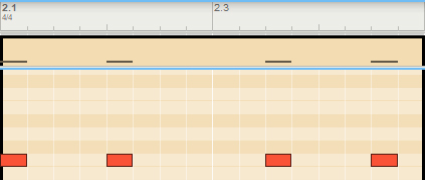
To manually edit the beats from Beat Map, you need to send the MIDI notes to a sequencer track. You do this with the Send To Track function on the Player top panel, see “Common Player device parameters”.
Using CV
On the back of Beat Map, you'll find a comprehensive selection of CV inputs and outputs.
Using these with a Pulsar CV LFO can create longer, varying rhythmic patterns or random variations. There are plenty of examples of this among the Combinator Style Patches.
Whenever this receives a positive CV value, the beat will start over from the first step.
These send out the X/Y coordinates as CV values, letting you use the Map display as an XY controller for other devices in Reason.

Working with Players : Beat Map