Pulveriser : Parameters

Parameters
Pulveriser contains three main effect sections; Squash (compression), Dirt (distortion) and Filter (multi-mode filter with cutoff and resonance controls). In addition, Pulveriser features two modulation sections - an LFO with selectable waveforms and an Envelope Follower which can modulate the effect sections. The parameters in each section are as follows:
Common effect device parameters
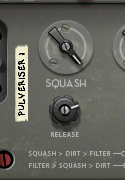
While the specific parameters for the Pulveriser effect device are described below, some features and procedures are common to all effect devices. Please, refer to “Common effect device features” for information about the Bypass/On/Off switch.
Note, however, that the Input Meter is different on the Pulveriser device. Instead of the standard multi-segment LED indicator found in other Reason effect devices, Pulveriser features a red lamp which reflects the intensity of the input signal.
Signal Routing selector
With the Signal Routing selector to the bottom left on the front panel you determine the signal flow through Pulveriser:
This setting puts the compressor before the distortion and filter sections in series:
In this configuration the compressor and distortion affect the entire unfiltered input signal.
This setting puts the filter before the compressor and distortion sections in series:
In this configuration the compressor and distortion affect the filtered input signal. This way you can define what frequencies should enter the compressor and distortion sections.
The Squash section
The Squash section is where you set the compression of the signal - from subtle compression to heavily “pumping” effects.
Squash
The Squash knob affects compression ratio, threshold and make up gain in a nice and musical way.
Release
The Release knob controls the compressor release time. If you set this to a fairly low value and have the Squash amount fairly high, you will get that nice “pumping” compression effect.
The Dirt section
The Dirt section is where you can add distortion to the signal - from gentle to screaming outrage.
Dirt
The Dirt knob controls the level of distortion.
Tone
The Tone knob controls a lowpass filter. Turned fully clockwise the filter is completely open, letting all frequencies through.
The Filter section
The Filter section features five different filter types. Each filter type has controls for Frequency and Peak (resonance amount).
Filter selector
Select one of the following different filter types (or bypass):
This will let the input signal through the Filter section unaffected.
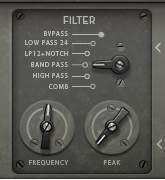
This is a lowpass filter with a slope of 24dB/octave, similar to the LP24 lowpass filter in the Subtractor (see “24 dB Lowpass (LP 24)” in the Subtractor chapter).
This is a lowpass filter with a slope of 12dB/octave, in series with a notch filter. The cutoff frequency of the lowpass filter and the center frequency of the notch filter are the same. Changing the Frequency control will generate sort of an “animated” effect.
This is a bandpass filter similar to the BP12 filter in the Subtractor (see “Bandpass (BP 12)” in the Subtractor chapter.
This is a highpass filter with a slope of 12dB/octave, similar to the HP12 filter in the Subtractor (see “Highpass (HP12)” in the Subtractor chapter.
This is a comb filter similar to the “Comb +” Filter in Malström (see “Comb + & Comb –” in the Malström chapter).
Frequency
The Frequency knob controls the cutoff frequency or center frequency depending on selected filter type.
Peak
The Peak knob controls the resonance amount.
The Tremor section
The Tremor section in Pulveriser is an LFO which can modulate the Filter Frequency parameter and/or the main output Volume parameter. The Tremor section features the following parameters:
Rate
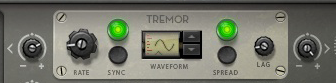
Controls the LFO rate. The Rate range in Pulveriser is very wide and can reach way up in the audio frequency range. The rate can also be synced to the sequencer tempo by clicking the Sync button to the right (see “Sync” below). In sync mode, the Rate knob controls the sync resolution.
As a special feature, the rate can also be modulated from the envelope follower in the Follower section, see “The Follower section”.
Waveform selector
Select one of nine LFO waveforms. Apart from standard waveforms (sine, triangle, square etc.) there are random, non-linear and stepped waveforms. The shape of the waveforms are shown in the display and reflect how the modulated signal is affected.
Sync
Click the Sync button to synchronize the LFO Rate to the main sequencer tempo. In Sync mode the LFO cycle is also synced to the sequencer, which means that the LFO cycle chases the current sequencer position.
Control the sync resolution with the Rate knob, see “Rate” above.
Spread
The Spread button introduces a stereo effect by modulating the left and right audio channels with two LFO signals phase shifted 180 degrees in relation to each other. This means that you are able to generate kind of a “roto-speaker” effect to the processed signal.
Lag
The Lag control acts like a lowpass filter on the LFO signal, making the LFO signal smoother. This is especially noticeable on waveforms with sharp edges or transients like the square, sawtooth and stepped waves. On the sinewave you will barely notice any effect since it’s already “smooth” by nature.
Modulation Amount knobs
On either side of the Tremor section are two bipolar modulation amount knobs, with zero modulation at the 12 o’clock position. Since the modulation parameters are bipolar it means that if the knob is in the “-” sector it will invert the LFO wave shape. This is especially useful in LFO Sync mode where you can define the “direction” of the modulation in relation to the sequencer playhead.
*
*
This will introduce a tremolo effect to the Wet signal fed via the Volume control.
*
The Follower section
The Follower section features an envelope follower which analyzes the amplitude of the incoming signal and outputs a modulation (CV) signal that corresponds to the incoming audio level. The modulation signal can then control the Frequency parameter in the Filter section and/or the LFO Rate parameter in the Tremor section. The Follower section features the following parameters:
Trig
Click/hold the Trig button to manually trig/gate the envelope follower. Clicking/holding the Trig button will make the envelope follower output a modulation signal according to the settings of the Attack and Release parameters described below. If you hold the Trig button for a longer period than the Attack time, the Follower will output maximum CV signal level. When you then release the Trig button, the CV signal level will drop according to the Release time and continue to follow the audio input signal level instead.
Threshold
This defines at which input signal level the envelope follower should trig. Set to a low value, the envelope follower will react as soon as there is any audio signal present on the Pulveriser inputs. Set to a high value, the envelope follower will react only on loud input signals, or from a manual Trig signal.
The red lamp to the right of the Threshold knob gives a visual indication of the CV signal level.
Attack
This controls how fast the envelope follower should react after the input signal has reached above the Threshold value. Note that the attack time can only be increased compared to the input signal - never shortened.
Release
This controls how fast the envelope follower CV signal should drop to zero after the input signal has decreased below the Threshold value. Note that the release time can only be increased - never shortened.
Modulation Amount knobs
To the left of the Follower section are two bipolar modulation amount knobs.
*
If the modulation knob is in the “+” sector the rate will increase according to increased audio level. If the modulation knob is in the “-” sector the rate will decrease according to increased audio level.
If Sync is enabled in the Tremor section, the rate will jump between the different resolutions according to the Follower modulation amount.
*
*
If the modulation knob is in the “+” sector the Filter Frequency will raise according to increased audio level. If the modulation knob is in the “-” sector Filter Frequency will drop according to increased audio level.
Blend
With the Blend knob you control the mix between the dry and wet signal. With the knob set somewhere in between the Dry and Wet position you will have parallel processing. This can be useful if you, for example, want to process a drum loop with compression (Squash) and distortion (Dirt) and mix the processed signal with the dry before sending it to the outputs.
Volume
With the Volume knob you set the total output level of the dry+wet signals.

Pulveriser : Parameters